Introduction & best practice
The Care Instructions feature allows you to set up your icons, layers, and materials specific to the care instructions for any style. Additionally, it supports the translation of care instructions into multiple languages. To ensure accurate material composition for your styles, you can link the Main Item directly to your care instructions. Learn more about the Main Item feature here.
NOTE: To use the Languages feature, your company must have the professional license subscription.
Table of contents
- Before you start
- Step-by-step guide
- Advanced care instructions setup
- Video guide - care instructions
Before you start
1) Make sure the 'Company Admin' and 'Care Instruction' roles are assigned to you as a user; otherwise, it will NOT be possible to see this section. To learn more about assigning different roles to a user, click here.
2) To set up your care instructions in multiple languages, click here.
NOTE: To minimize manual work, you can import care instruction information from an Excel file through the import function. Read more about the Care Instruction Import here.
Step-by-step guide
Icons
- Navigate to Admin > Care Instructions
- Choose the header 'Icons'
-
Click on the 'Add Icon' button to add as many care instruction icons as needed

In the new row:
- Add icon ID - used as unique identifier, especially useful during data imports and exports, ensuring that information aligns correctly across systems
- Upload icon image - *mandatory
Find a download for icon images here. - Define for which region the icon is applicable
-
Define icon type, in case US or Europe is chosen as the region
-
NOTE: You can choose a region that determines the different icon standards of care instructions in different regions. Available Options: Europe, US, Custom
Selecting Europe or US ensures the care standards align with that region’s requirements. With the Custom option, you will need to decide the order in which the care instruction icons appear and select the specific icons to be displayed.
- Enter default text - *mandatory
- New icons will be set by default to active and can be set to inactive after being saved
- Inactive icons can not be selected on any style
- Enter translated text in case you work with different languages

- Icons can be deleted - as long as they are not used in any style
- Reorder icons by dragging and dropping them into your preferred order. The same order will be seen on style level when you select your icons.

Download icon images
Upload icons already used by your company or download a zip file of all available icons from Ginetex. These icons are registered trademarks of GINETEX/COFREET in many countries, including Denmark. Their use requires prior approval and may involve fees in some regions. Contact Ginetex or a national committee for details.
Disclaimer:
Delogue PLM is not responsible for the icons or the use of the icons, and Delogue can NOT be held responsible for any missing payment or compensation to GINETEX/COFREET now or in the future.
By downloading these icons, you accept these terms.
Download the zip package from below

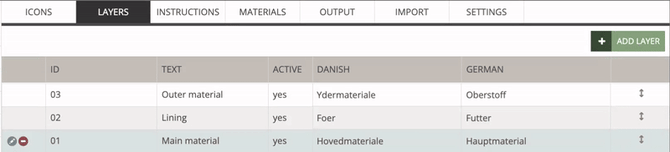
Layers
- Navigate to Admin > Care Instructions
- Choose the header 'Layers'
- Click on the 'Add Layer' button to add as many Care Instruction layers as needed

In the new row:
- Add layer ID - used as unique identifier, especially useful during data imports and exports, ensuring that information aligns correctly across systems
- Enter default text - *mandatory
- New layers will be set to active and can be set to inactive after being saved
- Inactive layers can not be selected on any style
- Enter a translated text in case you work with different languages
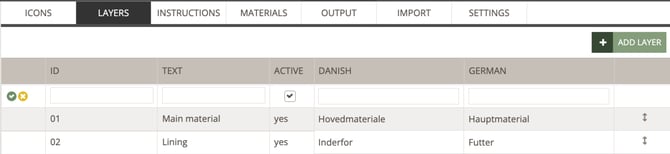
- Layers can be deleted - as long as they are not used in any style
- Reorder layers by dragging and dropping them into your preferred order. The same order will be seen on style level when you select your icons.
Instructions
- Navigate to Admin > Care Instructions
- Choose the header 'Instructions'
- Click on the 'Add Instruction' button to add as many Care Instruction instructions as needed

In the new row:
- Add instruction ID - used as unique identifier, especially useful during data imports and exports, ensuring that information aligns correctly across systems
- Enter default text - *mandatory
- New instructions will be set to active and can be set to inactive after being saved
- Inactive instructions can not be selected on any style
- Enter a translated text in case you work with different languages

- Instructions can be deleted - as long as they are not used in any style
- Reorder layers by dragging and dropping them into your preferred order. The same order will be seen on style level when you select your icons.

Materials
- Navigate to Admin > Care Instructions
- Choose the header 'Materials'
- Click on the 'Add Material' button to add as many Care Instruction materials as needed
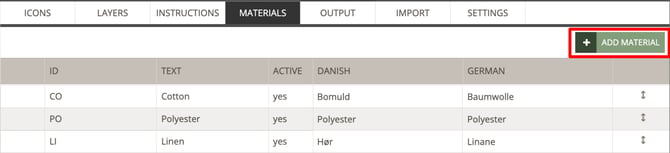
In the new row:
- Add material ID - used as unique identifier, especially useful during data imports and exports, ensuring that information aligns correctly across systems
- Enter default text - *mandatory
- New materials will be set to active and can be set to inactive after being saved
- Inactive materials can not be selected for any style
- Enter a translated text in case you work with different languages

- Instructions can be deleted - as long as they are not used in any style
- Reorder layers by dragging and dropping them into your preferred order. The same order will be seen on style level when you select your icons.

Download material translations
To find translations of materials use the 'Care Instruction Import Template' as a reference. This template can be used when importing care instructions into your Delogue platform. You can copy and paste information directly into the Excel file downloaded from Admin > Care Instructions > Import. To find out more about the Care Instruction Import function read here.
Disclaimer:
This list of care instructions has been translated by 3rd party.
Delogue PLM takes no responsibility for the translations - it is the sole responsibility of the user of the translations to ensure these are correct.
By downloading this file you accept these terms.
Advanced care instructions setup
After completing the basic setup of icons, layers, instructions, and materials, you can enhance your care instructions in Delogue with advanced features. You can enable multiple languages for your care instruction information, define how care instructions are extracted in Style Custom Reports and Custom Exports, and efficiently update or upload new data using the import function. Additionally, configure supplier access, apply color-specific customization, and manage subtabs and exceptions for a more streamlined setup.
Use multiple languages
It is possible to include different languages for icons, layers, instructions, and materials.
Read more about how to set up additional languages here.
Output
To be able to extract care instructions in the export of the Style Custom Report and Custom Export you need to define the output first.
Learn more about the Care Instruction Output here.
Import
To be able to update existing data and upload new care instruction information, you can use the Import function. Read more about the Care Instruction Import here.
If you want to import care instructions from another style instead, read more about it here.
Advanced settings
Enable supplier access, configure color-specific customization, and manage subtabs and exception reasons for advanced Care Instructions by reading the following article.
Video guide - care instructions
Description
In this video, we will teach you how to set up your care instructions in the Admin section.