Introduction & best practice
After setting up your care instructions, you can customise how they appear when exporting data through a Style Custom Report or a Custom Export. Firstly, the Style Custom Report option lets you generate reports and export them to Excel, providing detailed care instructions for manufacturers and suppliers or it can, for example, help verify compliance with industry standards. Secondly, the Custom Export allows you to transfer care instruction data to other systems through an integration, ensuring seamless data exchange and compatibility with your existing workflows.
Table of contents
- Before you start
- Step-by-step guide
- Edit or delete an output
- Use the care instruction output in the style custom report
- Examples of care instruction output settings
Before you start
1) Make sure you set up care instructions before. Read more about the setup here.
2) Make sure the 'Company Admin' and 'Care Instruction' roles are assigned to you as a user. To learn more about assigning different roles to a user, click here
Step-by-step guide
Create new output
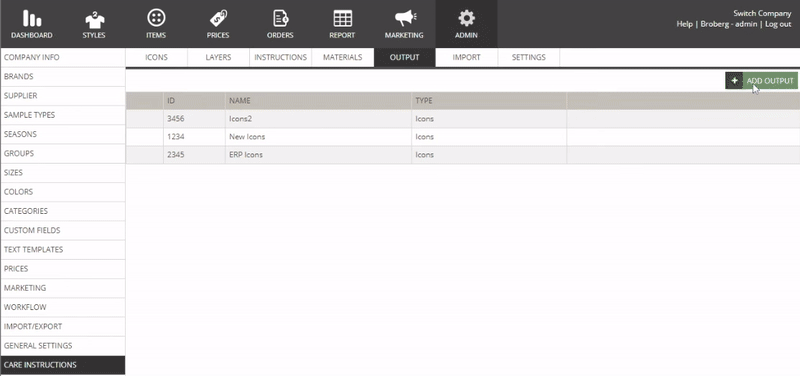
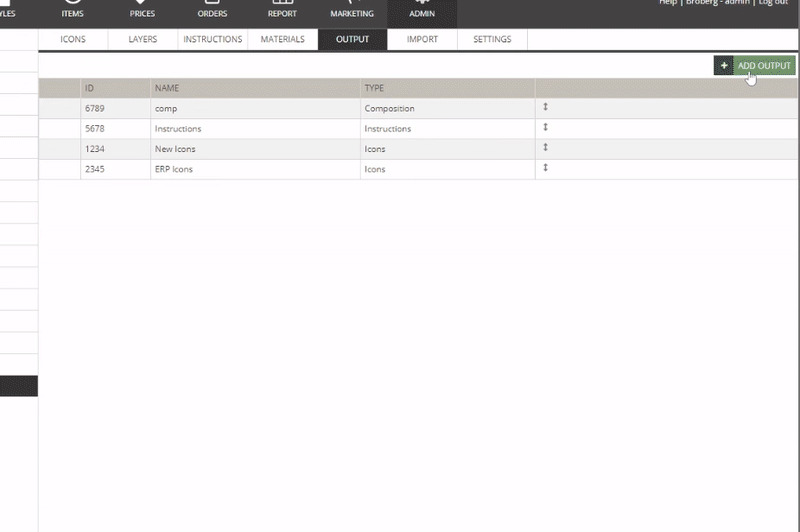
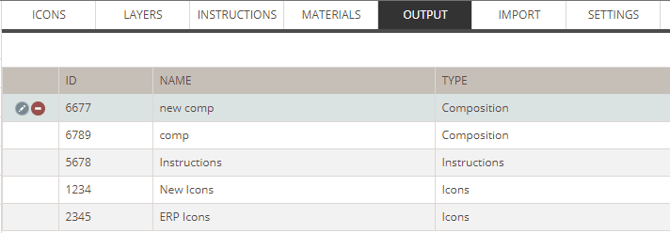
Navigate to: Admin > Care Instructions > Output
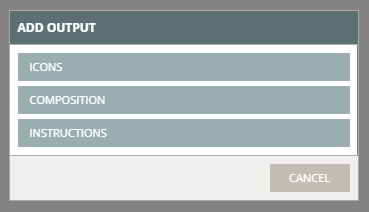
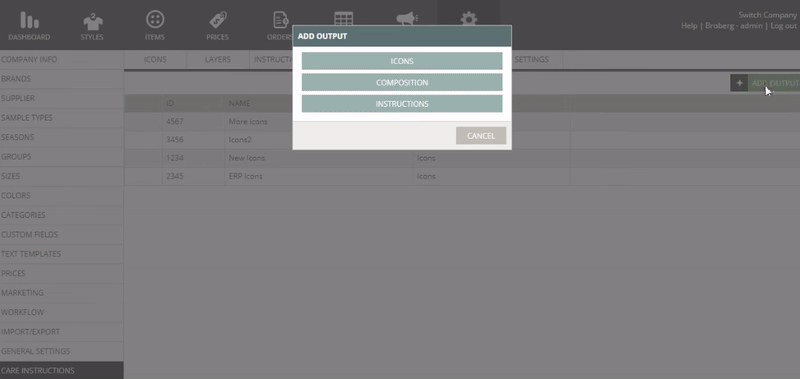
- Click on 'Add Output' to add new output

- Select which output type you want to add - from the pop-up window that appears
- It is possible to create multiple outputs
Define output
For each output type you have different options you can build your output from. You build your output by dragging the options into the sequence box. You can rearrange the options inside the sequence box. If you need to remove an option you drag it outside of the sequence box. In the same way, you can set up what your separator should consist of. The same goes for 'Ends with' - this defines what your sequence should end with.
- Fill out an ID - the ID is optional but we recommend that you use the ID too - especially if you need it for any kind of integration
- Give the output a name - *mandatory
- Drag and drop the wanted options in the sequence box
- Click 'Preview' to see a preview of the layout you created

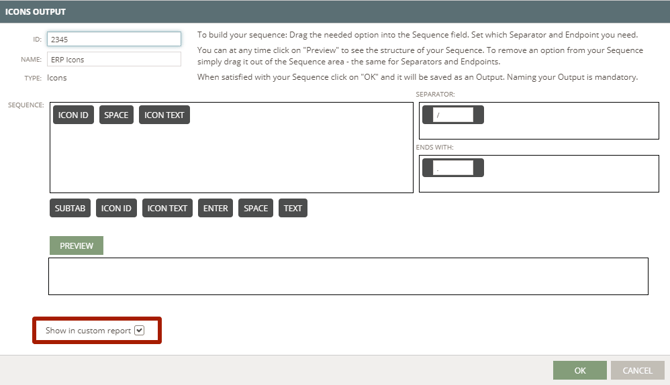
Icons
- Fill out an ID - the ID is optional but we recommend that you use the ID too - especially if you need it for any kind of integration
- Give the output a name - *mandatory
- Drag and drop the wanted options in the sequence box
- Click 'Preview' to see a preview of the layout you created
Icon options:
- Icon ID
- Icon Text (the output will only contain text - no images)
- Enter
- Space
- Text
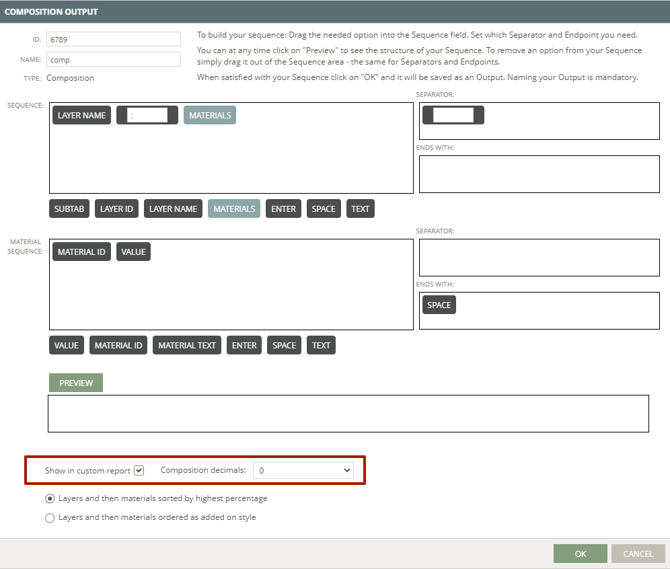
Composition
- Fill out an ID - the ID is optional but we recommend that you use the ID too - especially if you need it for any kind of integration
- Give the output a name - *mandatory
- Drag and drop the wanted options in the sequence box
- when choosing option 'Materials' an extra sequence box will appear - this section has its own set of options. Drag and drop the options for materials mentioned below
- use the 'Subtab' option if you want to include information from multiple care instruction subtabs in your output
- Click 'Preview' to see a preview of the layout you created
- Define how layers and materials are sorted:
- Layers and then materials sorted by highest percentage
- Layers and then materials ordered as added on style
Composition options:
- Subtab
- Layer ID
- Layer name
- Materials
- Enter
- Space
- Text
Material options:
- Value
- Material ID
- Material Name
- Enter
- Space
- Text
Instructions
- Fill out an ID - the ID is optional but we recommend that you use the ID too - especially if you need it for any kind of integration
- Give the output a name - *mandatory
- Drag and drop the wanted options in the sequence box
- Click 'Preview' to see a preview of the layout you created
Instruction options:
- Instruction ID
- Instruction Text
- Enter
- Space
- Text
Edit an output
- Outputs can be edited at any time
- Click on the 'pencil' icon to enter edit mode
- Confirm that you want to make changes - this will have an affect on both reports and integration setups that are connected to the output
- The specific pop-up window you used when creating the output will be visible
- Make the adjustments needed
Delete an output
- Outputs can be deleted at any time
- Click on the red 'delete' icon
- Confirm that you want to delete the output
Use the care instruction output in the style custom report
You can select which Outputs you want to include in the Style Custom Report:
- When setting up an Output in any pop-up, on the bottom of the window you will see an option to include it in the Style Custom Report
- Place a checkmark next to the option 'Show in custom report'
For the Composition Output, there is one extra setting once you placed a checkmark next to the option 'Show in custom report'. This is useful when using the material option 'Value'. The extra setting allows you to decide how many digits of the value should be displayed after the comma.
- Choose the composition decimals from 0-2
For example if you have a material composition of 20% polyester and 80% cotton you choose '0' decimals. If you have a material composition of 19,95% polyester and 80,05% cotton you choose '2' decimals.
- To find more information on how to export care instruction information in a Style Custom Report read here
- To find more information on how to include care instruction information in your Custom Export setup for an integration to other systems read here
Example of care instruction output settings
Examples of what the settings for the different output types could look like you find below. These examples are also referred to in the 'Care Instructions - Webinar'.
Settings for Icons Output

Settings for Composition Output

Settings for Instructions Output
