Introduction & Best Practice
In Delogue, certificates are used to ensure that styles and items meet specific compliance standards, such as 'GOTS' or 'OEKO-TEX'. You can create and manage certificates and test reports linked to standards, styles, and items. The steps below will guide you through creating the different certification types in Delogue. If you want to learn more about the purpose of different certificates, find our blog article about Scope and Transaction certificates here.
The types of certificates available in Delogue are:
- Scope Certificate
- Test Report
- Transaction Certificate
- Product Certificate
NOTE: To be able to use the Compliance Module, your company must have the Professional license subscription.
Table of Contents
- Before You Start
- Step-by-step guide
- Copy A Certificate Or Test Report
- Follow A Certificate Or Test Report
- Filtering And Search Certificates Or Test Reports
- Cancel/Delete Certificates Or Test Reports
- Filter And Search Certificates And Test Reports
- The DoC Generator
- Add Rating To Certified Style or Item
Before You Start
1) Make sure the 'Compliance User' role is assigned to you as a user. To learn more about assigning different roles to a user, click here.
2) In case you are working with the DoC generator, the 'Compliance Admin' role has to be assigned to you as well.
3) Make sure you have activated the available certificate types in Admin. To learn more about the activation of certification types, click here.
Step-by-step guide
Scope Certificates
Follow the steps described below or find our video guide on setting up scope certificates here.
Navigate to: Compliance > Certificates
- Click on 'Add Certificate'
- Select Type: 'Scope'
-
Choose the associated standard Find out how to add standards here
-
Add license number and brand contact
-
Set validity and expiration date - the expiry notification date will send an email reminder to the associated brand contact
-
Choose a group and category Find out how to create Compliance categories and groups here
- Choose an institute and an institute contact
Find out how to add institutes here - Choose a supplier and a supplier contact

Scope Certificate Subtabs
- Workflow
Here, you can add tasks from workflows and also create individual tasks related to the scope certificate. Click on 'New task' and fill out the required information or click on 'Workflow from template' to add a task workflow. To learn more about creating workflows for certificates, click here.
- Internal Communication
- Files
Upload and organise documents related to your scope certificate. For example, this could be the PDF file of the certificate you have received from the issuing institute or test lab. You can organise your files into folders and view them in either list or thumbnail view.
- Custom Fields
Add any additional information you need to report on using a custom field. For example, the facility name, type and country. You can learn how to create custom fields for certificates here.

- Used In
Link styles and items covered by the certificate. As long as the scope certificate is in the state: 'Draft', 'In Progress', 'Valid' or 'Expired' - you will be able to add items and styles to the scope certificate. If the certificate is in the state 'Cancelled', you will not be able to add any items or styles to the scope certificate anymore.

- Click on 'Add Items' or 'Add Styles'
- Filter and choose the correct style or item
- Click 'Add Selected'
- The selected items and styles will appear listed under the subtab 'Used In'
You can view and edit the rating for each listed item and style. By clicking 'Show More' on the far right of each listed item or style, you can see which standard the scope certificate has been issued against. To learn more about how to add a rating to your style or item, read here.
Transaction Certificates
When creating a transaction certificate in Delogue, you link it to the corresponding scope certificate and specify a purchase order number. Follow the steps described below or find our video guide on setting up transaction certificates here.
Navigate to: Compliance > Certificates
- Click on 'Add Certificate'
- Select Type: 'Transaction'
-
Choose the associated scope certificate Find out how to add scope certificates here
-
Add certificate number and brand contact
-
Set validity date
-
Choose a group and category Find out how to create Compliance categories here and groups here
- Choose an institute and an institute contact
Find out how to add institutes here - Choose a supplier and a supplier contact
- Insert the PO number

Transaction Certificate Subtabs
- Workflow
Here, you can add tasks from workflows and also create individual tasks related to the transaction certificate. Click on 'New task' and fill out the required information or click on 'Workflow from template' to add a task workflow. To learn more about creating workflows for certificates, click here.
- Internal Communication
- Files
Upload and organise documents related to your transaction certificate. For example, this could be the PDF file of the certificate you have received from the issuing institute or test lab. You can organise your files into folders and view them in either list or thumbnail view.
- Custom Fields
Add any additional information you need to report on using a custom field. For example, the facility name, type and country. You can learn how to create custom fields for certificates here.

- Used In
Link styles and items covered by the certificate. As long as the transaction certificate is in the state 'Draft' , you will be able to add items and styles to the certificate. If the transaction certificate is in the state 'In Progress', 'Valid' or 'Cancelled', you will not be able to add any items or styles to the transaction certificate anymore.

- Click on 'Add Items' or 'Add Styles'
- Filter and choose the correct style or item
- Click 'Add Selected'
- The selected items and styles will appear listed under the subtab 'Used In'
Test Reports
For test reports, input test description, report number, purchase order number, and state. You can also track the request date, expected arrival date, and completion date. Add standards and log in ratings once you receive the results. Follow the steps described below or find our video guide on setting up test reports here.
Navigate to: Compliance > Certificates
- Click on 'Add Certificate'
- Select Type: 'Test Report'
-
Define a test description
-
Add test report number and brand contact
-
Set requested, completed and ETA date
-
Choose a group and category Find out how to create Compliance categories here and groups here
- Choose an institute and an institute contact
Find out how to add institutes here - Choose a supplier and a supplier contact
- Insert the PO number

Test Report Subtabs
- Workflow
Here, you can add tasks from workflows and also create individual tasks related to the test report. Click on 'New task' and fill out the required information or click on 'Workflow from template' to add a task workflow. To learn more about creating workflows for certificates, click here.
- Internal Communication
Here, you can communicate internally regarding any questions or information related to the test report with any colleague who has the 'Compliance User' or 'Compliance Admin' role assigned.
- Files
Upload and organise documents related to your test report. For example, this could be the PDF file of the report you have received from the issuing institute or test lab. You can organise your files into folders and view them in either list or thumbnail view.
- Custom Fields
Add any additional information you need to report on using a custom field. For example, the facility name, type and country. You can learn how to create custom fields for certificates here.

- Used In
Link styles and items covered by the test report. As long as the test report is in the state 'Draft', you will be able to add items and styles to the test report. If the test report is in the state 'In Progress', 'Passed' or 'Failed', you will not be able to add any items or styles to the test report anymore.

- Click on 'Add Items' or 'Add Styles'
- Filter and choose the correct style or item
- Click 'Add Selected'
- The selected items and styles will appear listed under the subtab 'Used In'
- Standards
Under the subtab 'Standards', you can add the standard to which the test report is connected. You can add the relevant standard when the test report state is set to 'Draft'. After adding a standard, you will be able to select a rating for styles and items under the subtab 'Used in'.
- Click on 'Add Standard'
- Search and choose a standard
Find out how to add more standards to choose from here
Product Certificates
In Delogue, you can document a product certificate to verify that the specific products listed in a transaction comply with the requirements of a recognised sustainability standard and are covered under a valid scope certificate. To create a new product certificate, follow the steps below or find our video guide on setting up product certificates here.
Navigate to: Compliance > Certificates
- Click on 'Add Certificate'
- Select Type: 'Product'
-
Add certificate number and brand contact
-
Set validity and expiration date - the expiry notification date will send an email reminder to the associated brand contact
-
Choose a group and category Find out how to create Compliance categories here and groups here
- Choose an institute and an institute contact
Find out how to add institutes here - Choose a supplier and a supplier contact

Product Certificate Subtabs
- Workflow
Here, you can add tasks from workflows and also create individual tasks related to the product certificate. Click on 'New task' and fill out the required information or click on 'Workflow from template' to add a task workflow. To learn more about creating workflows for certificates, click here.
- Internal Communication
Here, you can communicate internally regarding any questions or information related to the product certificate with any colleague who has the 'Compliance User' or 'Compliance Admin' role assigned.
- Files
Upload and organise documents related to your product certificate. For example, product labels, declarations and certificate files that you have received from the issuing institute or test lab. You can organise your files into folders and view them in either list or thumbnail view.
- Custom Fields
Add any additional information you need to report on using a custom field. For example, the facility name, type and country. You can learn how to create custom fields for certificates here.
- Used In
Link styles and items covered by the product certificate. As long as the transaction certificate is in the state 'Draft', you will be able to add items and styles to the product certificate. If the product certificate is in the state 'In Progress', 'Valid', 'Expired ' or 'Cancelled', you will not be able to add any items or styles to the product certificate anymore.

- Click on 'Add Items' or 'Add Styles'
- Filter and choose the correct style or item
- Click 'Add Selected'
- The selected items and styles will appear listed under the subtab 'Used In'
You can view and edit the rating for each listed item and style. By clicking 'Show More' on the far right of each listed item or style, you can see which standard the product certificate has been issued against. To learn more about how to add a rating to your style or item, read here.
- Standards
Under the subtab 'Standards', you can add the standard to which the product certificate is connected. You can add the relevant standard when the product certificate state is set to 'Draft'.
- Click on 'Add Standard'
- Search and choose a standard
Find out how to add more standards to choose from here
After you have added the related standard, you can also work with the monitoring and DoC generator subtab.
- Monitoring
Through Monitoring, you will be able to capture inspections both externally and internally conducted on purchase orders relating to the scope certificate. This allows you to keep monitoring data associated with personal protective equipment category three, connected as closely to the certificate they relate to as possible.
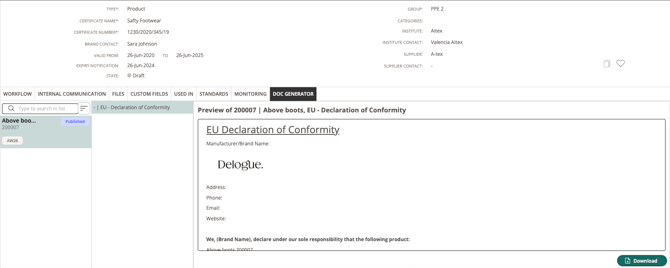
- DoC Generator
The DoC Generator allows you to create a Document of Conformity (DoC) from a template and download it. To read more about how to work with the DoC Generator, read below.
Copy A Certificate Or Test Report
Navigate to: Compliance > Certificates
- Choose the certificate or test report that you would like to copy
- Click on the 'Copy' icon - on the right side, next to the header information

- Choose which information you would like to copy
- The copied certificate or test report will show up in the list to the left
- Choose the copied certificate or test report and update specific header information if necessary
Follow A Certificate Or Test Report
Navigate to: Compliance > Certificates
- Choose the certificate or test report that you would like to follow
- Click on the 'Heart' icon - on the right side, next to the header information

- The certificate or test report you choose will appear with a heart symbol to mark it in the list of certificates and test reports to the left
- When you follow a certificate or test report, you will receive an expiry notification sent to your personal email address.
- You will receive an email notification whenever a message is sent to you or any of your colleagues through the 'Internal Communication' subtab.
Cancel/Delete Certificates Or Test Reports
In general, it is not possible to delete a certificate or test report; instead, you can change the state of the chosen certificate or test report. When you change the state of a transaction, scope or product certificate to 'Cancelled', it will disappear from the list to the left. For test reports, you can set them to 'Failed'. In case you do not want to view the failed test reports any longer in the list of certificates and test reports to the left, you will have to create a filter that excludes failed test reports from being shown.
If you want to find any cancelled certificate later, you can always filter for it. Read more about how to filter and search certificates and test reports below.
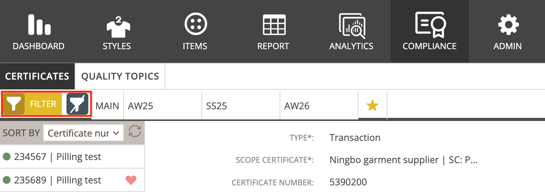
Filter And Search Certificates Or Test Reports
Navigate to: Compliance > Certificates
- Click on the 'Filter' button at the top of your screen

- A pop-up window appears where you can define different parameters
- On the left, you see the parameters to define
- On the right side, it gives you a preview of all certificates and test reports that apply to the defined parameters
- On top of the preview, you can see the states in which the certificates and test reports are in
- To apply the filter, click on the green 'Filter' button in the lower right corner

- To save a filter as a favourite to be able to return to the filter later, define a filter name in the top left corner of the filter pop-up window
- Click on the green 'Filter' button
- The saved filter will appear as an extra header on the top of your screen

- Use the 'Search' field of the filter pop-up window to quickly find any certificate or test report name or number

- When a filter is applied to your certificates and test reports, the filter button on the top of your screen will show in yellow
- Remember to click the 'Remove Filter' button to remove any filtration from your original view of certificates and test reports
The DoC Generator
Before you can download the DoC for your certified styles, you will have to set up a template in Admin. Find a detailed guide for the setup here.
NOTE:
1. Be aware that the DoC generator can only be used when the certificate type is "product"
2. To be able to create new Compliance DoC Templates, make sure the 'Compliance Admin' role is assigned to you.
Navigate to: Compliance > Certificates
Use the Template for a Specific Product:
- Choose your product certificate
In the DoC subtab, you select:
-
-
The style that has been added under the subtab 'Used In' before
-
The appropriate DoC template
-
- A preview shows the completed DoC filled with the correct style and certification details
- To export and send click 'Download' to get the PDF
Add Rating To Certified Style or Item
After you have added a style or item to a certificate or test report, you will have to add a standard to the certificate or test report. Afterwards, you can fill out the rating for the specific style or item.

- Click on the test name in column 'Rating' - e.g., 'Social Audit'
- Choose a rating from the drop-down
- Click 'Apply'
The rating will display behind the test name in the column 'Rating'. When clicking on 'Show more' you can see which standard the rating is related to.
View Certificates on Specific Styles
Navigate to: Styles > Compliance
When you are on a specific style, under the 'Compliance' subtab, you can view any Product Certificates, Scope Certificates, Transaction Certificates, or Test Reports that have been associated with that style.
Additionally, you can view certifications and test report results related to the items listed in the style’s item list.
For each type of certificate or test report, the following information is available:
- Product Certificates: Certificate number, certification name, issuing institute, status, validity, expiry date, and ratings
- Test Reports: Test report number, test description, PO number, status, requested date, ETA date, completed date, and ratings
- Scope Certificates: License number, connected standard, status, validity, and expiry date
- Transaction Certificates: Certification number, associated scope standard, PO number, status, and validity

- For the items listed under the headline 'Item list compliance', you will be able to view the following information: Item number, item name, associated certificate number, certificate/test report name, issuing institute, status, validity, expiry date and ratings

Next Steps
Understanding the Purpose of Scope and Transaction Certificates
Navigate Certifications (webinar - January 2024)
Introduction - Compliance Module
Compliance Module - Admin Setup
Include Certificates In The Style Custom Report
ESG data extraction from the Item Custom Report
Find the Compliance Module FAQ here