NOTE: The Care Label section in Delogue is no longer supported. We recommend finding an alternative solution for working with care label layouts.
Table of contents
General Information
The Care Label Template is a way of managing your company's care instructions.
You can create a template for a Care Label in Admin > Care Instructions > Labels.
Your company must have the Care Instruction Template module before you can use the Care Label Template function.
The Care Label Template is only for use by Company Admin users.
When setting up your Care Label Template, you will see dummy data.
It's first when you download the Care Label PDF in a specific style, you will see the correct output.
You can read more here on how to use a Care Label Template on a Style .
The Structure of a Care Label Template
The Care Label Template is divided into 5 areas. These are Header, Footer, First, Middle, and Last page.
Header/ Footer
The Header and Footer will be visible on all the pages in your Care Label. Although you can decide if you only want to see the header once in your label, by using the Header First Page option.
First page
The First page will be the first page in your care label. Here you can drag and drop the content you want.
Middle page
On the Middle page, you will typically inset your compositions and washing instructions. Even if the Middle page is only one page in the system, the page will be divided into more pages when generating a PDF.
Last page
The Last page will be the last page on your care label. Here you can drag and drop the content you want.
Create a new Care Label Template
To create and set up a new Care Label Template, you must go to the sub-page "Labels" for Care Instructions, in the Admin section.
Here you will also see a list of existing Care Label Templates.
Click on the green button "+ Add Template" to create a new Care Label Template.
You will now see a page, where you define the size of your Care Label.
- Here you can set up the height and width of your Care Label - including default margin sizes and borders.
- You can also select the background color of the Care Label and font color - and rotate the care label/ select if it should be portrait or landscape.
- Please remember to select a name for your Care Label Template.

After setting up the size and look of your Care Label Template, you must focus on the content.
Click on the green button "Next" at the lower right corner for continuing to set up the Care Label.
Add Content in the Header and Footer
First, you must add content to the Care Label's Header & Footer, and decide the size of them.
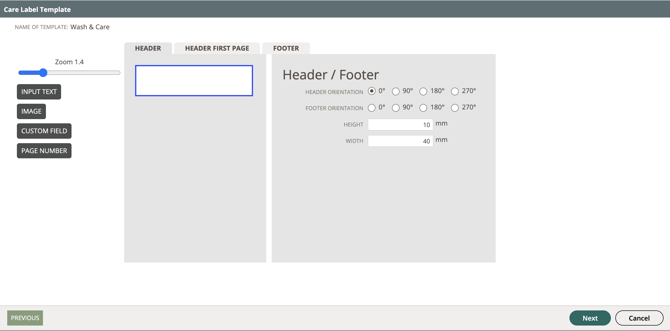
By dragging and dropping the content options on the left side into the white box, you can decide where the content should be placed - and what the content is about.
| Content Categories | Explanation |
| Input text | Textbox for free writing of content. You can also decide the font and size of the text |
| Image | Uploading an image from your computer into the Header/ Footer area |
| Custom Field | Adding custom field values to the care label, that will differ depending on the value selected on the style |
| Page number | Show the number of page(s) in the Header/ Footer for the whole Care Label |
When you have selected which content the Header and/or Footer should contain, you can decide the size of the content by margins, font size, where on the care label it must be placed, etc.
NOTE: Click on the content categories in the table above to see, how to set up the style of content.
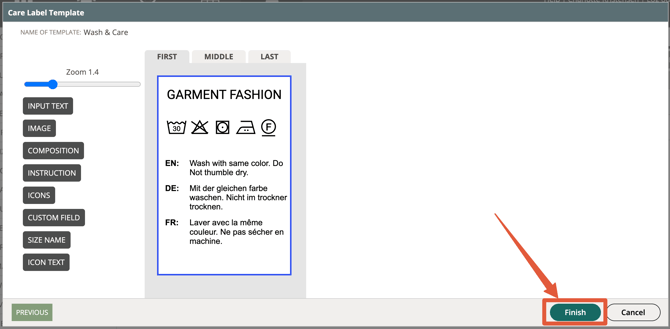
Add Content on the First, Middel and Last Page
Once you have defined and set up the content for your Care Labels Header and Footer, you must add content to the Care Label by clicking on the green "Next" button.
By drag and drop, you can easily decide where the content must be placed at your Care Label.
Just move the content option into the white box at left, and decide by settings that show up at right, where the content must be placed.
Here you can also define the content and add text, images, etc. depending on what kind of content you have added.
Please click on the content categories in the table below, to see how to decide the style of the content.
| Content Categories | Explanation |
| Input text | Textbox for free writing of content |
| Image | Uploading an image from the computer to the Care Label |
| Composition | Selection of which compositions must be shown in the Care Label |
| Instruction | Selection of which Instructions must be shown in the Care Label |
| Icons | Placement of Icons in the Care Label |
| Custom Field | Selection of which Custom Fields must be shown in the Care Label |
Visual Example:

Save the Care Label Template
Once you are done with setting up your Care Label Template, please click on the green 'Finish'-button for saving.
Edit a Care Label Template
It is possible for you to edit an existing Care Label Template.
Mouse over the name of the Care Label Template you will like to edit.
Here you will see 3 icons on the right. Click on the first icon - the edit icon.
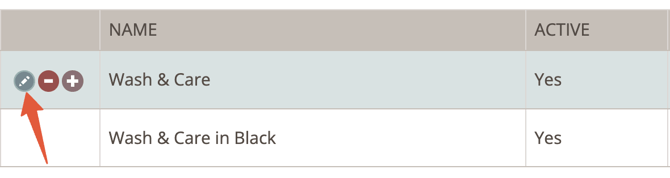
When clicking on the edit icon, you can now edit the Care Label Template the same way you created it.
Copy a Care Label Template
It is also possible for you to copy an existing Care Label Template.
Mouse over the name of the Care Label Template you will like to copy.
Here you will see 3 icons on the right. Click on the '+' icon - the copy icon.
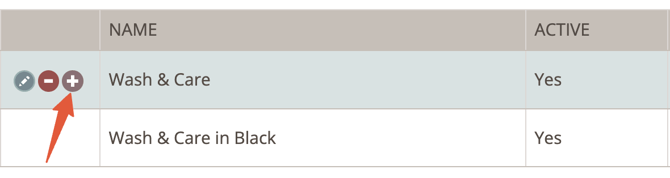
When clicking on the copy icon, the template will open and you can now change the content of the copied template.
NOTE: Please remember to click on the green button "Finish" for saving.
Delete a Care Label Template
You can delete an existing Care Label Template.
Mouse over the name of the Care Label Template you will like to delete.
Here you will see 3 icons on the right. Click on the red '-' button to delete.

This will tricker a pop-up message asking you to confirm this action.

NOTE: If the Care Label Template is in use on styles, it will not be possible to delete the template. Instead you can inactivate the template when in edit mode.
Used in Styles
You can get a full overview of all the styles in a specific Care Label Template used.
Click on the green button 'Used in Style' and you will see a list of all the styles where the template is used.

Care label - video guide
The care label template is highly customizable and you can create as many as you like. These care label templates can be used on a style level and once you connect the template to a style, the system will fetch the data automatically.
Page number

1) You can change the margins for the Page number content. Simply remove the number and insert a new number. The default size of the margins for the content is the same as you have set for your Care Label.
2) You can decide the placement of the Page number. If it must be aligned vertically and horizontally.
3) In these fields, you can define the style of the Page number text.
You can select the font, the color, and the line height and spacing for the text.
4) This is the field where you can write the Page number text. Meaning you can define a text that must be shown before the page number will occur.
We use the text 'Page' as default.
5) Here you can decide, how the Page number content must be shown in the template.
If you select the first option "Front 1, Back 1, Front 2", the page number will count page numbers differently for the front and back pages.
If you select the second option "Front 1, Back 2, Front 3", the page number will count every page (both front and back pages) as one document.
Instruction
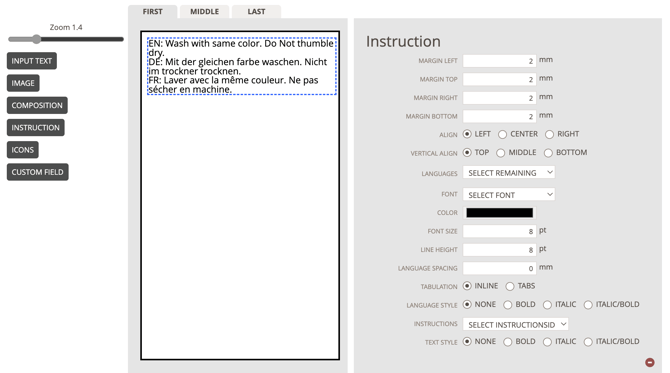
1) You can change the margins for the Instruction content. Simply remove the number and inset a new number. The default size of the margins for the content is the same as you have set for your Care Label.
2) You can decide the placement of the Instruction content. If it must be aligned vertically and horizontally.
3) In the dropdown called 'Languages' you can select the languages that you want the instruction content to be shown as, in your template.
It is possible to add all languages at one time - and remove a single language after selection. Simply click on the small "x"-icon on the language you want to remove.
The dropdown contains languages that are created for your company on the page Admin > General Settings > Languages. Please read here how to set up languages .
4) In these fields, you can define the style of the Instruction text.
You can select the font, the color, and the line height and spacing for the Instruction text.
It is also possible to select if there should be a "tab" space between the language ID and the instruction text.
And you can make the Instruction content bold, italic, or both.
5) In the dropdown called 'Select Instruction ID', you must select which Instruction that must be shown in the template.
You can choose between the Instructions that already are created in your company.
You can read more about how to add Instructions here.
You can also read more about the setting here.
Input text
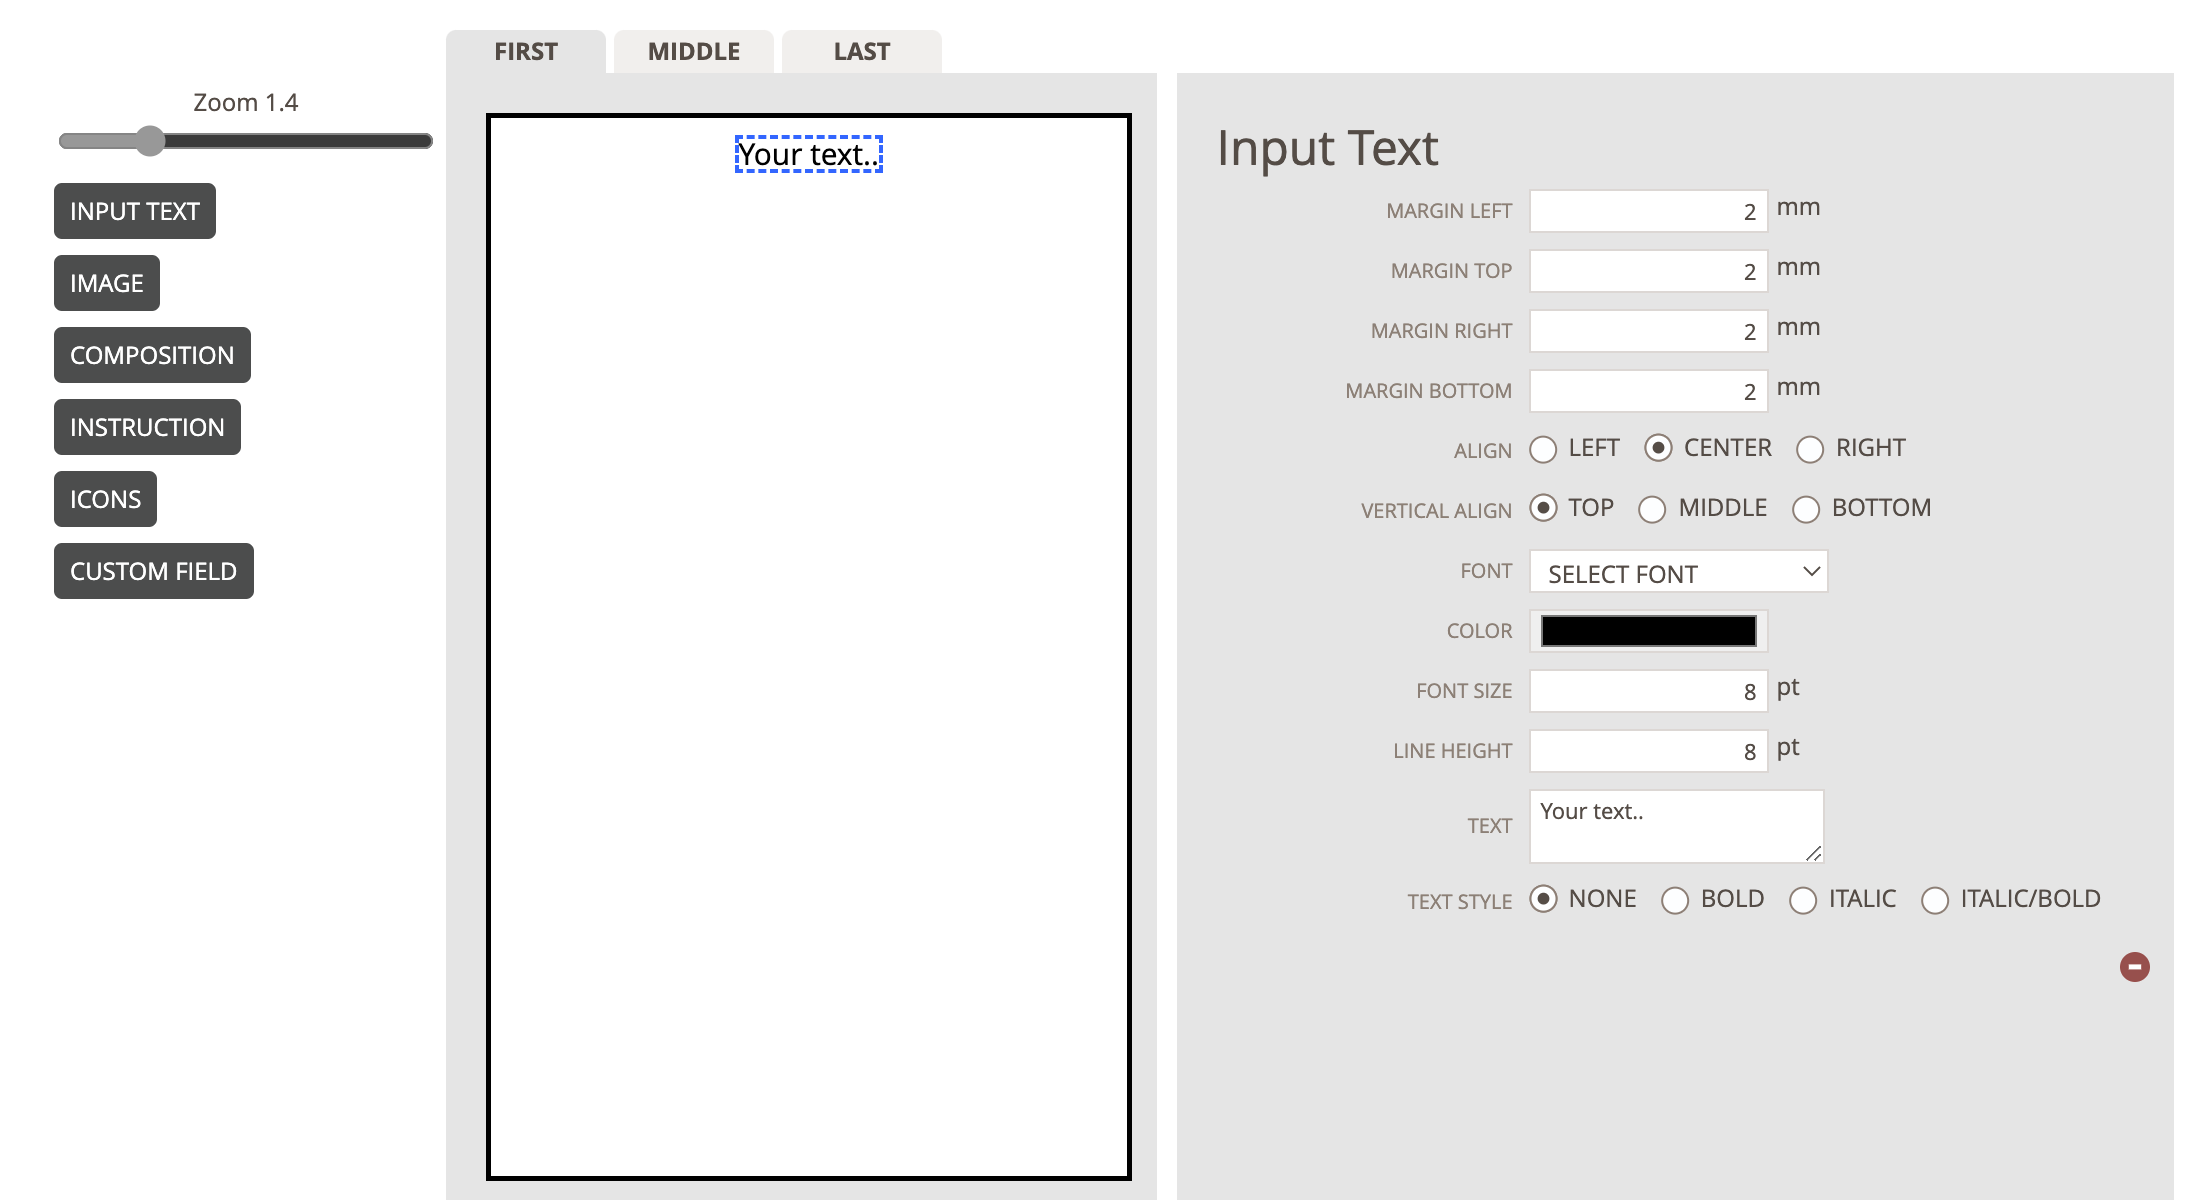
1) As the first thing, you can change the margins for the Input Text content. Just simply remove the number and inset a new number. The default size of the margins for the content is the same as you have set for your Care Label.
2) You can decide the placement of the Input Text. How it should be aligned vertically and horizontally.
3) In these fields, you can define the style of the Input Text. Simply select one of our default fonts, the color of the texts, if the text should be in bold, italic etc.
You can also change the size of the font and the line.
4) At last, you can write the Input Text that you want to place in your Care Label.
Just move the cursor into the field "Text" and begin to type in the text you want.
You can see how the text will look in the label layout at the left while writing.
Image
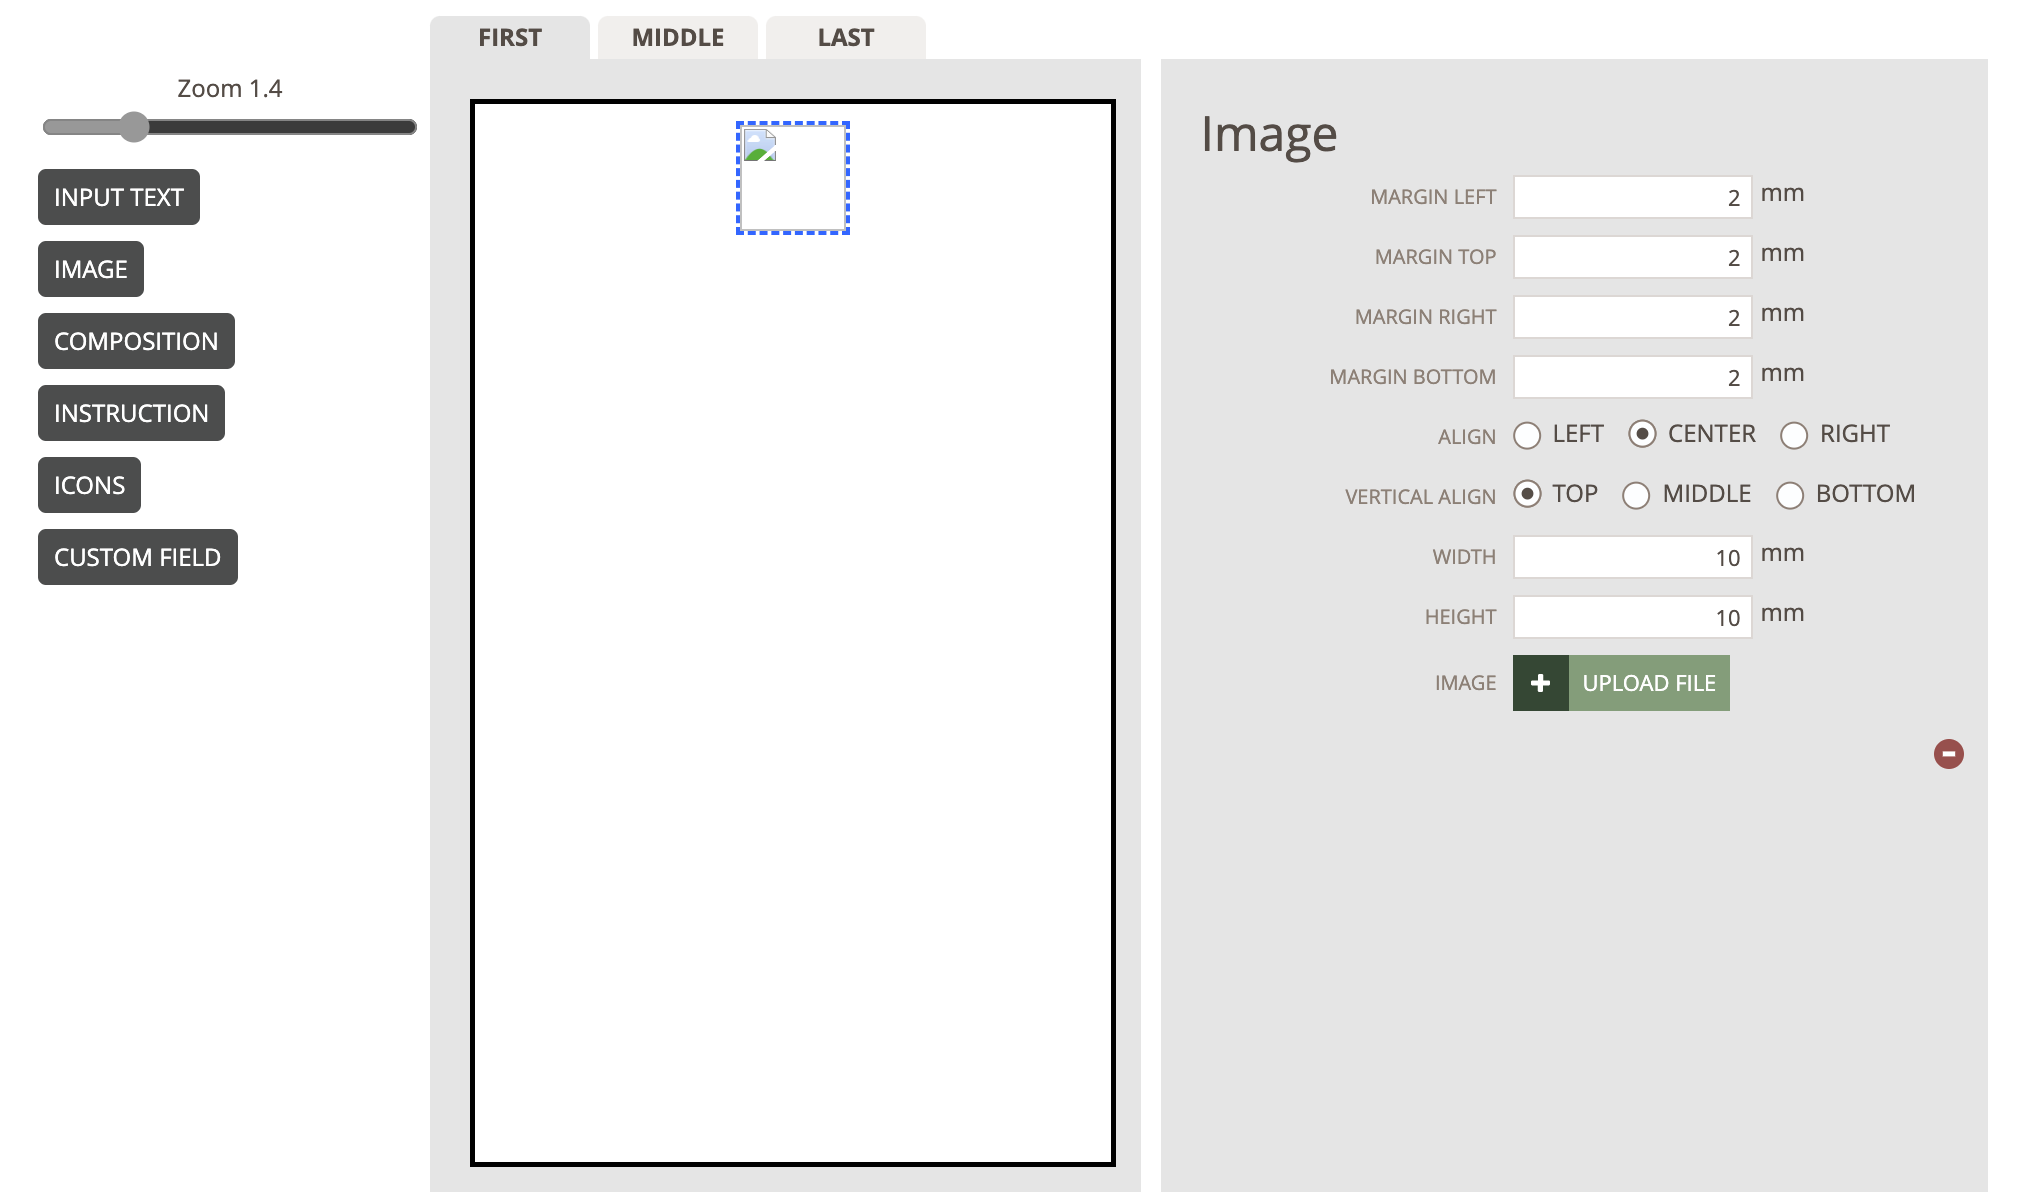
1) As the first thing, you can change the margins for the Image. Just simply remove the number and inset a new number. The default size of the margins for the content is the same as you have set for your Care Label.
2) You can decide the placement of the Image. How it should be aligned vertically and horizontally.
3) In these fields, you can define the width and height of the image. Typically it will be easier to adjust these fields, after uploading the image.
4) At last, you can upload the image you want in your Care Label.
When clicking on the green button "Upload file", you can select any image you have locally on your machine and upload the image.
Icons
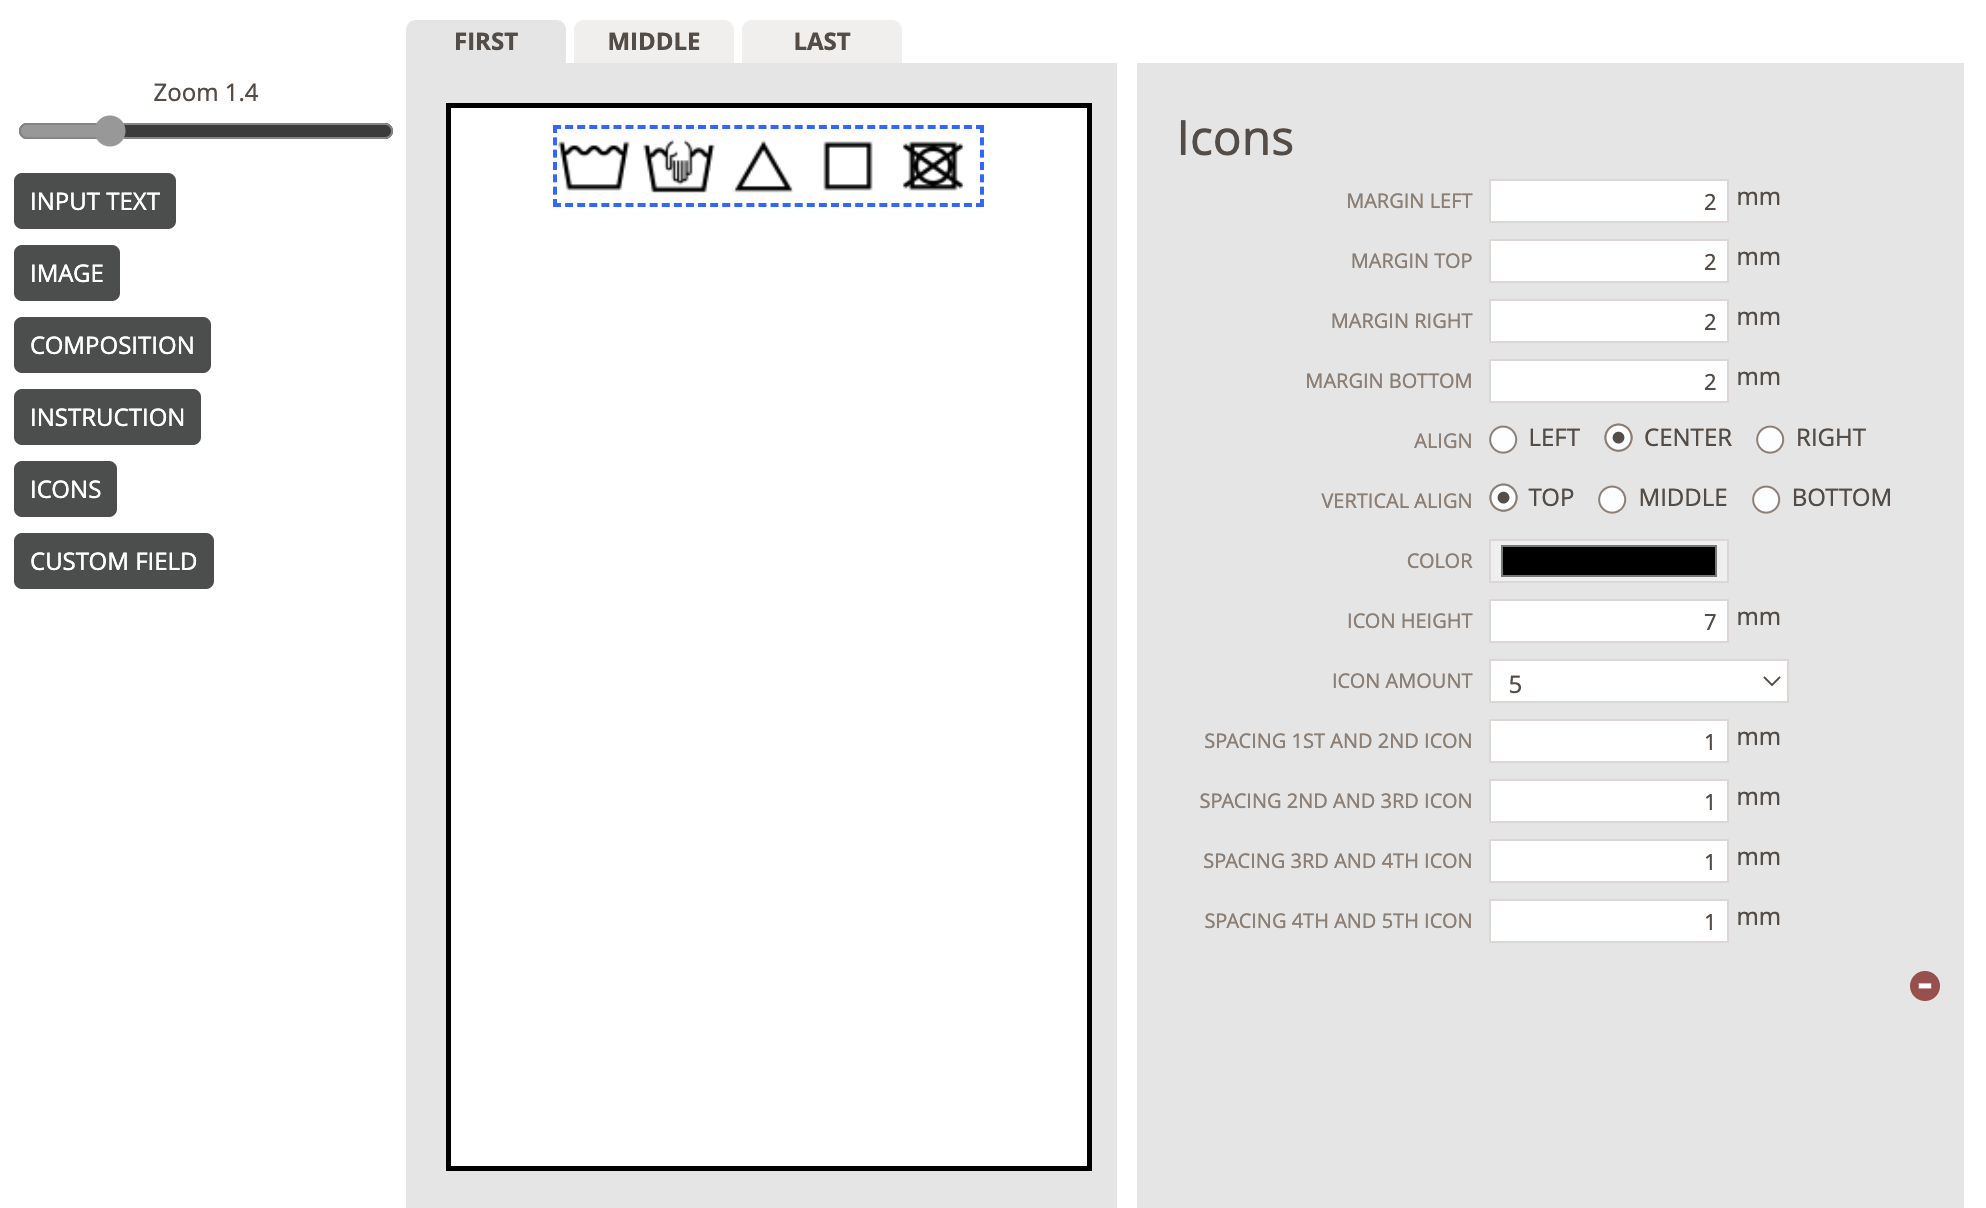
- As the first thing, you can change the margins for the Icon content.
Simply remove the numbers in the fields and insert a new number. The default size of the margins for the content is the same as you have set for your Care Label. - You can decide the placement of the Icons. How it should be aligned vertically and horizontally.
- In these fields, you can define the size of your icons. Especially the height of the icons in mm., and how many icons you want to be shown in the template.
- At last, you decide the spacing between each icon. Simply click on the arrows or type in the correct space in mm.

NOTE: The icons that are showing while setting up the care label are dummy data.
To see the correct icons, you must add icons for a Style's Care Instruction.
You can also read more here about how to add icons in the Admin Section.
Custom Field
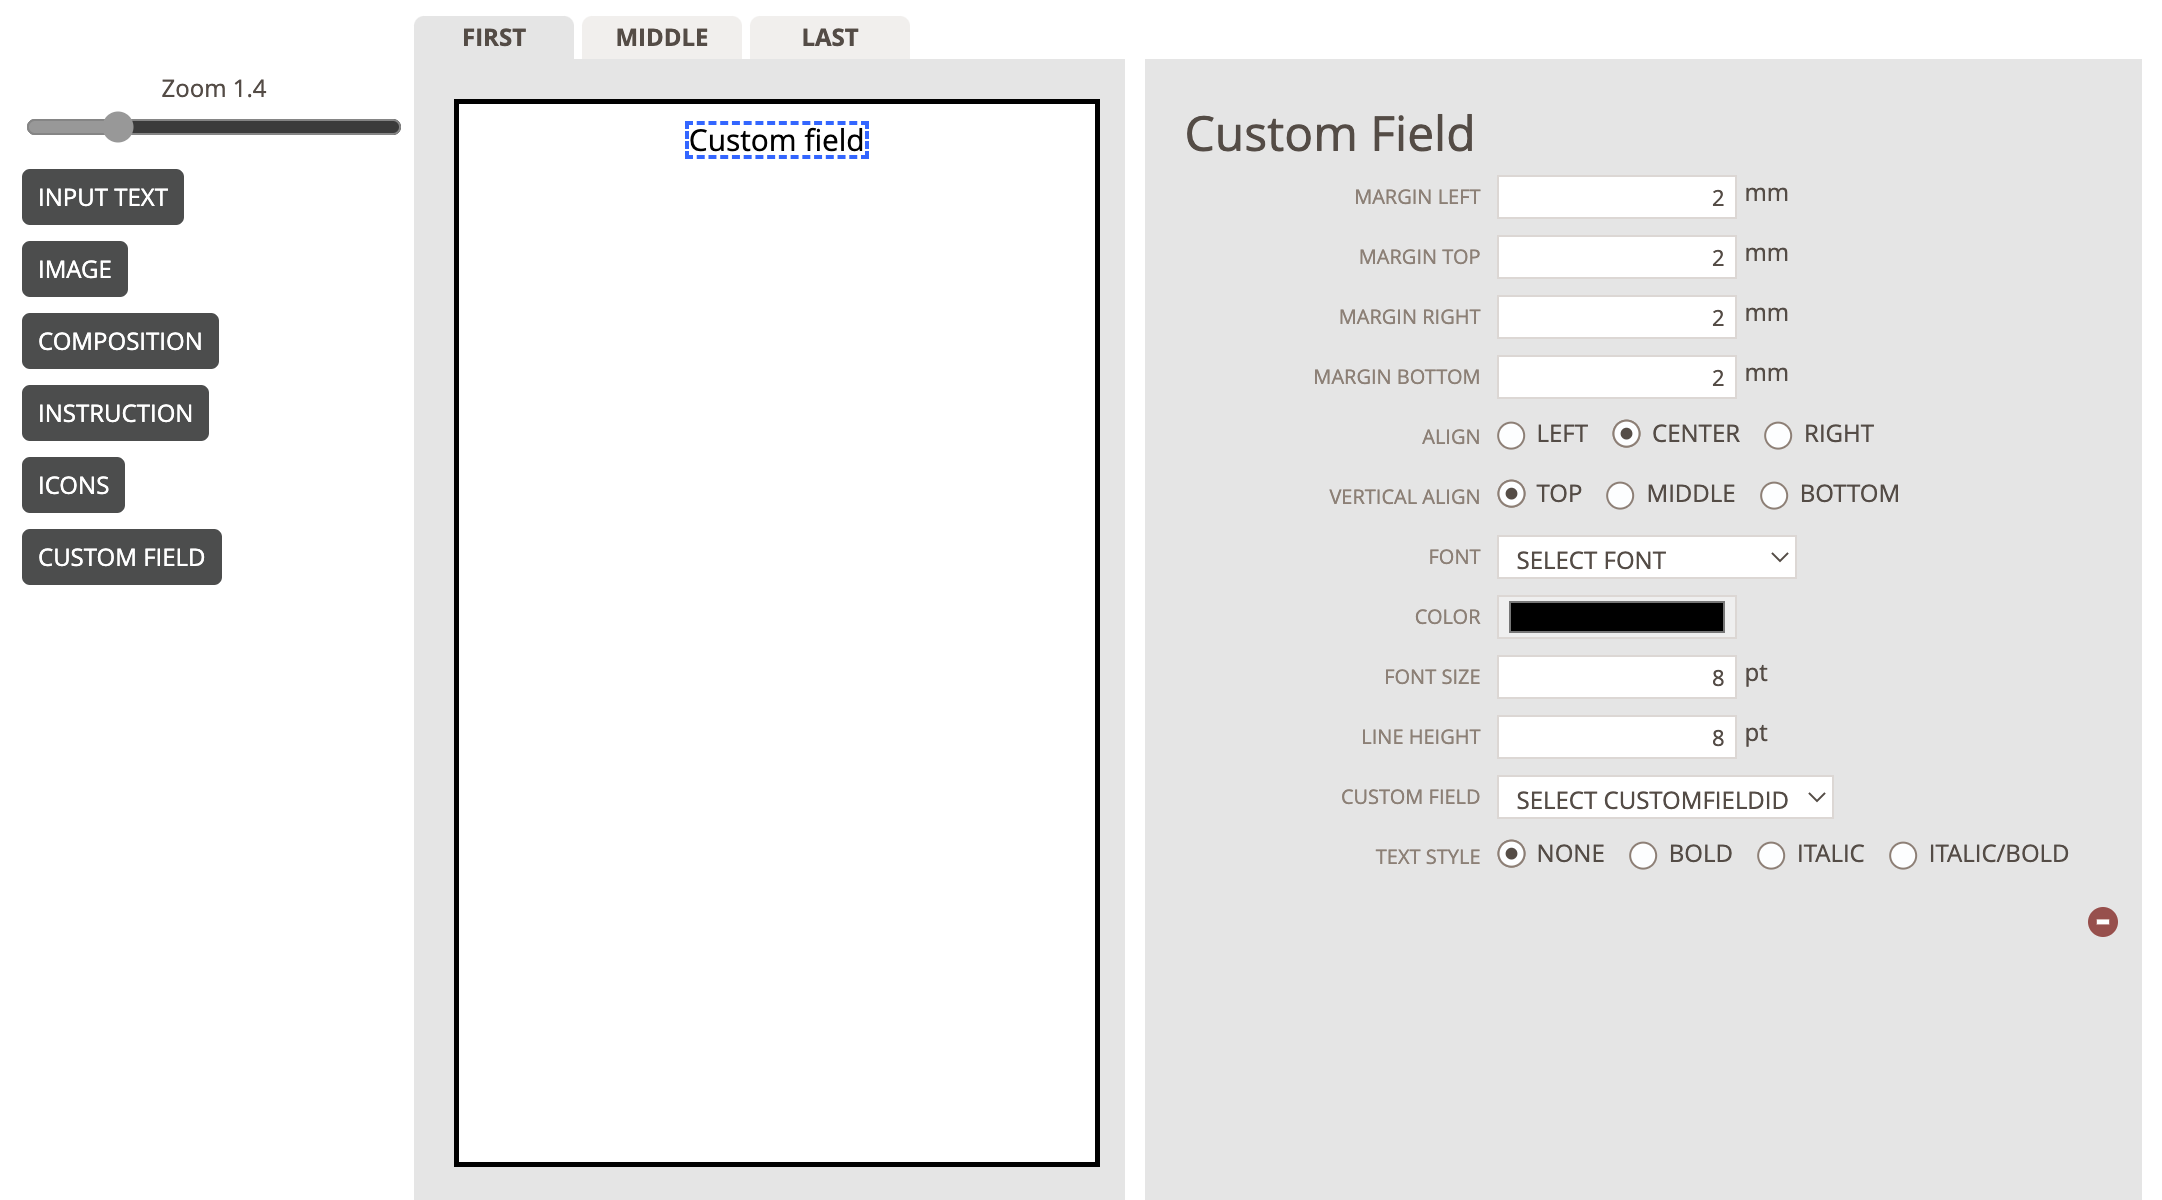
1) You can change the margins for the Custom Field content. Simply remove the number and inset a new number. The default size of the margins for the content is the same as you have set for your Care Label.
2) You can decide the placement of the Custom Field. If it must be aligned vertically and horizontally.
3) In these fields, you can define the style of the text in your Custom Fields.
Simply select one of our default fonts in the dropdown, the color of the text, if the text should be in bold, italic, etc.
You can also change the size of the font and the line height for the text.
4) In the dropdown called 'Custom Field', you must select which Custom Field must be shown in the template.
You can choose between the Custom Fields that are created in your company.
You can read more about how to add Custom Fields here.
Composition
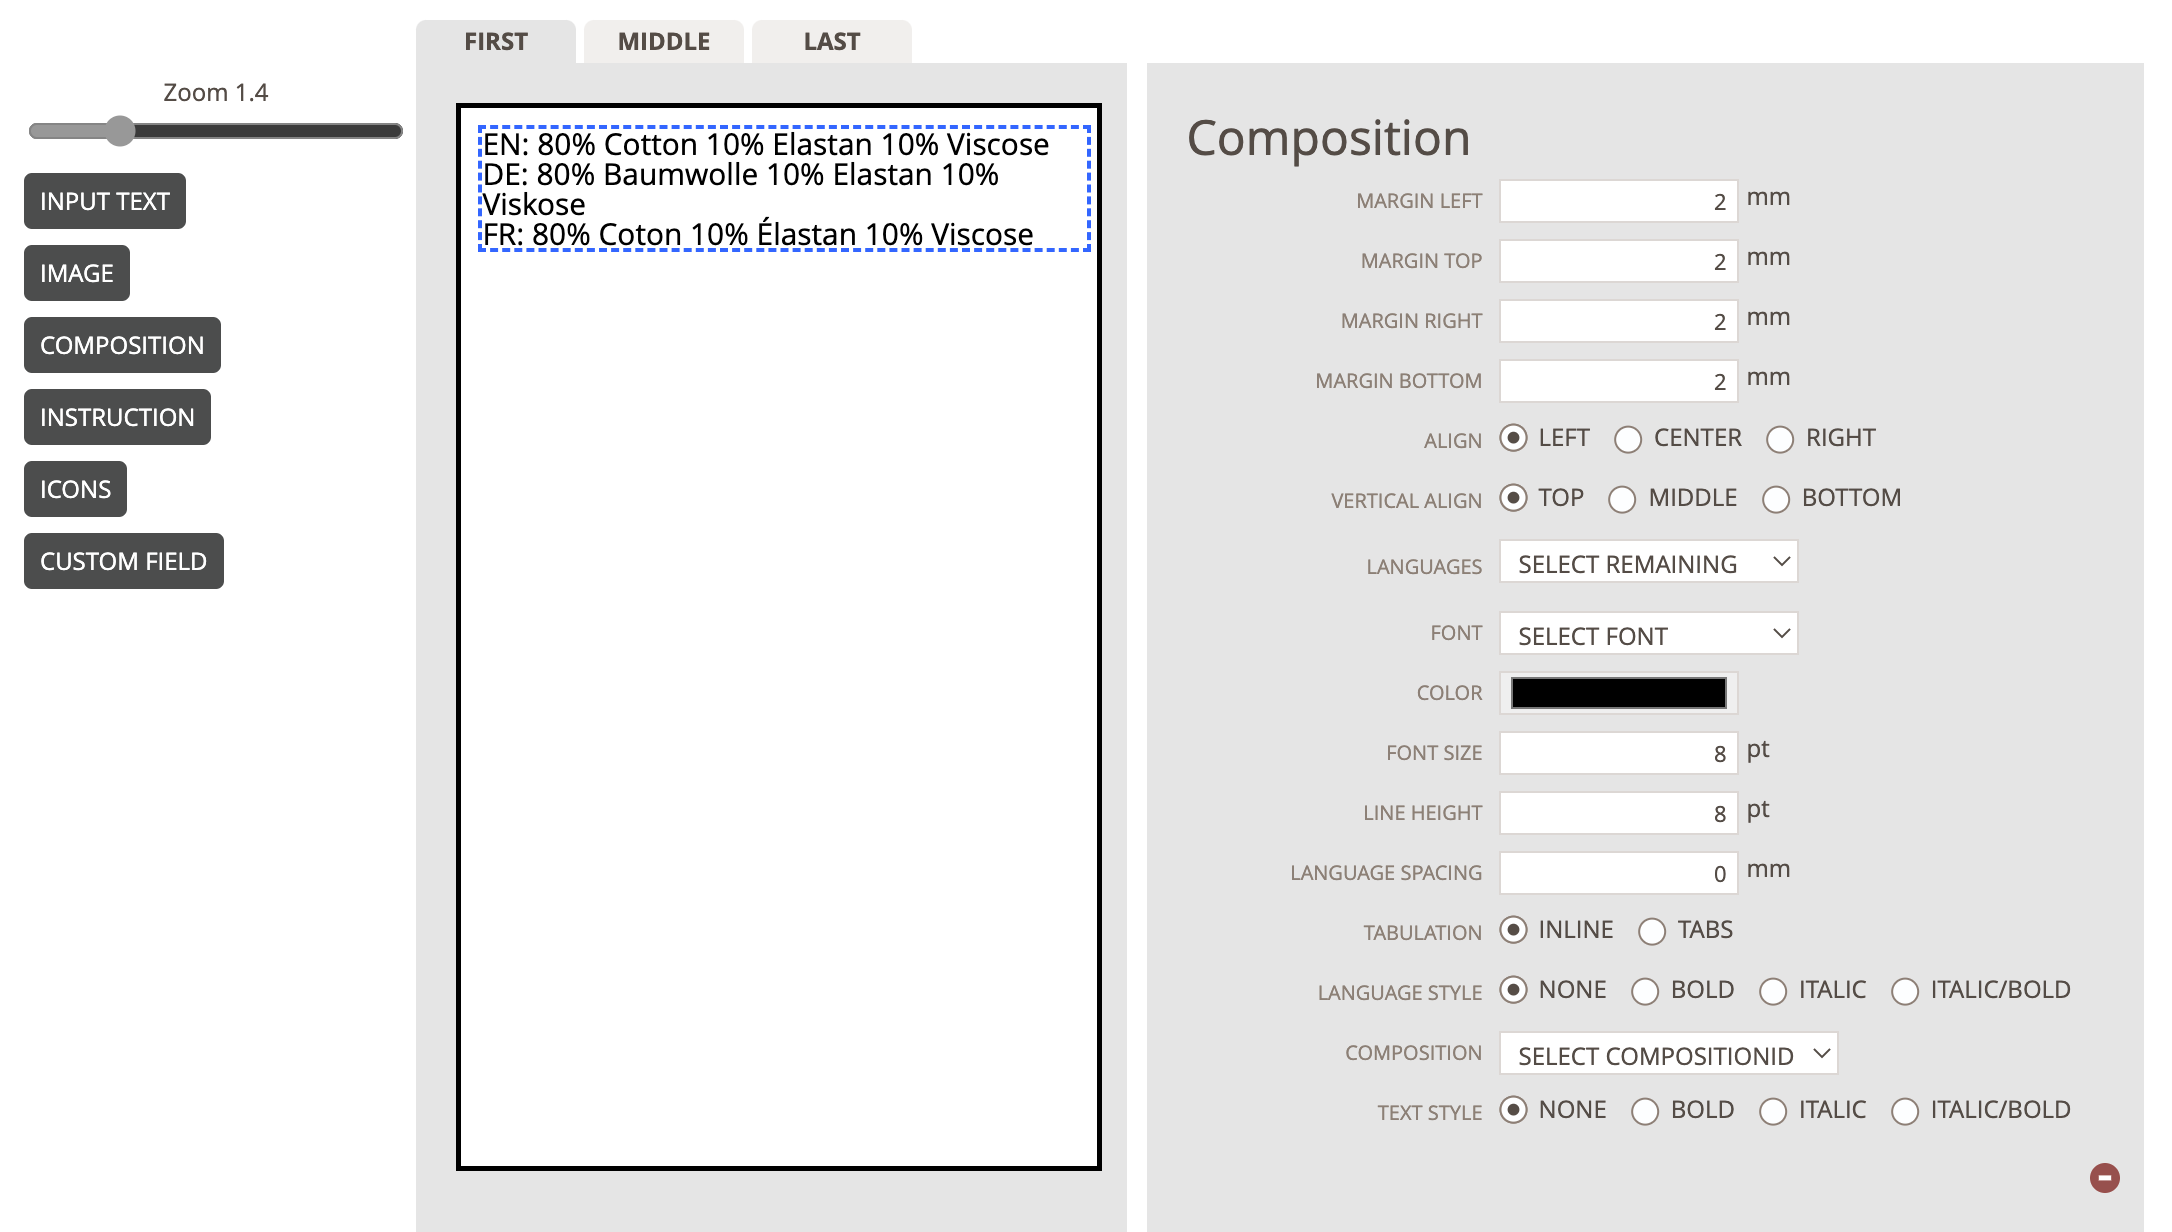
1) You can change the margins for the Composition content. Simply remove the number and insert a new number. The default size of the margins for the content is the same as you have set for your Care Label.
2) You can decide the placement of the Composition content. If it must be aligned vertically and horizontally.
3) In the dropdown called 'Languages' you can select the languages that you want the Composition content to be shown as, in your template.
It is possible to add all languages at one time - and remove a single language after selection. Simply click on the small "x"-icon on the language you want to remove.
The dropdown contains languages that are created for your company on the page Admin > General Settings > Languages. Please read here how to set up languages .
4) In these fields, you can define the style of the Composition text.
You can select the font, the color, and the line height and spacing for the Instruction text.
It is also possible to select if there should be a "tab" space between the language ID and the instruction text.
And you can make the Instruction content bold, italic, or both.
5) In the dropdown called 'Select Composition ID', you must select which Instruction that must be shown in the template.
You can choose between the Compositions that have already been created in your company.
You can read more here about how to manage the compositions.
You must also create an Output to define, which information that must be shown for the composition itself.
You do this on the page Admin > Care Instruction > Output