Introduction & Best Practice
The import features allows you to import new and update large volumes of style data by uploading Excel sheets. You can update existing style data, upload any kind of custom field data, and certain price data in a single upload. Additionally, you can also update already existing style data with size information and colour information, as well as custom fields set to 'per colour' and 'per size'. This tool requires accurate, well-structured data. Carefully read each section's instructions and review the guidelines before starting the import to avoid errors.
NOTE:
Important notes on importing style and item data:
- Once style or item data has been imported, there is no possibility of retrieving old data. Therefore, we highly recommend running tests before importing a large volume of data and limiting the 'Import/export' role to one or a few designated users.
- To use this feature, your company must have the Professional license subscription
-
Choose the correct upload type: Be sure to select the appropriate upload type. Uploading the wrong type of Excel sheet will result in errors.
-
Test before full import: When using the Import Update function to update style and item data, it is important to test the process first. Always start with a small test - just one or two rows in your Excel sheet.
-
Use non-critical data for testing: Run your initial tests on a style that is not critical to your business. If something goes wrong during the import, the data may be permanently lost. There is no way to recover it.
-
Upload in smaller batches: Once your data is ready, upload it in smaller batches. This makes it much easier to identify and fix any issues if errors occur during the import.
Table of Contents
- Before You Start
- Step-by-step Guide
- Import new style data
- Prepare Excel file to import new style data - Update existing style data (incl. custom fields & prices)
- Prepare Excel file to update style data - Import style size data
- Import style colour data
- Prepare Excel file to import style colour data - Import style custom field per colour
- Prepare Excel file to import custom field per colour data - Import style custom field per size data
- Prepare Excel file to import custom field per size data
- Import new style data
Before You Start
1) Make sure the 'Import/Export' role is assigned to you as a user. To learn more about assigning different roles to a user, click here.
2) Remember not to change or delete any column headers from the downloaded template files - otherwise the import will fail.
3) Follow the exact instructions about syntax when adding header information for custom field data.
Step-by-step Guide
Import of new style data
WARNING: If you have the "Auto style no" function active in your header (Admin > Company Info > Header, or the style name/number generator function active, this must be deactivated before you import new styles.
STEP 1: Download the Excel template
Navigate to: Admin > Import/Export > Import
- Click the green 'Import' button
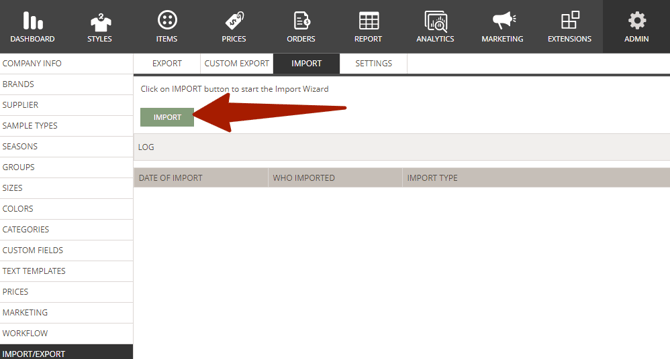
- Select import type 'Styles'
- Click 'Download Template File'

STEP 2: Prepare the Excel file
This is an example of how to fill out the Excel template to import new style data:

- Mandatory columns to fill out: Brand, Contact Person, Style Name, Supplier ID, Season (if defined in style header)
- For 'Contact Person': insert the contact person's email address found in: Admin > Company Info. The contact person must be active in Delogue
- Leave column 'Extra Text' blank
- Make sure that the data filled in to: Brand, Supplier ID, Supplier Name, Season, Group and Category already exist in Delogue > Admin. If not, the import will fail.
- Save your file
NOTE: The spelling of States must match the spelling in the platform.
STEP 3: Upload the file to Delogue
After you have prepared your Excel file you can start with the import.
Navigate to: Admin > Import/Export > Export
- Find the headline 'Style Import'
- Click the grey 'Browse' button
- Choose & upload the prepared Excel file

-
Check whether all information has been successfully uploaded
- You can analyze the result of the import by reading the "Response" below the "upload" button. Take a screenshot if you find it difficult and send it to support@delogue.com for help
NOTE: We recommend that you alway make an upload test before uploading a full collection of styles. Make a copy of the Excel with only one style and upload that first. If that is a success you can carry on and upload the rest.
Update existing style data (incl. custom fields & prices)
Navigate to: Admin > Import/Export > Import
Prepare Excel file to update style data
Add style data to the downloaded template file
- Mandatory columns to fill out: Brand, Contact Person, Style Name, Supplier ID, Season (if defined in style header)
- Under 'Contact Person' insert the contact person's email address found in: Admin > Company Info
- Leave column 'Extra Text' blank
- Save your file and upload it in Admin > Import/Export > Import
NOTE: The spelling of States has to be according to the spelling in the platform.
'Unpublished' can only be used to update deleted styles
- Click the green 'Import' button
- Select import type 'Styles'
- Click 'Upload Excel File'
- Choose & upload the prepared Excel file
- Set a check mark next to 'I am aware that import of data can not be undone'
- Click 'Import'
-
Check whether the styles, custom fields, and prices have been successfully created
Add custom field data to the downloaded template file
When adding or updating custom fields through the import function, make sure to create all necessary custom fields in Admin first - read how to create custom fields in Admin here.
This is an example of how to fill out the Excel template to update style and custom field data:

- Mandatory columns to fill out: Brand, Contact Person, Style Name, Supplier ID, Season (if defined in style header)
- Leave column 'Extra Text' blank
- Add the header syntax 'CF:ID' for any custom field you want to add - e.g., 'CF:4711' and 'CF:12'. See below for where to find the custom field ID information.
-
Add the custom field value under each header - e.g., ‘11’ as custom field '4711' is a numeric custom field and 'Yellow flag' as it is the chosen value from the allowed value custom field '12'.
- A custom field that has the setting 'Multiple allowed values' activated can be imported by separating the multiple values with a comma
-
In case you are filling out information for a date custom field, write the date in the following format: dd-mmm-yyyy - e.g., '01-jan-2022'
-
Save your file and upload it in Admin > Import/Export > Import
NOTE: Always add the header syntax for custom fields in the columns to the right of the ‘Extra Text’ header in your Excel file
To find the custom field ID information, navigate to: Admin > Custom Fields > Styles
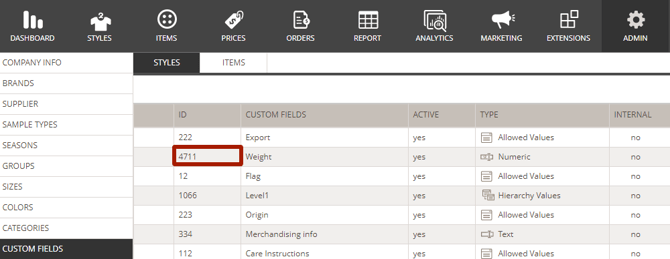
- Double click on the custom field
-
View the available custom field values
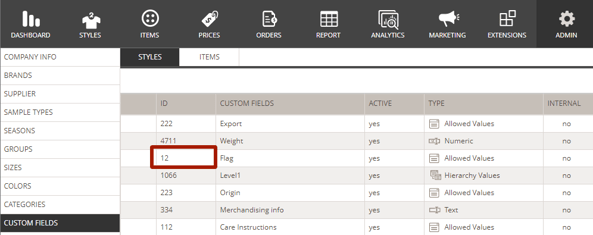

NOTE: We advise that you do not use spaces in any of the IDs because it might cause problems if you have to integrate it with your ERP system
Add price data to the downloaded template file
You can update the price types Currency, Number and Percentage via the import function. When adding or updating prices through the import function, make sure to create all necessary prices in Admin first - read how to create prices in Admin here.
This is an example of how to fill out the Excel template to upload style, custom field and price data:

- Mandatory columns to fill out: Brand, Contact Person, Style Name, Supplier ID, Season (if defined in style header)
- Leave column 'Extra Text' blank
- Add the header syntax 'P:REF' for the price you want to update - e.g., 'P:B' as 'B' is the Ref ID from Admin. See below where to find the price reference ID information.
-
Add the price value under each header - e.g., ‘12’ as price 'B' is a currency price field
-
Save your file and upload it in Admin > Import/Export > Import
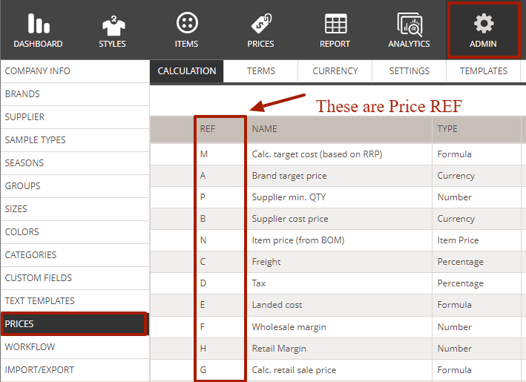
NOTE: It is not possible to update Formula Price fields or Item Prices - they will be ignored in the update.
Updating prices per Style color and size
If you are working with differentiated prices per style color and size, it is possible to update these by using the template called 'Style Price per color and size'.
Navigate to: Admin > Import/Export > Import
- Click the green 'Import' button
- Select import type 'Style Price per color and size'
- Click 'Download Template File'
Follow the guide for style data import above
Import style size data
Navigate to: Admin > Import/Export > Import
- Create all necessary size ranges and size range sizes in Admin - read how to create size ranges in Admin here.
- Click the green 'Import' button
- Select import type 'Styles Sizes'
- Click 'Download Template File'
- Prepare Excel file - read more here
- Click the green 'Import' button
- Select import type 'Styles Sizes'
- Click 'Upload Excel File'
- Choose & upload the prepared Excel file
- Set a check mark next to 'I am aware that import of data can not be undone'
- Click 'Import'
- Check if the size ranges with all necessary size range sizes have been successfully added to your styles
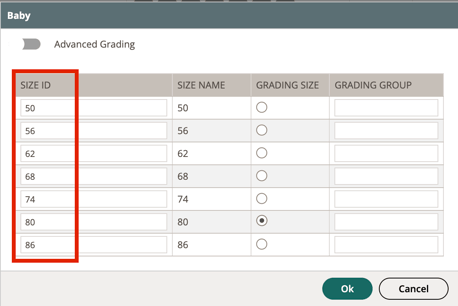
Prepare Excel file to import style size data
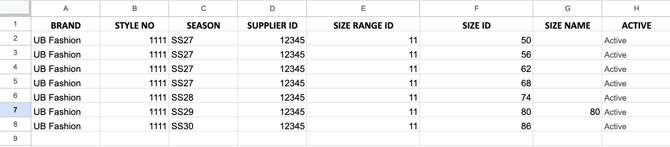
- Fill out column: Brand, Style No, Season, Supplier ID
- Add the size range ID - e.g., '11'
- Fill out one row for each size range size - e.g., '50', '56', '62', '68', '74', '80', '86'
- Under size name fill out the size that should be associated as grading size - e.g., '80'
- In column 'Active' enter 'Active' for every row
- Save your file and upload it in Admin > Import/Export > Import

Import style colour data
Navigate to: Admin > Import/Export > Import
Create all necessary colours in Admin – read how to create colours in Admin here.
-
Click the green ‘Import’ button
-
Select import type ‘Styles Colors’
-
Click ‘Download Template File’
-
Prepare Excel file – read more below
After you have prepared your Excel file, navigate to: Admin > Import/Export > Import
-
Click the green ‘Import’ button
-
Select import type 'Styles Colors'
-
Click 'Upload Excel File'
-
Choose & upload the prepared Excel file
-
Set a check mark next to 'I am aware that import of data cannot be undone'
-
Click 'Import'
-
Check if all colours variants have been successfully added to your styles
Prepare Excel file to import style colour data
This is an example of how to add a colour range with multiple active colour range colours to a style:

-
Fill out column: Brand, Style No, Season, Supplier ID
-
Fill out the color range ID – e.g., '3200' and '1680'
-
Fill out color ID2 - only in case you are using color ID2
-
Fill out one row for each colour variant – e.g., 'Buttercup' and 'Coral'
- In column 'Active' enter 'Active' for every row
-
Save your file and upload it in Admin > Import/Export > Import
Import style custom field per colour data
Create all necessary custom fields in Admin - make sure they are set to 'diff. per color'. Read how to create custom fields in Admin here.Navigate to: Admin > Import/Export > Import
- Click the green 'Import' button
- Select import type 'Style Custom Field Per Color'
- Click 'Download Template File'
- Prepare Excel file - read more here
- Click the green 'Import' button
- Select import type 'Style Custom Field Per Color'
- Click 'Upload Excel File'
- Choose & upload the prepared Excel file
- Set a check mark next to 'I am aware that import of data can not be undone'
- Click 'Import'
- Check if all custom field information has been successfully added to custom fields per color on your styles
Prepare Excel file to import style custom field per colour data

- Fill out column: Brand, Style Name, Style No, Season, Supplier ID, Color ID, (Color ID2 only in case you are using ID2)
- Add the header syntax 'CF:ID' - e.g., 'CF:02' and 'CF:03'. You can read more about how to add custom field data to your import Excel file here.
-
Add custom field values to each row — e.g., ‘description a’ for color 1 for custom field '02', and ‘CAK’ for custom field '03'.
- Set a check mark next to 'I am aware that import of data can not be undone'
- Click 'Import'
- Save your file and upload it in Admin > Import/Export > Import
Import style custom field per size data
Create all necessary custom fields in Admin - make sure they are set to 'diff. per size'.Read how to create Custom Fields in Admin here.
Navigate to: Admin > Import/Export > Import
- Click the green 'Import' button
- Select import type 'Style Custom Field Per Size'
- Click 'Download Template File'
- Prepare Excel file - read more here
- Click the green 'Import' button
- Select import type 'Style Custom Field Per Size'
- Click 'Upload Excel File'
- Choose & upload the prepared Excel file
- Set check mark next to 'I am aware that import of data can not be undone'
- Click 'Import'
- Check if all custom field information has been successfully added to custom fields per size on your styles
Prepare Excel file to import style custom field per size data

- Fill out column: Brand, Style Name, Style No, Season, Supplier ID
- Add the header syntax 'CF:ID' - e.g., 'CF:100' and 'CF:106' You can read more about how to add custom field data to your import Excel file here.
-
Add custom field values to each row — e.g., ‘Amazon’ for size 1 for custom field '100', and ‘Fit-Specific-Style’ for custom field '106'
- Save your file and upload it in Admin > Import/Export > Import
Next steps
Further reading