Introduction & best practice
Size ranges are used to determine the sizes within a product. It can be used to define sample request sizes and create a size chart. If you only have one size, you still need to create a size range to be able to make a sample request.
Table of Contents
- Setting a default unit
- Creating a size range
- Allow half sample
- Use size ID
- Setting a default grading size
- Working with grading groups
- Working with advanced grading (PRO feature)
- Renaming a size range
- Deactivate a size range or delete it
Setting a default unit
It is possible to set up any of the suggested units (centimetres, inches, millimetres) as a default unit when you create size charts.
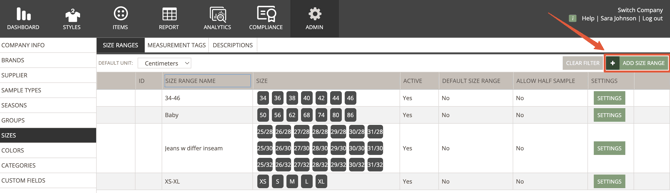
Navigate to: Admin > Sizes > Size Ranges
- Click on the drop-down and select the unit you need - it will be saved once you have selected it and will ONLY influence new size charts
- Decide if you want your measures to be written with decimals or as fractions - fractions are mostly used when working in inches
- Read more about working and setting up inches and fractions here

NOTE: On Style level, the unit can be changed on individual styles.
Creating a size range
Navigate to: Admin > Sizes > Size Ranges
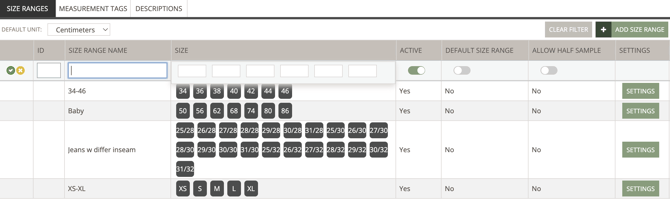
- Click the 'Add size range' button to create a size range
- In the new table row, type in the name of your size range and the respective sizes - extra boxes will appear if you add more than 6 size steps
NOTE: You cannot add or delete size steps to an existing size range at a later stage. Therefore, make sure you include all sizes you need in your size ranges. For example, XS-XL and XS-L are two different size ranges, so both need to be created.
On Style level, it will be possible to inactivate specific sizes within the chosen size range. Therefore, it can be a good idea to consider making larger size ranges, keeping the number of different size ranges to a minimum.
- If you want the new size range to become the default size range, slide the toggle to the right to select - note that you can only have one default size range
- Click the green 'save' icon to save

Allow half sample
If you are working with products that come in pairs, you might have the need to order only a half pair in your sample requests. To do this, you need to activate the half sample functionality directly on the size range.
Navigate to: Admin > Sizes > Size Ranges
- Toggle the slider to the right to activate for the given size range

Use size ID
Once you have saved your size range, you can add size IDs to every size in the size range.
Navigate to: Admin > Sizes > Size Ranges
- Click on the green 'Settings' button to the right of the size range

- This will show you a pop-up with all the sizes in this size range
- Add the ID for each size
- Once you are done, click on the 'OK' button to save your changes

Setting a default grading size
Once you have saved a size range, you can define a default grading size - this can also be done for already existing size ranges.
Navigate to: Admin > Sizes > Size Ranges
- Click on the green 'Settings' button
- Select the size you need to be the default grading size
- Click on 'OK'

Working with grading groups
You can set up grading groups for each size range.
Navigate to: Admin > Sizes > Size Ranges
- Click on the green 'Settings' button
- Select the size for which you want to set up grading groups
-
Add a group name in the grading group field

- Start typing
- If the name you are typing has already been created, it will appear on a drop-down list
- If the name has not been created yet, you will see 'Add.....' - Finish typing or click on the displayed suggestion from the drop-down
- The new group name will be added to the list and can be used for other sizes in that size range - only those values that you end up using in a grading group will be present in the drop-down list
- You can at any time edit the grading groups

NOTE: The values in the drop-down list are size range specific and will not be available in other size ranges.
See how you work with grading groups on Style level
Working with advanced grading (PRO feature)
With Advanced Grading, you can set up complex grading relationships instead of just using linear grading. This can be a help for you if you work with products that have multiple sizes in the same size.
NOTE: There are some basic rules you need to keep in mind:
- If a size range is already used, it is not possible to activate Advanced Grading
- If a size range is already used and the Advanced Grading is activated, it is not possible to turn off the Advanced Grading
Activate advanced grading
Navigate to: Admin > Sizes > Size Ranges
- Click on the green 'Settings' button
- When you open the 'Settings' pop-up, you can activate the Advanced Gradings by sliding the toggle to the right
- You will now get the extra options that belong to the Advanced Grading

Grade relation
With Grade Relation, you can define how the single sizes should relate to each other.
Navigate to: Admin > Sizes > Size Ranges
- Click on the green 'Settings' button
- Start by defining the grading size - you will notice that both grading relation and grading sign automatically adjust to the grading size

- Now you can build your relationships between the single gradings
- In the 'Grading Relation' column, you can set relations between sizes
- If you change the grading size after you have set the grading relation, the grading relation will be cleared for the size you chose as new grading size
NOTE: When dealing with trousers of varying inseam lengths, it is generally recommended to grade within the waist sizes. This approach allows you to focus solely on adjusting the inseam measurement for each inseam size.

NOTE: Be careful that you do not set up circular relationships. The system will warn you if you try to save.
Grading sign
Grading Sign is the second part of how sizes can be related to each other.
Navigate to: Admin > Sizes > Size Ranges
- Click on the green 'Settings' button
- Default sizes that are lower than the Grading Size will be 'minus', and bigger than the grading size will be 'plus'
- You can change that so that the grading sign fits with the grading relation, and you get the right relation between sizes

Renaming a size range
Navigate to: Admin > Sizes > Size Ranges
- When in edit mode, type in the new name
- Click the green 'save' icon to save your changes

Deactivate a size range or delete it
You can deactivate a size range if you no longer need it, and it won't affect existing styles.
Navigate to: Admin > Sizes > Size Ranges
- Select the size range you want to deactivate and slide the toggle to the left in the column 'ACTIVE'
- Remember to save your changes

- If a size range is not in use anywhere, you can delete it
- Hover over the size range in question and click on the 'delete' icon
- Confirm that you want to delete it

Integration with your ERP
When working with an automatic integration to other systems, such as your ERP, there are a few key considerations to keep in mind:
- Depending on how your integration is configured, the ERP may connect directly with your Size Range IDs. This means it will create all sizes within the specified size range, regardless of whether the sizes are active or inactive at the style level
- If the integration considers the activation status of sizes at the style level, ensure that your Size IDs match the size naming used in your ERP

Next steps
Inches and Fractions - Admin Setup
Grading groups - Working with Styles
Point of Measure - Admin Setup