Introduction
When a brand/customer sends you a supply chain mapping request, you will receive an email notification and find the request waiting in your Supplier Portal.
The mapping request has two stages: first you confirm which processes you perform, then you map the facilities involved in each process. This guide covers both stages.
Table of contents
- Before you start
- Finding your mapping requests
- Stage 1 — Reviewing and confirming processes
- Stage 2 — Mapping facilities to processes and add product certificates
- Submitting for brand approval
- Requests needing review
- Request statuses explained
Before you start
- Make sure you are logged in to your Supplier Portal account (read more here)
- Check that your facilities and subsuppliers are already set up in your portal — you will need these when completing facility mapping in Stage 2 (read more here)
- Have an overview of which processes your organisation performs for the styles and items included in the request
- Have your facility and product certificates uploaded to the relevant facilities
Before a certificate can be used in a mapping, it needs to live on the facility it belongs to. You upload and manage both facility and product certificates per facility in the Subsupplier Library. For help, see Managing facility and product certificates.
Once uploaded to a facility, you can reuse the same certificate across every mapping request and every brand you work with.
Finding your mapping requests
You will receive an email notification when a brand sends you a mapping request. The email goes directly to the contact person the brand selected when creating the request.
To access the request:
- Log in to your Supplier Portal
- Navigate to Supply Chain Mapping
- Use the Column Selector and Filter to easily find the correct request
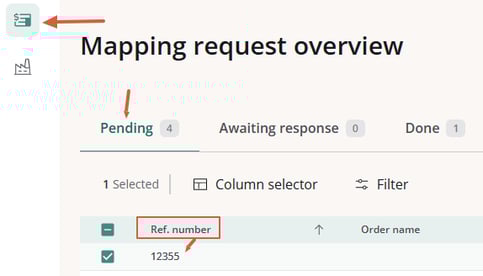
- Open the request from the Pending requests list by clicking on the "Ref. number"
- NOTE: The request shows the brand name, the styles/items included, and the process categories the brand has selected.
Stage 1 — Reviewing and confirming processes
-
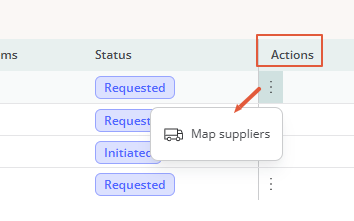
Navigate to the Action column and click on the three dots to get to the action: "Map Suppliers":
-
You now get this view:
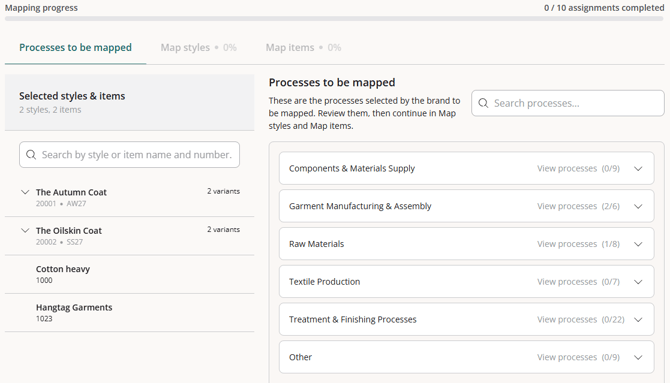
The brand has selected one or more process categories that they want mapped. Your task is to review each category and identify which specific processes you actually perform.
a. Understanding the process categories
Processes are grouped into 6 categories:
| Category | What it covers |
|---|---|
| Garment Manufacturing & Assembly | Core assembly processes such as cutting, sewing, and quality inspection |
| Treatment & Finishing Processes | Post-production treatments such as washing, dyeing, and printing |
| Textile Production | Fabric and yarn production, including weaving and knitting |
| Components and Materials Supply | Supply of trims, buttons, zips, labels, and similar inputs |
| Raw Materials | Upstream material processing such as cotton ginning or leather tanning |
| Other | Any processes that fall outside the categories above |
b. Selecting your processes
For each category, the brand has requested:
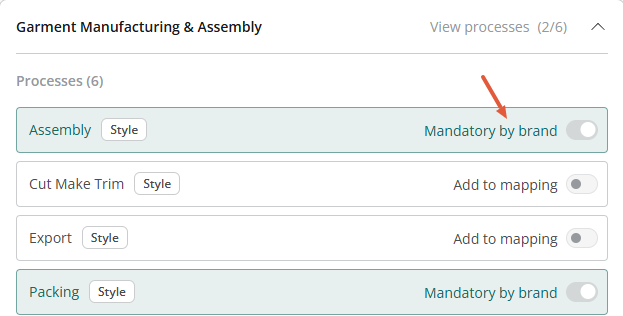
- Click to expand the category and view the individual processes requested within it
- Select the checkbox next to each process you perform
- Use 'Select All' to select every process in a category if applicable
- A counter shows 'X / Y selected' so you can track your progress per category
TIP: Only select the processes you genuinely perform for these styles or items. Accurate selection leads to better supply chain data for both you and your brand customer.
c. Mandatory processes
Some processes may be marked as Mandatory by the brand. These are pre-selected and cannot be deselected — they will always be included in the mapping.
Mandatory processes are clearly indicated in the interface.
d. Confirming your selection
Once you have reviewed all categories and selected your processes, click 'Confirm processes'.
This moves the request to Initiated status and signals to the brand that you are ready to begin facility mapping.
NOTE: After confirming, processes can no longer be changed unless the brand puts the request On Hold.
Stage 2 — Mapping facilities to processes and add product certificates
With processes confirmed, the next step is to map the specific facilities involved in each process and add the respective product certificates. This is where you link your subsuppliers and facility locations, and their belonging certificates, to the individual processes you perform.
Make sure your facilities and belonging certificates are set up before completing this stage — read more in the Subsupplier management, Facilities & Processes article.
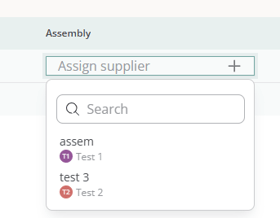
The options available for each process depend on what you have in your subsupplier library.
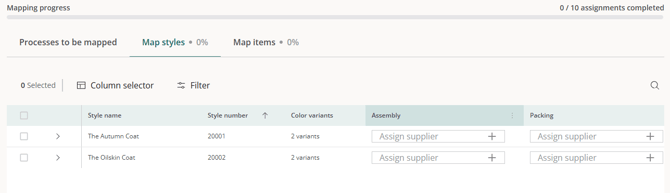
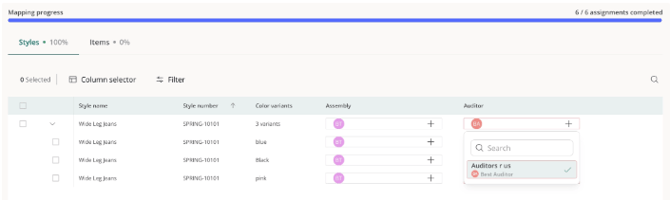
The grid is laid out as style variants down the side, process steps across the top. Style rows are collapsible parent rows; each variant sits as a child row beneath its style. Every variant-and-process cell sits at the meeting point of one variant, one process, and the facility you assigned in previous steps.
- Click a cell to assign a facility — you can select multiple facilities if relevant
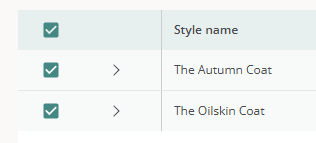
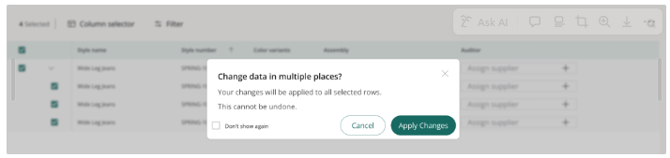
- Use the checkboxes to update multiple rows in bulk
- The progress bar on the top shows how many mappings you still have to complete:

Adding product certificates
After mapping your Styles and Items, the next step is to add the relevant product certificates. Here is what you need to know before getting started:
- A cell with a facility assigned shows an 'Add product certificate' action. Select it to open a dropdown of the product certificates available on that facility.
- If the dropdown is empty, it means no certificates have been linked to these facilities yet. You can easily add them in your Subsupplier Management.
- You can add more than one product certificate to a cell.
- A cell with no facility assigned shows 'No supplier assigned' and stays disabled. Assign a facility in the previous steps (mapping Styles and Items) first, then come back.
- Expired certificates don't appear in the dropdown, so you can only pick certificates that are currently valid.
- If you change the facility on a mapping after adding certificates, that cell is cleared and you will need to add the certificates again.
When a style row is collapsed, it shows a roll-up of which product certificates have been added across its variants for each process, so you can scan progress quickly.
Note: This step is exclusively for mapping product certificates. Facility certificates are excluded here and will be handled automatically in the next step, allowing you to focus solely on the product certificates you add manually.
Certificate expiry alerts
When adding product certificates during the mapping, a warning banner will appear at the top if a facility's certificate expires within 90 days, or if its validity ends before the requested shipment date (ETD). This is simply a reminder to renew in time; you can still complete the mapping process.
Once the certificates are added, your company admins get an email when a certificate is about to expire (90 days before, by default) and again if it expires. The alert links straight to the certificate so it is easy to upload a renewal and keep your coverage up to date.
Review certificates
In the next step, you can review all product and facility certificates in one place before submitting.
- Facility Certificates: These are filled in automatically, pulled from the facilities you assigned while mapping your Styles and Items. They cannot be edited here and are displayed as certificate tags for each variant.
- Product Certificates: These are the certificates you manually added in the previous step, also displayed as tags per variant. Any ETD-based warnings from the previous step will remain visible here as a reminder.
Take a moment to review everything. You can go back to make adjustments if needed, or click 'Submit' once you are ready.
Note: You cannot submit a mapping that contains expired certificates. If an expired certificate is detected, the submission will be blocked. This applies to both new mappings (Initiated) and revised mappings (Needs review).
To proceed, please remove the expired certificate or replace it with a valid one. Please note that it is possible to leave certificate cells empty if it is not required for that specific cell.
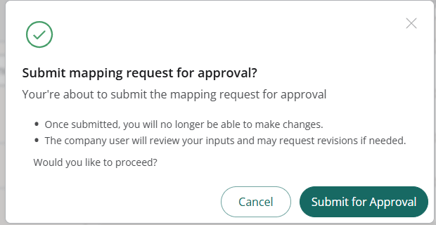
Submitting for brand approval
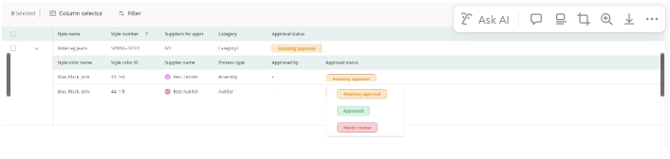
When you have mapped all processes to their facilities and added all belonging certificates, click 'Submit for approval'. The request moves to 'Awaiting Approval' status and the brand is notified to review your mapping.
If the brand identifies anything that needs adjustment, they will return the request to you with a 'Needs Review' status.
Requests Needing Review
If the brand marks one or more mappings as “Needs review” the request moves back to the Pending tab.
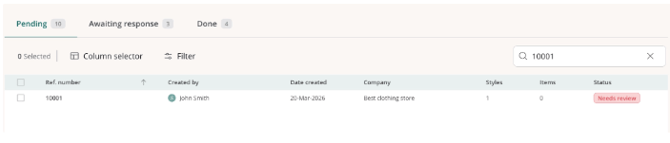
On the mapping request, the mappings marked for review will appear outlined in red.
Correct the mapping and then resubmit to the brand.
Request statuses explained
| Status | What it means | Your available actions |
|---|---|---|
| Requested | Brand has sent the request. Awaiting your process confirmation. | Map Style and Item Suppliers and Certificates |
| Initiated | You have confirmed your processes. Product and Facility mapping, including adding certficiates, can now proceed. | Map Suppliers and Certificates |
| On Hold | Brand has paused the request. No action required from you. | — |
| Awaiting Approval | You have submitted your completed mapping to the brand. | — |
| Needs Review | Brand has flagged specific mappings for you to revisit. | Check and remap Suppliers and Certificates |
| Approved | Brand has approved the full mapping. | — |