In the confirmed state, you will be able to edit:
Information & Best practice
Use the Dashboard section to get a great overview of all your Sample Requests. Simply go to the 'Sample request' sub-tab and you will instantly see a matrix with all your sample requests. You can then browse through the different sample states (Planned, Requested, Confirmed, Sent, Received, and Commented) and follow your samples process.
Not only can you overview your samples in the Dashboard, but you can also update the states and add ETD, tracking number and notes through this section, either one-by-one or through batch actions.
Tabel of Content
Which samples are displayed?
All styles where you are the contact person will appear on your Dashboard > Sample requests - if there are any sample requests on the style. If you are not the contact person, follow the style using the heart icon and it will also appear in the Dashboard.
On the Sample Request Dashboard remember that you can choose to see all Sample Requests or only those from a specific contact person.
Just select the needed option in the drop-down in the top right corner.

Sample Requests States
In the Dashboard section, under the Sample request sub-tab, you will be able to see the sample requests divided into the different states.
To learn more about the different states, click here.

By clicking on each state in the process line, you will find all sample request that matches your selection in the 'WHO' drop-down, of the given state.
Depending on which state you are looking at, you will find different option to edit.
Below is explained the possibilities for each state.
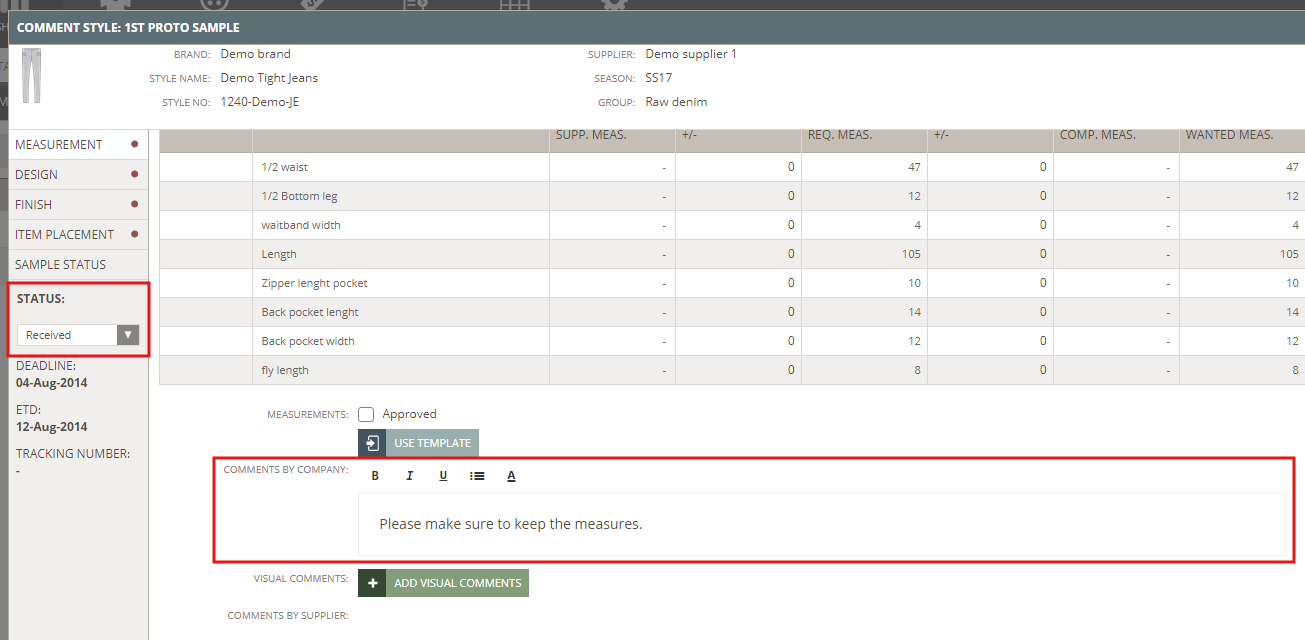
NOTE: In all states - except Commented - it will be possible to edit the Note.
In the Commented state it can only be read.
Suppliers can only read the Note - in all states.
PLANNED
Planned sample requests will appear in the first state of the dashboard.

In the planned state, you will be able to edit:
- Color/size: Simply click on the box showing the amount, and edit the amount per size or color.
- Deadline: Adjust the deadline
NOTE: The deadline will display in RED if it is overdue.
- Change the state to 'Requested': Simply click on the 'Request' button.
After clicking 'Request', the normal sample request box will appear and you can write a note to your supplier(s).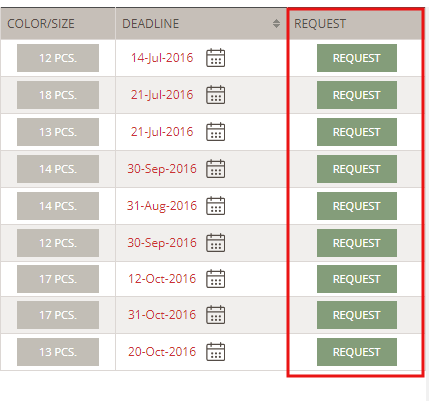
REQUESTED
Your sample request will now appear in the Requested state.
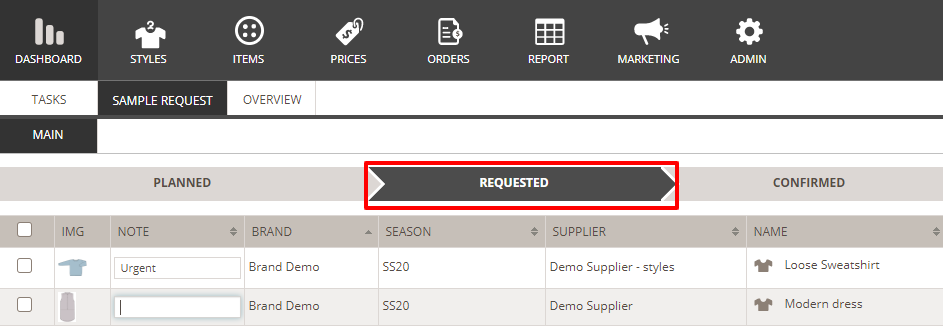
In the requested state, you will be able to edit:
- Color/size: Simply click on the box showing the amount, and edit the amount per size or color.
- Deadline: Adjust the deadline
- Change state to 'Confirmed': Click on the 'Confirm' button.
- ETD date: Add the ETD (Estimated time of Delivery) in the pop-up window.
NOTE: It is expected that the supplier is making the steps of confirming the sample request and adding the ETD. Make sure that you agree on this process with your supplier.
CONFIRMED
When the supplier has confirmed the sample request, it will appear under the Confirmed state.
NOTE: If the supplier cannot reach the requested deadline, the ETD will be displayed in red.
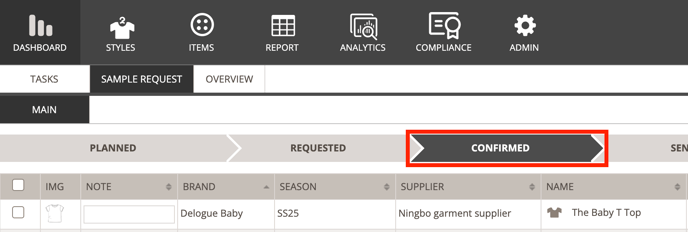
In the confirmed state, you will be able to edit:
- Color/size: Simply click on the box showing the amount, and edit the amount per size or color.
- Deadline: Adjust the deadline
- Adjust the ETD: in case you can't wait until the date your supplier has suggested. Remember to inform your supplier that the requested ETD has changed in the Communication tab of the style.
- Change state to 'Sent': Once the sample has been sent, click the 'Send' button
- Tracking number: Add tracking number in the pop-up window.
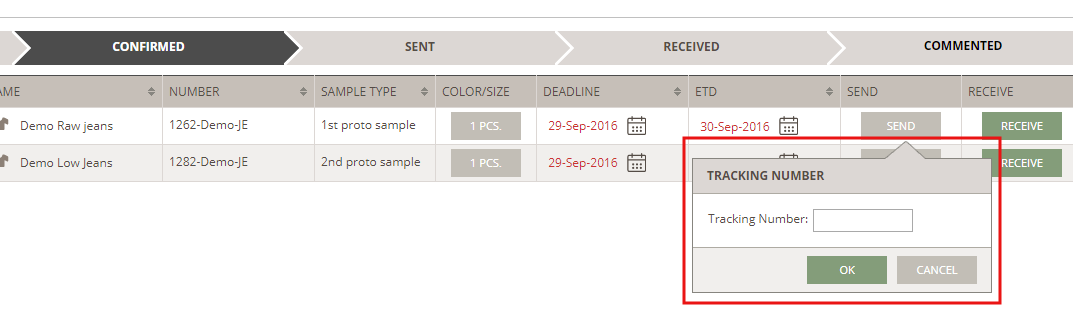
NOTE: It is expected that the supplier is changing the state to 'Sent' and adding the tracking number. If your supplier has forgotten to move the sample request to sent state and you have received the sample, simply click the 'Receive' button to move the sample to the received state.
SENT
When the supplier has registered the sample as sent, it will appear under the Sent state.
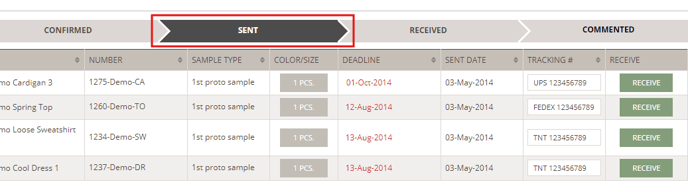
In the sent state, you will be able to edit:
- Color/size: Simply click on the box showing the amount, and edit the amount per size or color.
NOTE: In case your supplier has only sent parts of the requested sample amount, you should correct the amount before receiving the the sample in the system.
If you expect to receive the remaining pieces at a later point, we recommend to create a new sample request with the remaining amount, to be able to track on this shipment on its own.
- Change state to received: Click the 'Receive' button when you have received the sample from the Supplier
RECEIVED
When you have received the sample, it will appear under the received state.
NOTE: Only 'received' Sample Requests from the last 90 days will be displayed in this overview.
In the received state, you will be able to:
- Comment on your sample: Click the green 'Comment' button to comment on the specific sample request.
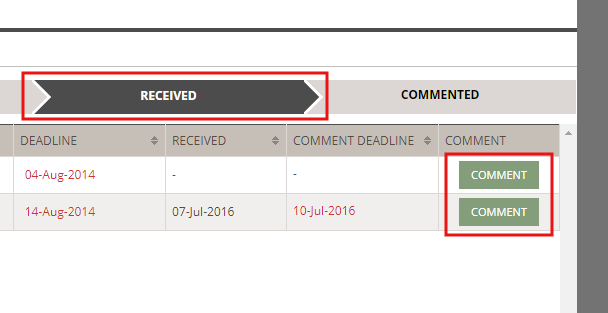
- A pop-up window will appear where you can add your comments. Learn more here.
If this information should be invisible to the supplier, just keep the sample state as 'Received'. Change it when you are ready to send comments to the supplier.
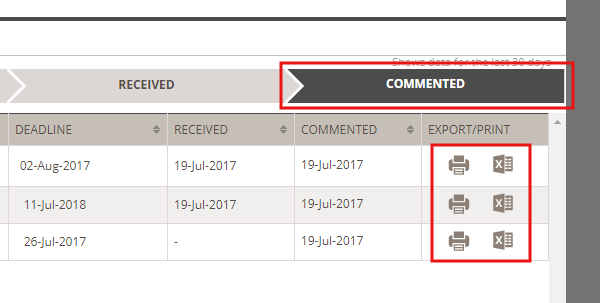
COMMENTED
Commented sample requests will be displayed in the last state - the 'Commented' state. Here, you are able to both export and print the sample request comments by clicking the respective icons.
NOTE: Only Commented Sample Requests from the last 90 days will be displayed.

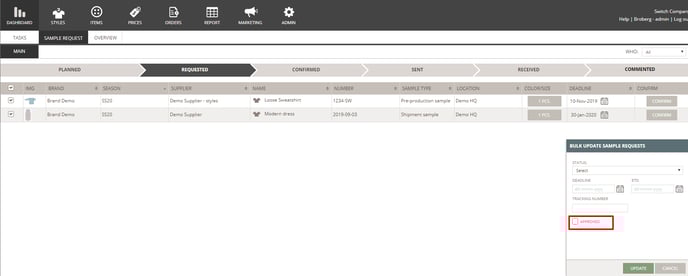
Update your Sample Requests in batches
When you work with your Sample Requests via the Dashboard you can Bulk update some of the values.
Per state of the Sample Request you can select one or more sample requests and update values such as, status, deadline, ETD, tracking number, note or approve the entire sample request.
Step-by-step
- Set a check-mark on those Sample Requests you want to update.
That will make a pop-up window appear with the values you can update for Sample Requests in this state. - Once you have set the new value - remember to click on "Update"
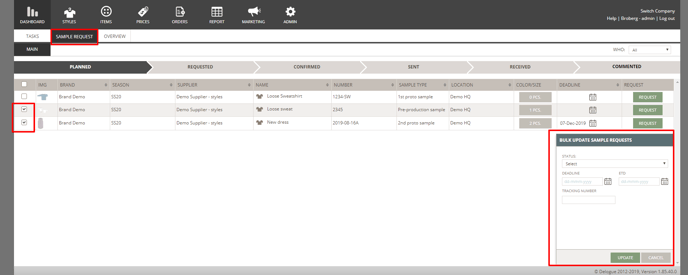
- For all states it is possible to change the state of the Sample Requests - the example here is for Sample Requests that are in Planned state.
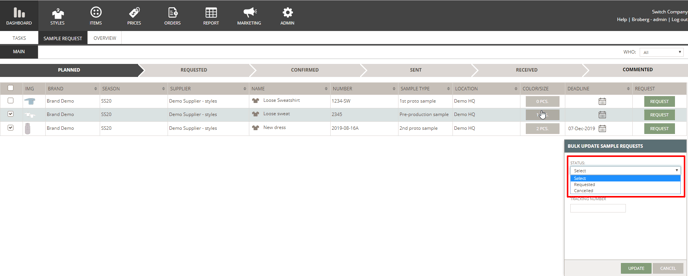
- For all Sample Request - except those that are in Planned state - you can also Bulk update the approved field. This will set the entire Sample Request to Approved.
Just set a check-mark in the Approved check-box and click on 'Update'.