Introduction & best practice
EPR stands for Extended Producer Responsibility, and in short, it means that brands are now being held accountable for what they place on the European market, not just during production and sale, but all the way through to when it is thrown out.
Our recommendation for managing EPR data in Delogue is to work season by season. By ensuring that your packaging and tagging items are consistently detailed and always added to your styles, you will have the primary packaging data readily available in the platform, making future reporting much easier and more accurate.
Table of contents
Before you start
You might wonder why EPR data belongs in your PLM and not your ERP. The answer? During your product development your packaging materials are chosen. This is where you still have it in your hands, you are making decisions about what to use and what it is made of. When you capture that data here, while it is fresh and accurate, your ERP can later pull the quantities needed to calculate your impact. No backtracking. No guessing.
Example of tagging items
Item creation
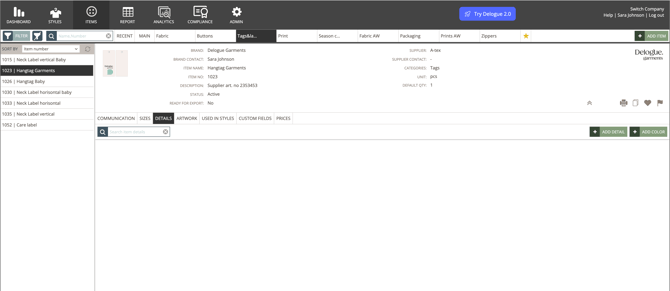
Firstly, create all tags and labels you are using as an item in Delogue.
Navigate to: Items
- Click the 'Add Item' button
- Fill out the item header information:
- Choose the relevant brand
- Select a brand contact
- Type an item name, e.g. 'Hangtag Garments'
- Type an item number
- Optionally type a description, e.g. the supplier article number
- Select a supplier - this has to be the supplier you are communicating with, read more about the item supplier choice below
- Select the suitable category of the item, e.g. 'Tags'
- Select the unit the consumption of the item will be measured - e.g. 'pcs' as you count tags in pieces
- Optionally add the default quantity, e.g. '1'
- Upload an image to your item header - supported formats are: .jpg, .png, .gif, .bmp
- Click on the green 'save' icon to create the item
Adding item specification
Secondly, add the item specification under the subtabs 'Sizes', 'Details' and 'Artwork'.
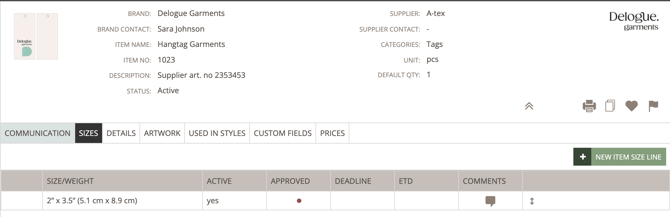
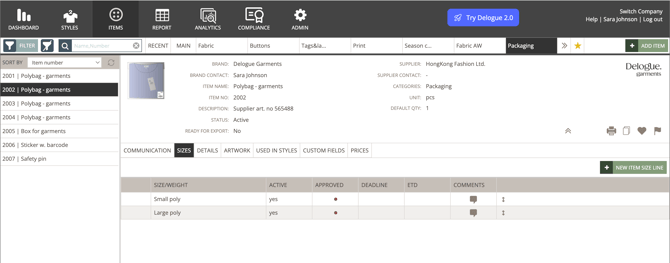
Adding sizes
Navigate to: Items
- Choose the item you created before from your list of items
- Click the 'Sizes' subtab
- Click the green 'New Item Size Line' button
- Type the size name, e.g. '2” x 3.5” (5.1 cm x 8.9 cm)' - we recommend creating one item per item size for better transparency and tracking purposes, the item weight has to be filled out in the item quality card under the Details subtab
- Click on the green 'save' icon to finish
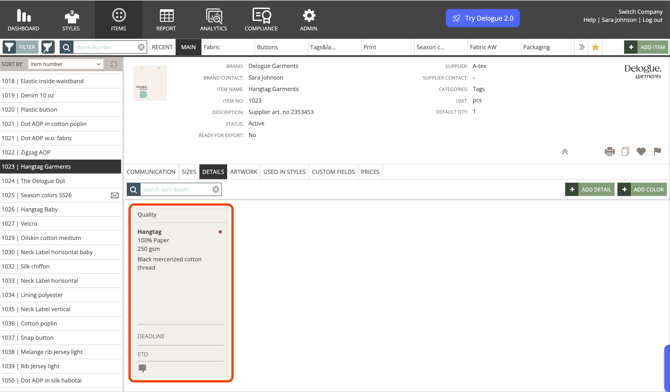
Adding quality details
Navigate to: Items
- Choose the item you created before from your list of items
- Click the 'Details' subtab
- Click the green 'Add Detail' button to add an item quality card
- Optionally write a description, which will be visible as bold text under column 'Quality' in the style item list - see image below
- Type the quality percentage as a number, e.g. '100'
- Select the item material, e.g. 'Paper'
- Type the item weight as a number, e.g. '250'
- Select the item weight unit, e.g. 'gsm'
- Optionally, add any additional quality information, e.g. a note for the supplier which thread should be used on the hangtag
- Click the green 'save' icon to finish
This is an example showing how the added information is displayed on the 'Item Quality Card'.
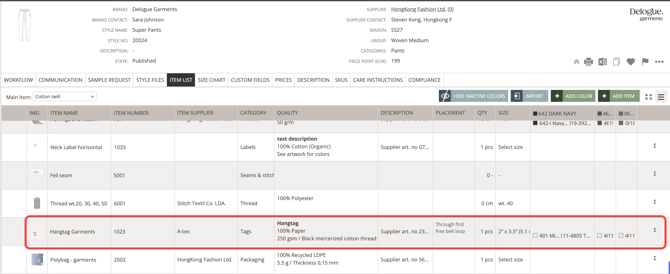
This is an example showing how the item information is displayed on the style item list on the style page.
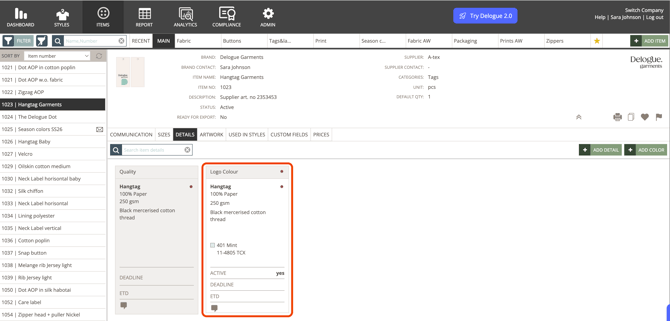
Adding colour details
Navigate to: Items
- Choose the item you created before from your list of items
- Click the 'Details' subtab
- Click the green 'Add Color' button to add an item colour card
- Optionally write a combo name, which can be used as a colour headline, e.g. 'Logo Colour'
- Type the colour name in the library color field, press enter and select the item colour suggested from your library
- Click the green 'save' icon to finish
This is an example showing how the added information is displayed on the 'Item Colour Card'.
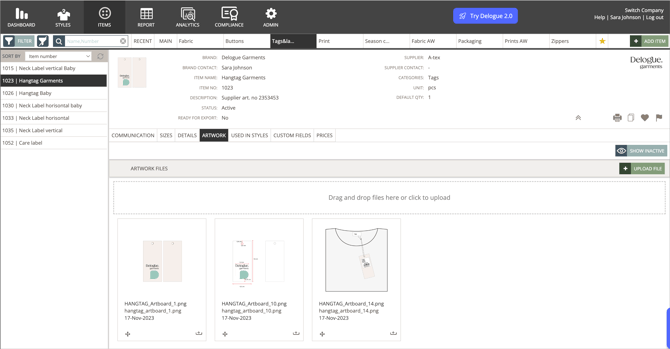
Adding item artworks
Upload any relevant files as an item artwork, which can be a reference for you and your supplier.
Navigate to: Items
- Choose the item you created before from your list of items
- Click the 'Artwork' subtab
- Upload files, the system has 3 default folders:
- Artwork files (visible for both brand users and supplier users)
- Communication files (visible for both brand users and supplier users, any files sent in a message in the communication subtab will automatically be added to this folder)
- Internal files (visible only for brand users)
- Click on the button 'Upload File' or use the 'drag and drop' to upload your files
Example of packaging items
Firstly, create all packing components you are using as an item in Delogue.
Item creation
Navigate to: Items
- Click the 'Add Item' button
- Fill out the item header information:
- Choose the relevant brand
- Select a brand contact
- Type an item name, e.g. 'Polybag - garments'
- Type an item number
- Optionally type a description, e.g. the supplier article number
- Select a supplier - this has to be the supplier you are communicating with, read more about the item supplier choice below
- Select the suitable category of the item, e.g. 'Packaging'
- Select the unit the consumption of the item will be measured - e.g. 'pcs' as you count polybags in pieces
- Optionally add the default quantity, e.g. '1'
- Upload an image to your item header - supported formats are: .jpg, .png, .gif, .bmp.
- Click on the green 'save' icon to create the item
Adding item specification
Secondly, add the item specification under the subtabs 'Sizes', 'Details' and 'Artwork'.
Adding sizes
Navigate to: Items
- Choose the item you created before from your list of items
- Click the 'Sizes' subtab
- Click the green 'New Item Size Line' button
- Type the size name, e.g. 'Small poly' - we recommend creating one item per item size if items differ in their weight for better transparency and tracking purposes
- Click on the green 'save' icon to finish
Adding quality details
Navigate to: Items
- Choose the item you created before from your list of items
- Click the 'Details' subtab
- Click the green 'Add Detail' button to add an item quality card
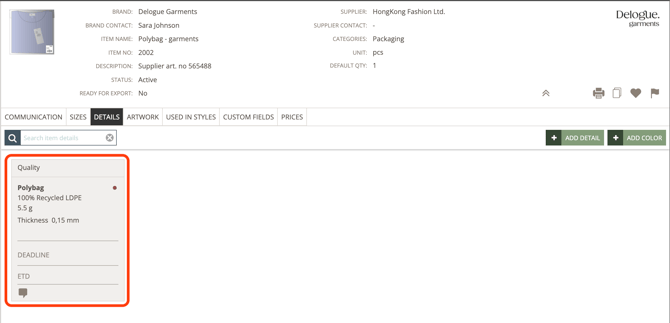
- Optionally write a description, which will be visible as bold text under column 'Quality' in the style item list - see below image
- Type the quality percentage as a number, e.g. '100'
- Select the item material, e.g. 'Recycled LDPE'
- Type the item weight as a number, e.g. '5.5'
- Select the item weight unit, e.g. 'g'
- Optionally, add any additional quality information, e.g. information on the thickness of the polybag
- Click the green 'save' icon to finish
This is an example showing how the added information is displayed on the 'Item Quality Card'.
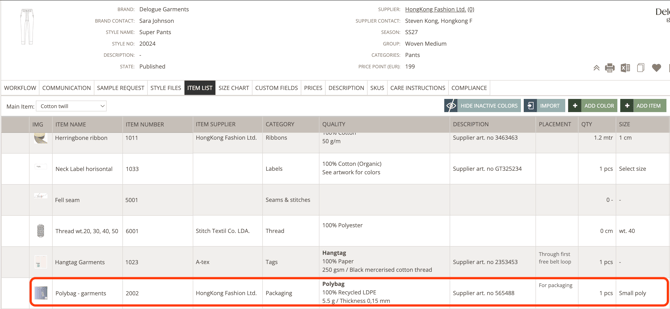
This is an example showing how the item information is displayed on the style item list on the style page.
Adding item artworks
Upload any relevant files as an item artwork, that can be a reference for you and your supplier.
Navigate to: Items
- Choose the item you created before from your list of items
- Click the 'Artwork' subtab
- Upload files, the system has 3 default folders:
- Artwork files (visible for both brand users and supplier users)
- Communication files (visible for both brand users and supplier users, any files send in a message in the communication subtab will automatically be added to this folder)
- Internal files (visible only for brand users)
- Click on the button 'Upload File' or use the 'drag and drop' to upload your files
This is an example showing files uploaded as item artworks.
Adding items to the style item list
Lastly, after you have created your relevant packaging and tagging items, you add the newly created items to all the style item lists they are used on. Once you have created the items, you can use them over and over again, meaning it will save time and will be easy to keep track of which items have been used for which style.
Navigate to: Styles
- Choose the relevant style for your list of styles
- Click the Item List subtab
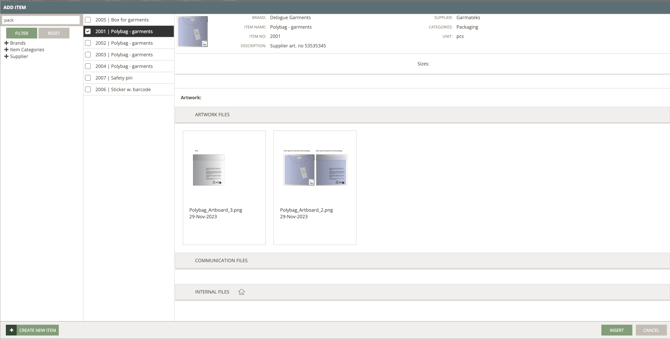
- Click 'Add Item'
- Start typing the item name and press enter, or use the filter to find the right item
- Set a checkmark next to the item you want to add to the item list
- Click 'Insert' to confirm
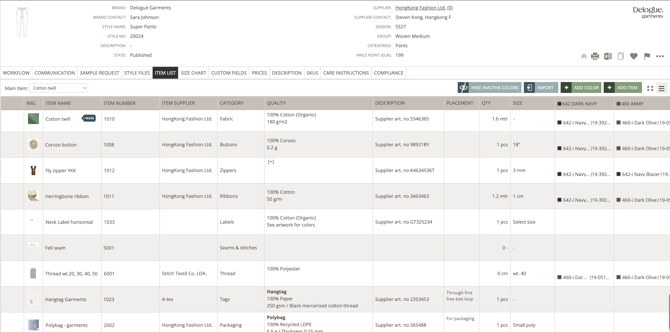
- Type placement information if needed
- Define the item quantity
- Choose an item size if relevant
- Click the field under each colour variant column to define an item colour
Item supplier
We recommend leaving the supplier field empty until you know for sure which supplier you are communicating with about the specific item.
If you have communication with the nominated trimming supplier, then we recommend adding this supplier information to the item, to be able to keep the communication within Delogue.
If it is your assembly supplier who will be communicating with the nominated trimming supplier, then we recommend adding the assembly supplier as the item supplier - to handle all needed communication within Delogue. In addition, the nominated trimming supplier can be added in a custom field for transparency purposes.
Next steps
Create an item list and import item list
Add item colours in the style item list