Introduction & best practice
With the Custom Export, you can set up all the web services exports your company needs in one place. This will make any integration to Delogue easier for you and your users. With an Custom Export setup, it is possible to send different parts of the Delogue data set to various integration partners, such as, e.g., ERP, PIM, and webshop providers. Our web services are REST APIs, and the data format is JSON.
For each custom export setup, the, e.g., ERP provider needs an API key to call our web services. The API key is unique per Custom Export, so the programmers calling our web service can only access the data the administrator has specified in the Custom Export setup.
INFO: Update May 2026
Our Open API is officially expanding. We've added new endpoints to supplement our existing core features, making it easier than ever to build with us.
Please find the data on all new API endpoints here.
Exporting data from Delogue can be done in 3 different ways:
- To export data from Delogue you can call our web service with a style number and get all relevant data for styles with that style number.
- It is also possible for you to create a webhook that can be called with a style number from Delogue by clicking the button 'Push Style Data'.
- Finally, you can also call a Delogue web service with a timestamp and get a list of style numbers that have been changed since that timestamp.
Table of contents
Before you start
1) Make sure the 'Company Admin' and 'Import/Export' roles are assigned to you as a user. To learn more about assigning different roles to a user, click here.
2) To use the Custom Export on the Style level you need to be assigned to the 'Integrator' role.
Create a custom export
Navigate to: Admin > Import/Export
- Choose the header 'Custom Export'
- Click the 'Add Custom Export' button - a new row appears
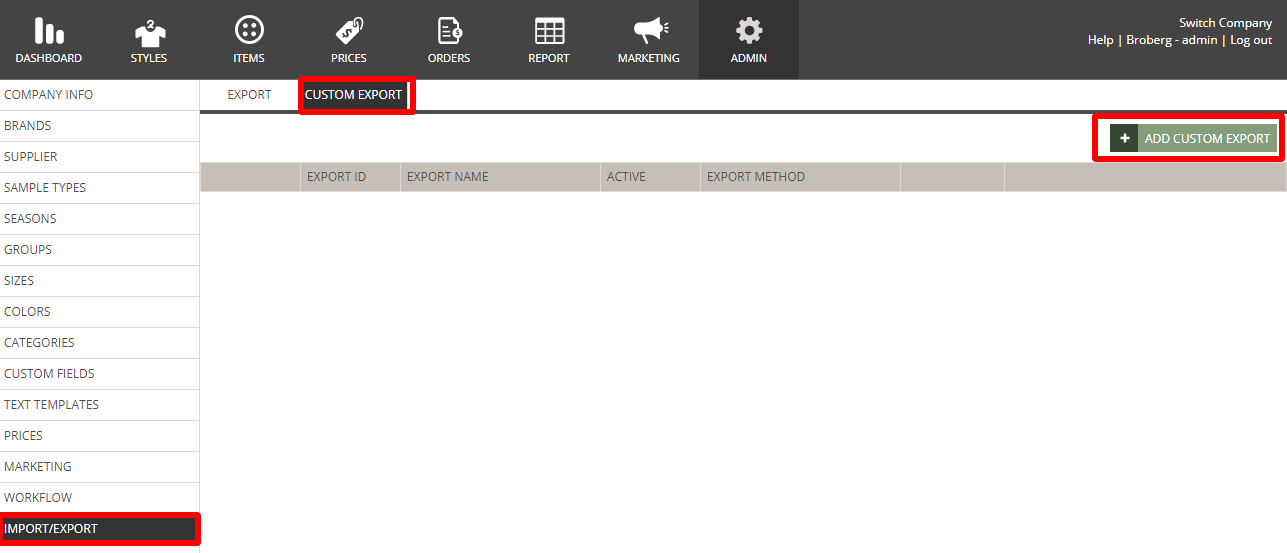
- Type a name for your Custom Export
- Set to 'active' or 'inacitve'
- The ID will be automatically generated by the system
- Choose the export method

Export methods
Webservice
To choose webservice as export method, follow the steps below:
- Choose 'Webservice' from the drop-down
- Click on the green 'save' button
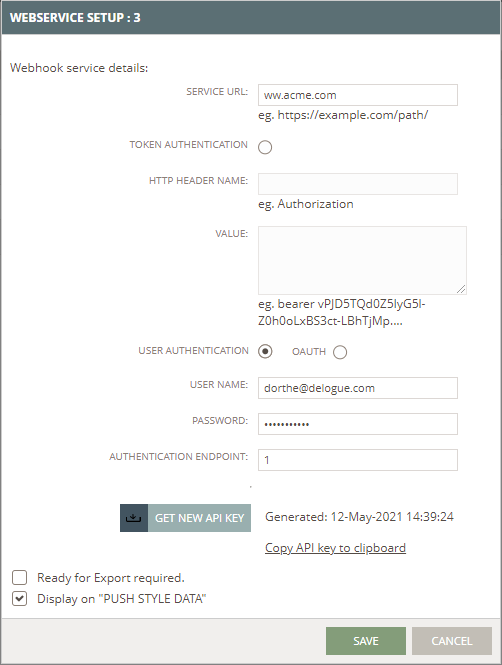
Now you can set up the webservice credentials:
- Click on the green 'Setup' button

- In the pop-up window you type the credentials for your service URL

- For more information read the full technical guide
Export data from Delogue

FTP
To choose FTP as export method, follow the steps below:
- Choose 'FTP' from the drop-down
- Click on the green 'save' button
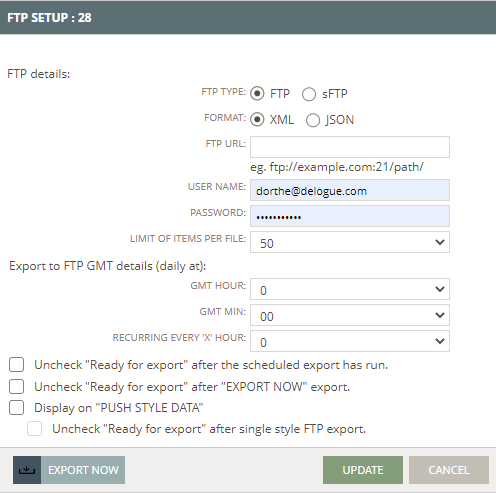
Now you can set up the FTP credentials:
- Click on the green 'Setup' button

- For more information read the full technical guide
Export data from Delogue
Custom export output
After setting up the custom export you can decide which data fields should be included in the custom export output.
- Click 'Show more'

For each section, there are different data options you can select or de-select so that your custom export includes the right information. You can choose from these sections:
- Basic Style data
- Style Files
- Item list - if Items are selected as option, you can also select between your item custom fields
- Measurement chart
- SKU / Barcodes
- Custom Fields
- Prices
- Care Instructions Output - find more information about the setup here

- Select the data fields you want to receive in your custom export output
- Click the green 'save' button to save your changes
- Now the custom export can be used on the Style level - read more about it here
Manual push
For the existing custom export (FTP and webservice), you can set up the option for a manual data push. The manual push will send one style number at a time.
Navigate to: Admin > Import/Export
- Choose the header 'Custom Export'
- Click on the green 'Manual Push' button

- In the pop-up select brands or seasons to be exported - if the user does not select any all will be selected

- Uncheck 'Ready for export' after the scheduled export has run (unchecked by default)
- Only include styles marked 'Ready for export'
- It will always default have the same setting as the integration data mapping setup (if that was checked this one is checked)
- with tooltip: 'Mandatory fields are only checked when a Style is set to ready for export'
The setting 'Only include styles marked 'Ready for export'' has to be the same setting shown in the setup, so if the user changes this in the e.g. setup, it will show the same setting here and vice versa. When this is changed a warning notice should be sent to the user saying that it will also change in the setup.
For the webservice export method the button to manual push will be greyed out if there is no webhook. If the user clicks it anyway they receive a warning: 'Not possible to do a manual push because there is no webhook set up'
The option 'Only include styles marked 'Ready for export'' will not be available for the webservice export.

Extra settings
For both, webservice and FTP, there are some extra settings:
Webservice
Navigate to: Admin > Import/Export
- Choose the header 'Custom Export'
- Click the green 'Setup' button of the specific custom export
- Ready for Export required - you can't make the export without styles set to 'Ready for Export'
- Display on 'Push Style Data' - when checked you will get this option on your push data option on Style level
For all other settings in the pop-up please check the full technical guide
FTP
Navigate to: Admin > Import/Export
- Choose the header 'Custom Export'
- Click the green 'Setup' button of the specific custom export
The extra settings in the pop-up window:
- Uncheck 'Ready for export' after the scheduled export has run - 'Ready for export' will automatically be inactivated for all selected styles after each scheduled export
- Uncheck 'Ready for export' after 'Export now' export - 'Ready for export' will automatically be inactivated for all selected styles after you have clicked on 'Export now'
- Display on 'Push Style Data' - when checked you will get this option on your Push Data option on the style level
- Uncheck 'Ready for export' after single style FTP export - 'Ready for export' will automatically be inactivated for all selected styles after you have pushed the data on a style
Edit/delete custom export
You can always edit your custom export.
Navigate to: Admin > Import/Export
- Choose the header 'Custom Export'
- Click the 'Edit' icon for the specific custom export
- Make your changes
- Finish with click on the 'Save' icon
In the same way, you can delete any of your custom exports.
- Click the 'Delete' icon for the specific custom export
- Click 'OK' to confirm deleting the custom export

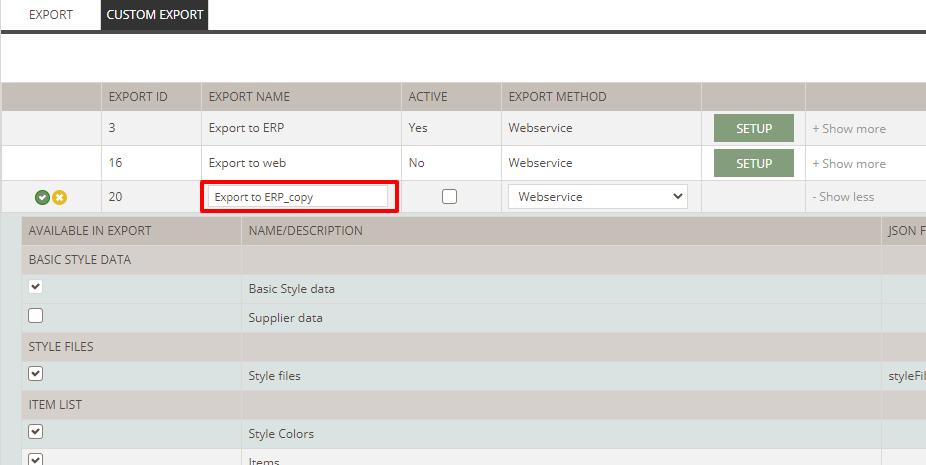
Copy custom exports
If you already have set up a custom export and you need a new one that is very similar, you can use the copy functionality.
Navigate to: Admin > Import/Export
- Choose the header 'Custom Export'
- Click the 'copy' icon for the specific custom export
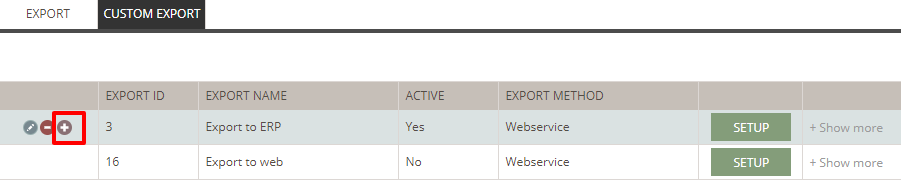
- You will now get a new row with the same name but added '_copy' and this new custom export will have the exact same settings as the one you copied from
- Your copy will by default be inactive - remember to set it to active once you have made the needed changes

Next steps
Push style data for a single style
Update data via import - introduction