Introduction & best practice
To be able to share information and communicate with your suppliers, you need to invite them to Delogue PLM. We recommend starting by creating a supplier company without inviting users right away. Prepare your styles in advance, and once everything is ready, you can begin inviting supplier users. Remember, you can always add supplier accounts and supplier users later in the process.
Table of contents
- Before you start
- Step-by-step guide
- Giving suppliers access to brands
- Resending a supplier user invitation
- Deactivate or delete supplier users
- Deactivate a supplier company
- Show supplier ID in style header
Before you start
1) Make sure the 'Company Admin' role is assigned to you as a user. To learn more about assigning different roles to a user, click here.Step-by-step guide
Add a supplier company
Navigate to: Admin > Supplier
- Click on 'Add supplier'
- Fill in the address and contact information about your new supplier
- The status of any newly created supplier will be set to 'active'
- Add supplier ID - used as a unique identifier, especially useful during data imports and exports, ensuring that information aligns correctly across systems
- Set a checkmark next to 'style supplier' and/or 'item supplier' - depending on whether the supplier company supplies style and/or items
- Select a currency - this is a prerequisite for working with the price module
- Click the green 'save' icon

Supplier currency
You can add the information on which currency you work with the supplier. To be able to select the correct currency, you have to make sure to create the currency in Admin first. Learn more about how to create a currency here. To assign a currency to a supplier, follow the steps below:
Navigate to: Admin > Supplier
- Choose a supplier company
- Set the header information to edit mode by clicking on the 'pen' icon
- Select a currency - depending on which currency you work with the supplier
- Click the green 'save' icon

NOTE: To be able to work with correct supplier prices, make sure you fill in the supplier currency information.
Supplier terms
When creating a supplier company in Delogue, it is optional to also select the agreed delivery terms and payment agreements. To be able to select the correct terms, you have to make sure to create the delivery and payment terms in Admin first. Learn more about how to create terms here. To assign a currency to a supplier, follow the steps below:
Navigate to: Admin > Supplier
- Choose a supplier company
- Set the header information to edit mode by clicking on the 'pen' icon
- Select terms of delivery and/or terms of payment - depending on which terms you have agreed on with the supplier
- Click the green 'save' icon

Add users to a supplier company
After you have added the supplier company in Admin, you can add users to the supplier company. Adding users is necessary for the supplier to be able to access and view styles assigned to them.
Navigate to: Admin > Supplier > Users
- Choose the supplier company from the list of suppliers to the left
- Click the 'Add user' button
- Fill in the name - *mandatory
- Fill in first and last name, and email address
- Set a checkmark under 'access to all brands' - to allow the supplier access to all your brands
- Or take off the checkmark and choose from the drop-down under 'brands' which brand the supplier should have access to

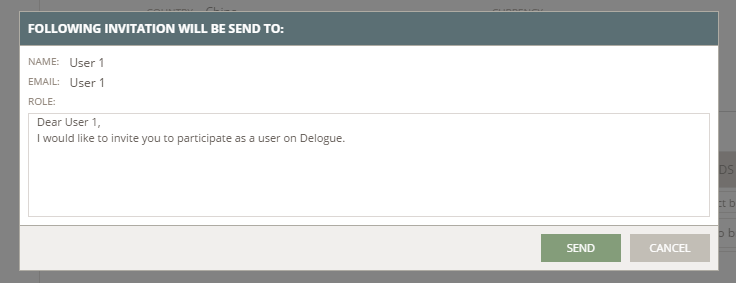
- Click 'Send invitation' - a pop-up window will appear where you can write a personalised invitation message
- Click 'Send' to finish
Add facilities to a supplier company
In case you want to document which sub-suppliers a supplier company is working with, you can store this information under the 'Facilities' subtab. Read more about how to add facilities to a supplier company here.
Giving suppliers access to brands
In case you have set up your style or item, and expect your supplier to be able to see all the new data, but they can't. Make sure you have given the supplier user access to the correct brands. Below you can read how to give access to supplier users to either all brands or selected brands of yours.
Giving supplier users access to all brands
If you work with multiple brands and your supplier requires access to all of them, you can automatically grant access in one step. By doing this, suppliers will also automatically gain access to any new brands you add in the future.
Navigate to: Admin > Supplier > Users
- Choose the supplier company from the list of suppliers
- Add a new user or set an existing user to edit mode
- Ensure the 'Access to all brands' checkbox is selected - you can always remove this access and go back to only giving your supplier user limited access to certain Brands
- Click the green 'save' icon

Giving supplier users access to one or more brands
Navigate to: Admin > Supplier > Users
- Choose the supplier company from the list of suppliers
- Add a new user or set an existing user to edit mode
- Remove the checkmark under column 'Access to all brands'
- Click the 'Select brand' drop-down menu to choose the brand(s)
- Click the green 'save' icon

Resending a supplier user invitation
In case supplier users have trouble receiving the invitation email you sent out you can easily resend an invitation to a supplier user.
Navigate to: Admin > Supplier > Users
- Choose the supplier company from the list of suppliers
- Set the invited user to edit mode by clicking on the 'pen' icon
- Click on 'Resend Invitation'

- Create a personalised invite message
- Click on 'Send' - the supplier user will receive another email with an invitation link

Deactivate or delete supplier users
Deactivate supplier users
If there is a Supplier User you no longer want to have access to your collection, you can deactivate them.
Navigate to: Admin > Supplier > Users
- Choose the supplier company from the list of suppliers
- Set the user to edit mode by clicking on the 'pen' icon
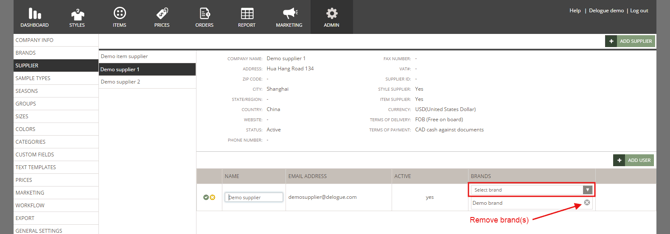
- Remove the checkmark under column 'Access to all brands'
- Click the 'Select brand' drop-down menu
- Click the 'cross' icon to remove the brand assigned to the supplier
- Click the green 'save' icon - the Supplier User will no longer see anything from the removed brand
Delete supplier users
Navigate to: Admin > Supplier > Users
- Choose the supplier company from the list of suppliers
- Hover over the user name you want to delete
- Click the red 'delete' icon
- Click 'OK' to confirm
- After you have deactivated or deleted a supplier user who has been associated as a supplier contact on a style or item, the supplier user will be displayed in the header information as before until you set the header information to 'edit' mode
- You can either choose a new supplier contact, or if not, the supplier contact field will not be filled in with any username anymore
NOTE: If there is only one remaining supplier user, the system will prevent you from deleting them and display an error message. This is because the system does not allow the deletion of the supplier admin.
Instead of deleting the user, you can deactivate them. This has the same effect: the supplier user will no longer have access to Delogue.
Deactivate a supplier company
When you have stopped working with a specific Supplier Company, it can be a good idea to deactivate the entire company. At least so that you and your colleagues don't select this supplier by accident.
Navigate to: Admin > Supplier
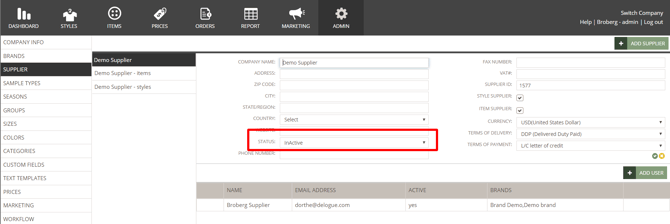
- Choose the supplier company you want to deactivate
- Set the header information to edit mode by clicking on the 'pen' icon
- Select 'InActive' from the status drop-down
- Remember to click the green 'save' icon
![]()
NOTE: The deactivation will not affect styles and items connected to the supplier. For transparency reasons, a Supplier Company can only be deactivated, not deleted.
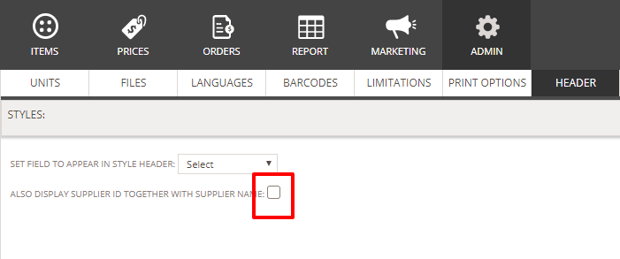
Show supplier ID in style header
You can configure the supplier field in the style header to display both the supplier ID and supplier name together.
Navigate to: Admin > General Settings > Header
- Find the headline 'Styles'
- Set a checkmark next to 'Also display supplier ID together with supplier name'
Example of what the style header will look like after enabling the above described functionality:

Next Steps
Payment and delivery terms setup
