Introduction & best practice
When in need of extra fields to fill in data, simply add more custom fields. They are useful when making integration with any ERP system, and where specific data has to be provided during data transfers. Your company Admin can set up and edit the needed custom fields either on Style or Item level. An overview of your custom fields for both Styles, Items and Compliance Institutes, Certificates and Quality Topics will be available in the Admin section, under the option 'Custom Fields'.
NOTE: If there are no custom fields defined, company users will not see any custom fields on Style, Item or Compliance level.
Table of contents
Before you start
1) Make sure the 'Company Admin' role is assigned to you as a user. To learn more about assigning different roles to a user, click here.
Step-by-step guide
Create custom fields for items
Navigate to: Admin > Custom Fields
- Choose the subtab 'Items'
- Click the 'Add Custom Field' button - a pop-up window will appear
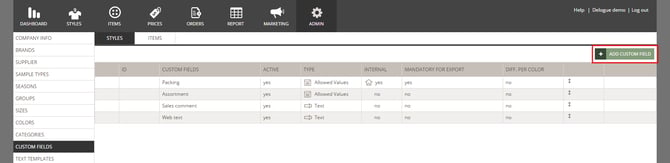
- Choose the custom field type by clicking on it

Date type
Navigate to: Admin > Custom Fields
- Click the 'Add Custom Field' button - a pop-up window will appear
- In the pop-up window, select the field 'Date'

- Define a custom field ID, which can be a combination of letters and numbers - used as a unique identifier, especially useful during data imports and exports, ensuring that information aligns correctly across systems
- Type a name - *mandatory
- Any new custom field will be set to active by default and can be set to inactive after being saved. Inactive custom fields can not be selected on any style
- Internal use only - the custom field won't be visible for suppliers
When internal use is enabled, the 'internal' icon appears in the custom field row
When changing the 'internal use only' setting, a warning message will appear. - Editable by supplier - the custom field will be editable for suppliers
When editable for supplier is enabled, the 'supplier' icon appears in the custom field row
- Mandatory for Export - setting a checkmark here means that the style can not be set to 'Ready for Export' before this custom field has been filled out, read more here
- Click 'OK' to save
Allowed value type
Navigate to: Admin > Custom Fields
- Click the 'Add Custom Field' button - a pop-up window will appear
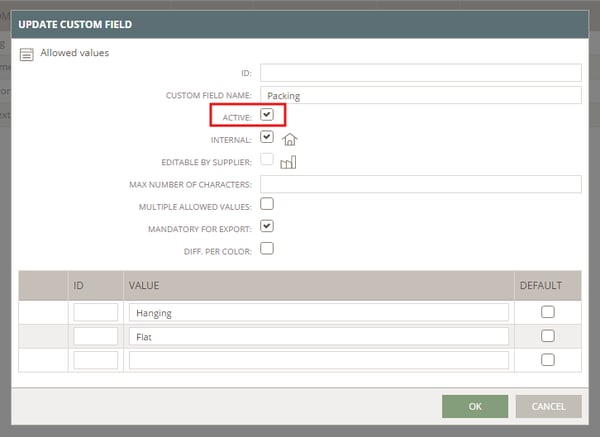
- In the pop-up window, select the field 'Allowed values'

- Define a custom field ID, which can be a combination of letters and numbers - used as a unique identifier, especially useful during data imports and exports, ensuring that information aligns correctly across systems
- Type a name - *mandatory
- Any new custom field will be set to active by default and can be set to inactive after being saved. Inactive custom fields can not be selected on any style
- Internal use only - the custom field won't be visible for suppliers
When internal use is enabled, the 'internal' icon appears in the custom field row
When changing the 'internal use only' setting, a warning message will appear. - Editable by supplier - the custom field will be editable for suppliers
When editable for supplier is enabled, the 'supplier' icon appears in the custom field row - Define a maximum number of characters - this is optional and can help to avoid false data input by limiting the maximum number of characters that can be inserted
- Choose if there can be selected multiple allowed values on the custom field
- Mandatory for Export - setting a checkmark here means that the style can not be set to 'Ready for Export' before this custom field has been filled out, read more here
- Decide if you want the value list to be sorted by value IDs or the values
Start to create your allowed value options
- Type in the value ID
- Type the value - a new line is created when you start typing
- You can make an allowed value the default value (optional)
- You can delete the allowed value by clicking on the 'delete' icon provided for each row
- Click 'OK' to save
Text type
Navigate to: Admin > Custom Fields
- Click the 'Add Custom Field' button - a pop-up window will appear
- In the pop-up window, select the field 'Text'

- Define a custom field ID, which can be a combination of letters and numbers - used as a unique identifier, especially useful during data imports and exports, ensuring that information aligns correctly across systems
- Type a name - *mandatory
- Any new custom field will be set to active by default and can be set to inactive after being saved. Inactive custom fields can not be selected on any style
- Internal use only - the custom field won't be visible for suppliers
When internal use is enabled, the 'internal' icon appears in the custom field row
When changing the 'internal use only' setting, a warning message will appear. - Editable for supplier - the custom field will be editable for suppliers
When editable for supplier is enabled, the 'supplier' icon appears in the custom field row - Define a maximum number of characters - this is optional and can help to avoid false data input by limiting the maximum number of characters that can be inserted
- Choose if it should be a text box or a text field:
- text box is used for longer text and allows multiple rows
- text field is used for shorter text and allows only one line of text
- Mandatory for Export - setting a checkmark here means that the style can not be set to 'Ready for Export' before this custom field has been filled out, and the custom field will be marked with a red dot, read more here
- Click 'OK' to save
Divider Type
With a custom field divider, it is possible for you to set up sections for Custom Fields on Style and Item level. This will help to keep a clean overview of all your custom fields on Style and Item level.
Navigate to: Admin > Custom Fields
- Click the 'Add Custom Field' button - a pop-up window will appear
- In the pop-up window, select the field 'Divider'

- Type a name - *mandatory (there is no ID for this type, since it will not be exported for integrations)
- Any new custom field divider will be set to active by default and can be set to inactive after being saved. Inactive dividers will not be visible on Style level.
- Internal use only - the custom field divider won't be visible for suppliers
When internal use is enabled, the 'internal' icon appears in the custom field row
When changing the 'internal use only' setting, a warning message will appear. - Click 'OK' to save
- Once you have created one or more dividers, you can place your other custom fields into the section they belong to. Drag and drop the custom fields below the divider they belong to, or drag the divider into the correct place. Custom fields that are above all dividers do not belong to any section.
Hierarchy value custom field
By organising custom fields hierarchically, you can more easily maintain data integrity and consistency, ensuring that parent-child relationships are accurately represented. For example, items can be categorised into a hierarchy, such as a zipper (child) belonging to trims (parent), with further attributes like metal teeth and medium length.
In case you would like to build hierarchy value custom fields, please read here.
Deactivate a custom field
You can deactivate custom fields. When deactivated, they will no longer appear on any item.
Navigate to: Admin > Custom Fields
- Choose the subtab 'Items'
- Hover over the custom field row and click the blue 'edit' icon - or double-click on the row
- When in edit mode, a pop-up window will appear where you can uncheck the option 'Active'
- If you, at a later stage, reactivate a custom field, the previous data that was inserted on items will appear again
Editing a custom field (in Admin)
You can edit your custom fields whenever necessary.
Navigate to: Admin > Custom Fields
- Choose the subtab 'Items'
- Hover over the custom field row and click the blue 'edit' icon, or double-click on the row
- When in edit mode, a pop-up window will appear where you can make your changes
- For example, change the name of the custom field, or add more values to an allowed value custom field
- Click 'OK' to save

Integration with your ERP
If you plan to integrate with an ERP provider, ensure that your custom fields follow the same structure as the ERP's fields. This means that the ID and value name must be the same in both systems.
Mandatory for export
When a custom field has been marked as 'Mandatory for Export' it means that the style can not be set to 'Ready for Export' until the custom field has been filled out. On Item level, the custom field will be marked with a red dot.

The 'Ready for Export' feature is used for integrations to ensure that an item is ready to be exported and sent to other systems. This feature will be found on Style level when clicking on the 3 dots:

Next steps
Custom Fields for Styles - Admin Setup
Hierarchy Custom Fields - Admin Setup
Custom Fields for Compliance - Admin Setup