Introduction & best practice
Hierarchy Custom Fields make it easier to manage large datasets by organising information into structured, parent-child levels. This approach streamlines daily work, allowing you to break complex data into manageable subcategories. For example, a blouse might be categorised as Top > Blouse > Long Sleeve > Raglan, while a zipper could be classified as Trims > Zipper > Medium Length > Metal Teeth. The article guides you step-by-step in creating your hierarchy value custom fields.
NOTE: To use this feature, your company must have the professional licence subscription.
Table of contents
- Hierarchy value setup overview
- Create the second-level
- Import hierarchy
- Video guide - hierarchy value custom fields
Hierarchy value setup overview

Create the first mother-level
Navigate to: Admin > Custom Fields
- Choose the subtab 'Styles' or 'Items'
- In the pop-up, you select the option 'Hierarchy Values'
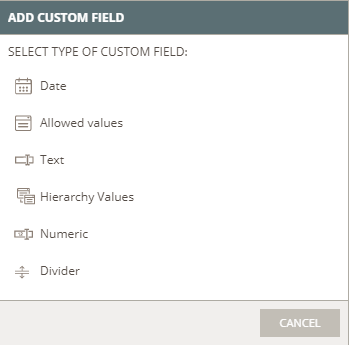
- Start with creating the mother-level - this means that this level cannot have any mother-level, you do not enter anything on the first screen in the pop-up
- Click on 'Next'
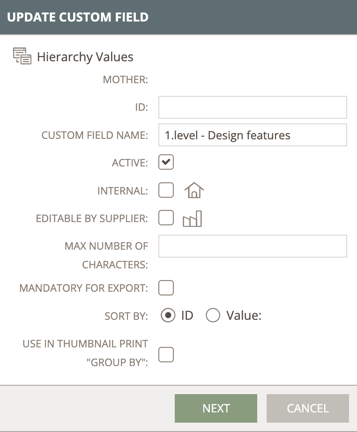
- Define the mother-level name
- Set all other options - these are the same as for any other custom field
- Click on 'Next'
Add mother-level values
- Add the allowed values for your first mother-level - these are the values the user will see in the dropdown on the style or item page
- It is important to note that it is possible to create several top-levels (mother-levels)
If you do that, you will have several independent hierarchies - Click on 'Save'

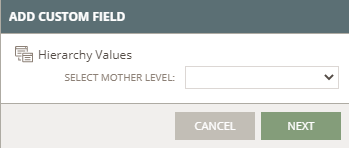
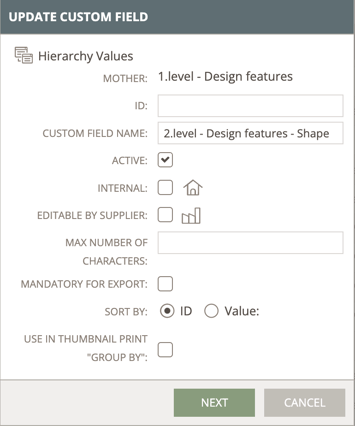
Create the second-level
Navigate to: Admin > Custom Fields
- Choose the subtab 'Styles' or 'Items'
- On the pop-up, you select the option 'Hierarchy Values'
- Select the mother-level you have created before
- Click on 'Next'
- Define the second-level name
- Set all other options - these are the same as for any other custom field
- Click on 'Next'
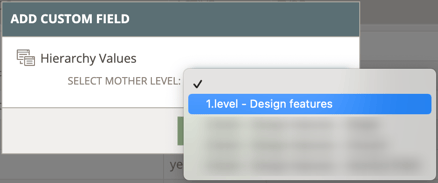
- In the next pop-up, you have to select which of the mother-level values you want to add options for, now you are building the tree structure
- In this example, you can select one of the allowed values, 'Bottom parts' and 'Upper parts', that were created at the mother-level before
- Click on one of the mother-level values

Add second-level values
- Now you add the allowed values for your second-level - these are the values the user will see in the dropdown on the style or item page
- Let's say that you have selected 'Bottom parts' as the mother-level value - now you need to add the allowed values associated with 'Bottom parts'

Here you can click on:
- Previous - will send you back to the previous screen - nothing will be saved
- Close - will close all pop-ups - nothing will be saved
- Save - will save values and send you back to the previous screen
Now you can repeat the process and create as many levels in your hierarchy as you like.
NOTE: When adding values to second-level (child-level) custom fields, you can only choose values that belong to the mother (parent) level linked to that field.
In the tree structure, the selectable mother-level values will be underlined.

Edit the hierarchy (in Admin)
You can edit your hierarchy custom fields. You can edit all the settings, including all values within the custom field.
Navigate to: Admin > Custom Fields
- Choose the subtab 'Styles' or 'Items'
- Hover over the custom field row and click the blue 'edit' icon, or double-click on the row
- When in edit mode, a pop-up window will appear where you can make your changes
- For example, change the name of the custom field, or add more values to an allowed value custom field
- Click 'OK' to save

NOTE: If you delete a value that has sub-levels, these will also be deleted.
To learn more about editing custom fields on Style or Item level, read here.
Delete a hierarchy custom field
If you want to delete a hierarchy custom field, keep in mind that sub-levels will also be deleted. When you delete a hierarchy custom field, it deletes all its allowed values and all sub-levels within. This could potentially cause you to lose a lot of data by deleting a single custom field. This is why any deletion of hierarchy custom fields requires confirming the delete operation twice.
Navigate to: Admin > Custom Fields
- Choose the subtab 'Styles' or 'Items'
- Hover over the custom field row and click the red 'delete' icon
- Click 'OK' twice to confirm
Import hierarchy (API)
It is possible to use an API to send hierarchy allowed values to Delogue. If you use this option, you should not create or change the values in Admin.
Read more in the documentation on how you set up the import of your hierarchy custom fields here.
Video guide - hierarchy custom fields
Description
- Step-by-step guide to creating custom field hierarchy
- Reorder custom fields in Admin
- Edit hierarchy values on Style level