Introduction & Best Practice
Company Info is for you, the place to store relevant company information. Any Company Admin User will be able to edit and view the inserted information.
Table of Contents
- Before You Start
- Step-By-Step Guide
- Unique/Auto Style Number
- Add Company Logo
- Invoice Email
- Integration Email
- Include Company Logo In Email Notifications
Before You Start
1) Make sure the 'Company Admin' role is assigned to you as a user. To learn more about assigning different roles to a user, click here.
Step-By-Step Guide
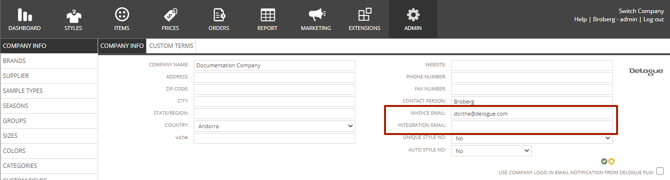
Navigate to: Admin > Company Info
Under the 'Company Info' header, you can type and edit your company information.
- Click on the blue 'pen' icon to edit the information
- Fill in the relevant header information
- Click on the green 'checkmark' icon to save any changes you made

Unique/Auto Style Number
Please note that the 'Unique Style No' and 'Auto Style No' options in the Company Info Header are an outdated version of the Style Number Generator, which is no longer supported by Delogue. In case you would like to set up a style number or name logic, you can read about the Style and Name Generator in Delogue here.
Add Company Logo
You can add a company logo to the company header information. This logo will display in email notifications if you choose to use this function. Read more about it below.
Navigate to: Admin > Company Info
- Hover over the area on the right side next to the company header information
- Click on the grey 'pen' icon that appears
- Choose an image
- Click on 'open'
- The uploaded logo will be displayed on the right side of your company header information

- If you haven’t uploaded your company logo, the Delogue logo will be displayed instead in email notifications
Invoice Email
- The 'Invoice Email' field in the Company Info Header is the place invoices from Delogue PLM will be sent to. It is mandatory to fill in this information.
Integration Email
- The 'Integration Email' field in the Company Info Header is, in case you are using an integration, the place where you can enter an email address to which any emails from your integration will be sent
- If you leave the 'Integration Email' field empty, any integration emails will be sent to your invoice email
Include Company Logo In Email Notifications
When uploading your company logo, you can also use the logo in email notifications.
Navigate to: Admin > Company Info
- checkmark the option 'Use Company Logo in the Email notification from Delogue'
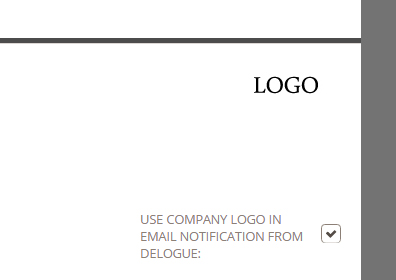
- The logo will appear in the upper right corner in any email notification that a company user or supplier user receives related to your Delogue account

Next Steps
Upload Brand Logos - Brand Setup
Style Number & Name Generator - Admin Setup