
Introduction & Best Practice
Certificate management is part of the broader supplier management workflow in Delogue. In Delogue 2.0, under Suppliers, you will find two sections:
- Direct Suppliers — your suppliers that you are in direct contact with. They are responsible for mapping their own subsuppliers and adding all relevant certificates.
- Subsuppliers — here you can create and manage your nominated suppliers. This is where you, as the brand, are in charge of adding certificates.
Suppliers can upload all relevant certifications to their profile and subsuppliers — both those they want to share proactively and those brands have requested. This includes certification type and 'valid from and to' dates.
To keep your certificate overview accurate and up to date, we recommend:
- Add certificates as soon as they are issued to ensure that the validity dates are always reflected correctly.
- Use the Expiry notification date field to give yourself enough lead time for renewals.
- Inactivate certificates that are no longer valid rather than deleting them, to retain a historical record
Table of contents
- Before you start
- Adding a certificate to a facility
- Certificate statuses
- Editing and managing certificates
- Expiry notifications
- Viewing a direct supplier's certificates
Before you start
1) Certificates can be added at product and facility level. If they are added at the facility level — make sure the relevant facility has already been added to the subsupplier before you begin. Learn more about adding subsuppliers and facilities.
2) Note that both brand and supplier users can add and manage certificates using the same steps.
Adding a certificate to a facility
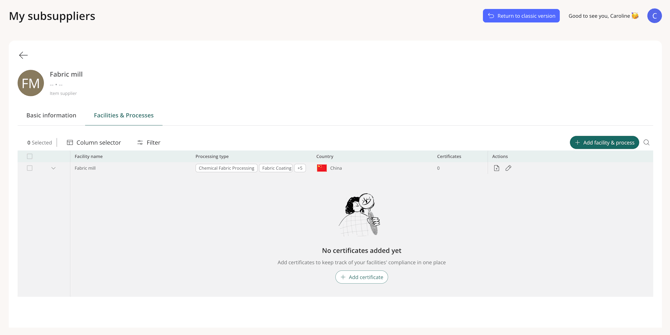
- Go to My subsuppliers in Delogue 2.0.
- Click the name of the subsupplier whose facility you want to add a certificate to.
- Click the Facilities & Processes tab.
- Click the expand arrow (›) next to the facility — this reveals the Certificates section beneath it.
- Click Add certificate.
- Fill in the certificate details:
|
Field |
Description |
Required |
|---|---|---|
| Type | Facility certificate or Product certificate | Yes |
| Certificate name | Filtered by type — select from the list | Yes |
| Certificate number | The certificate's unique reference number | Yes |
| Institute | The issuing body | No |
| Valid from | The date the certificate becomes valid | Yes |
| Valid to | The expiry date | Yes |
| Expiry notification date | When you'll be notified — defaults to 90 days before the 'Valid to' date but can be set individually | No |
7. Upload the certificate and click Save certificate.
The certificate now appears in the table beneath the facility, and the certificate count on the facility row updates.
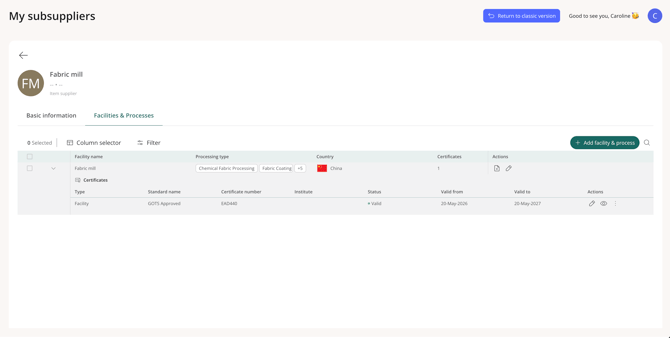
💡 Note: Certificate names and institutes are drawn from Delogue's system-defined lists. If a certificate type you need isn't listed, get in touch with our support team.
Certificate statuses
Each certificate is assigned a status automatically based on its validity dates.
| Status | When it applies |
|---|---|
| Not yet valid | The 'Valid from' date is in the future |
| Valid | Today falls between the 'Valid from' and 'Valid to' dates |
| Expiring soon | Today falls within the expiry notification window (90 days before expiry by default) |
| Expired | The 'Valid to' date has passed |
| Inactive | Manually set by a user — these certificates can no longer be used in supply chain mappings |
Editing and managing certificates
To edit a certificate, click the pencil icon on the certificate row. Update the fields you need and click Save changes.
To inactivate or delete a certificate, click the three-dot menu (⋮) on the certificate row and choose an option:
- Inactivate — marks the certificate as inactive without deleting it. Use this if a certificate is no longer current but you want to keep the record.
- Delete — permanently removes the certificate. This cannot be undone.
Expiry notifications
Delogue sends automatic email notifications to Company Admins when a certificate is approaching or has passed its expiry date.
Expiring soon — an email is sent when the certificate reaches its expiry notification date (90 days before expiry by default). You can adjust this date per certificate when adding or editing it.
Expired — a separate email is sent when a certificate passes its 'Valid to' date.
Both emails include the certificate name, facility name, certificate number, and expiry date, with a direct link to update or replace the certificate.
💡 Tip: You can shorten or extend the notification window on a per-certificate basis using the 'Expiry notification' date field. This is useful for certificates with longer renewal lead times.
Viewing a direct supplier's certificates (brands only)
Brands can view a summary of all certificates held across a direct supplier's facilities from the Direct Suppliers page.
- Go to Suppliers > Direct Suppliers.
- Click the name of the supplier.
- Click the expand icon to open the full supplier view.
- Click the Certificates tab.
This view lists all certificates across all the supplier's facilities, including certificate type, status, validity dates, and the related facility.
💡 Note: This view is read-only for brand users. To add or update certificates, the supplier needs to make changes from their own Supplier Portal account.