Introduction & best practice
The table view is a core component of Delogue 2.0 that gives you a structured, row-by-column overview of your data. It is available across all pages where you have a list of styles, items, certificates etc. It works the same way everywhere — learn it once, and you'll be comfortable everywhere.
Use the column selector to show exactly the fields that matter to your role, filters to narrow down to a specific season or supplier, and sorting to order your list the way you need it. The table view is designed to replace manual scanning and give your team a fast, focused overview of any part of your collection.
INFO: The table view is part of Delogue 2.0. To access it, click 'Try Delogue 2.0' in the right-hand corner of your Delogue platform. You can switch back to the classic version at any time — all your data stays synced.
Table of contents
Video Guide
The table view
-
Navigate to any tab the Delogue 2.0 navigation at the left-hand sidebar. For example "Styles", "items", "Suppliers", "Mapping Requests", etc.
-
You now have a list of rows. Each row in the table represents one record: a style, an item, a supplier, a mapping request or a task. Each column shows a specific data field for that record.
-
In this example you see a list of "items"

Search
-
Use the search field in the upper right corner of the table to quickly find a specific record.

Show / hide columns
The "Column selector" is your tool to organize your personal view with the data points that are relevant for you to get the full overview
- Click 'Column selector' in the top left of the table

- Use the search field inside the panel to find a specific column quickly
- Toggle each field on or off to show or hide it in the table
- Columns are grouped into General and Custom Fields sections
NOTE: The Name column cannot be removed from the table.
Reorder columns
- In the 'Column selector', hover over a column name.
- Grab the icon that appears left of the column name and drag it to a new position.
- To adjust the width of your columns simply hover over the Column name and pull the column to the correct size

- Your organization of the colums will stay unchanged, also if you click to another main tab and come back.
NOTE: General fields and Custom Fields cannot be mixed — they must stay within their own groups.
Pin columns
Pinning a column keeps it fixed on the left side of the table while you scroll horizontally.
- Click the three-dot menu on the column header you want to pin
- Select 'Pin'
- The column moves to the far left and stays visible while scrolling
Sort of rows
- Click the arrows on a column header to sort the table by that column
- Click once for ascending order, click again for descending
NOTE: Columns that hold multiple values — such as Categories or multi-select custom fields — cannot be sorted.
Filters
Use filters to narrow the table to exactly the records you need. Items and Styles can be filtered by any available field, and multiple filters can be combined.
Set up filters
- Click the 'Filter' button at the top of the table

- In the 'Filter on' drop-down, select the field you want to filter by
- Select or type the value you want to include
- To add another filter, click '+ Add a filter' in the bottom right of the panel and repeat the steps
- Click 'Filter' again to close the panel
The Filter button will appear highlighted when one or more filters are active — so you always know when you're looking at a filtered view.
NOTE: The Supplier contact cannot be used as a filter. Inactive data cannot be filtered.
Clear filters
- Click the 'Filter' button to open the filter panel
- Click 'Clear all filters' in the bottom of the box
All filters are removed and the full list is restored.
Save filters
After you have set up the filters and organized the columns you can save the view/filter.
- In the right hand side of the table view you see "Showall styles". This your new "Main" overview and shows all styles.

- If you want to save your current filter click on "Save as a new view"
- "View xx" will then appear in the list.
- Hoover over it to rename or delete the view

- You can now change from one view to another by choosing from the list.
Edit data from your view
Users can edit/update single rows of Styles and Items directly from the table view - no need to open individual records. Clicking any editable field activates it instantly, making it easy to do style specific data entry.
It is only possible to edit active style - inactive style can be shown in the view but not edited.
INFO: If you want to edit Style or Items in bulk, this is also possible with the Bulk selection edit. Read more here
How it works in practice
- Click on the field to activate edit mode
- Automatic save when you click outside the field or press Enter. Use ESC to cancel your changes.
- Built-in validation checks for required fields left empty, character limits, incorrect date formats, invalid numeric value or duplicate records.
- Hierarchy field edit will handle the Mother-Child relation with confirmation message to the user if a Mother-level field is changed which will impact the Child-level existing value.
- Automatic audit log of all changes.
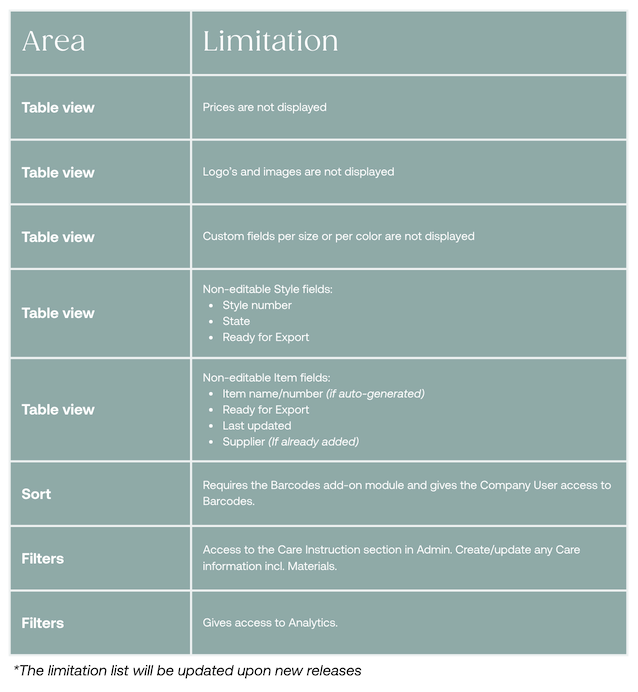
Known limitations
NOTE: be aware that the Table view is constantly being updated. So keep out an eye for updates. The limitations below will be fixed in this process