Introduction & best practice
In Delogue, your Personal Settings allow you to customise your account to suit your preferences and working style. From here, you can change your style/item list view, adjust notification preferences, manage out-of-office auto replies, and configure your privacy settings.
Your Personal Settings can be found under your user name in the top right corner of the Delogue platform.

Table of contents
Personal settings
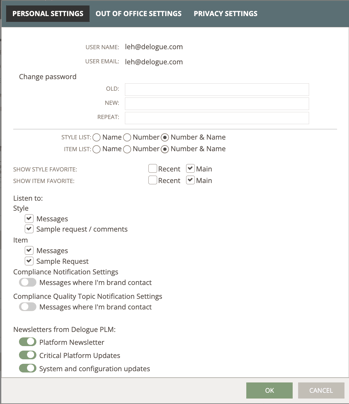
There are different options you can choose from when setting up your personal settings.
Navigate to: top right corner of the Delogue platform- Click on your user name in the top right corner of the screen

- The following pop-up will appear:
Change password
If you need to change your password, please follow these steps:
Navigate to: top right corner of the Delogue platform
- Click on your user name
- Type in both your old and new passwords in the correct fields
- Click 'OK' to save
NOTE: Your password must have min. 6 and max. 256 characters

Email address
The email address displayed under Personal Settings cannot be changed, as it is directly linked to your Delogue login. If you wish to use a different email address, you will need to create a new user account.
To create a new user, please read more here.
Style List view
You can choose how you want to see your Style List. Here are the different options:
- By Name: you will only see the style name listed
- By Number: you will only see the style numbers listed
- By Number & Name: you will see both style number and style names, separated with a "|"
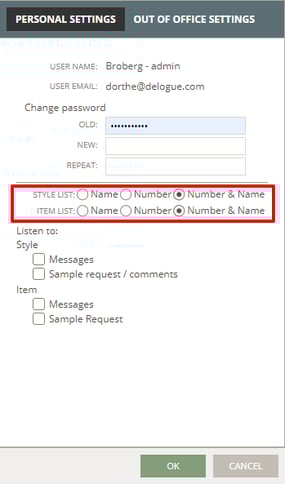
Item List view
The same goes for the Item List settings:
- By Name: you will only see the item name listed
- By Number: you will only see the item numbers listed
- By Number & name: you will see both item number and item names, separated with a "|"
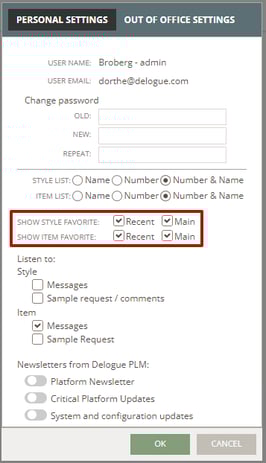
Default Favorites
Under 'Show Style Favorite' and 'Show Item Favorite' you can decide if you want to see the 'Recent' and the 'Main' filter in your style and item view.
NOTE: If you deselect both filters, you can end up with no styles or items being shown.

Listen to options
If you want to follow activities on all styles or items, even if they are not assigned to you as the brand contact, you can use the 'Listen To' feature in Delogue. When the 'Listen To' feature is activated, a message icon will appear (without a dot) on any style or item whenever one of the activities listed below occurs. You can choose to be notified about the following activities:
Styles:
- Messages
- Sample request/comments
Items:
- Messages
- Sample requests
Compliance:
- Messages for Certificates, Test Reports and Quality Topics, which are assigned to you as brand contact


If you want to follow only specific styles or items in addition to those already assigned to you as a brand contact, you can click the 'heart' icon to follow that specific style or item.
Learn more about the Follow function in Delogue here.
Subscribe to Delogue PLM newsletter and system updates
In your Personal Settings, you have full control over the type of information you receive from Delogue PLM.
You can subscribe to three types of information:
- Newsletter from Delogue PLM
- Critical Platform Updates
- System and Configuration Updates
Simply select the options that are important to you. You can update your subscription preferences at any time. Remember to click on the 'OK' to save your settings.

Out-of-office settings
In Delogue you can create your own 'out-of-office' message in Delogue.
Navigate to: top right corner of the Delogue platform
- Click on your user name
- Choose the Out-of-office settings header
- Write your personal 'out-of-office' message
- Set a start and end date for displaying it when you are out of the office

When you have set up your out-of-office period - with a start and end date - you can also choose to turn off notifications shown in Delogue while you are away. After the out-of-office period, you will still receive your emails, to make sure you can follow up on things when you get back.
- Once the end date has been reached, the notification icons will once again start appearing on all new notifications you get in Delogue PLM.

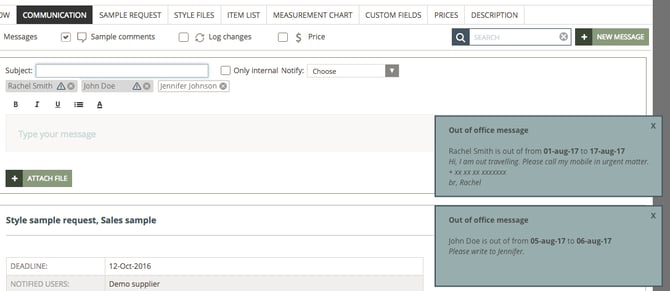
When an out-of-office message is activated, anyone who attempts to notify you will see a blue notification window on the right side of the screen. This pop-up displays the start and end dates of the out-of-office period, as well as the out-of-office message set by the user.
The notification window can be closed by clicking the 'cross' icon.
Additionally, while the user is out of office, a warning icon will appear next to their name whenever they are selected to be notified.
Privacy settings
The Privacy Settings in Delogue display a list of the permissions you have agreed to as part of your contractual use of the platform. If you disable any of these services, you will be locked out of the system. Next time you log in, you will have to agree to the terms of service again before gaining access to the platform.