Introduction & best practice
Here, you set up third-party institutes and laboratories responsible for testing your products and trims, or auditing your suppliers to issue scope certificates. Sometimes they are also referred to as test labs or certification bodies. Institutes are external partners and their users do not have access to Delogue. To ensure proper tracking and compliance, you must set up all relevant institutes in the Admin section as part of your institute library. These institutes are the ones that issue your compliance certificates.
Table of contents
Before you start
1) Make sure the 'Compliance Admin' and 'Compliance User' roles are assigned to you as a user. To learn more about assigning different roles to a user, click here.
Step-by-step guide
Add institute
Navigate to: Admin > Compliance
- Choose the header 'Institutes'
-
Click on the 'Add Institute' button to add as many institutes as needed

The entire header area will be editable now:

- Add institute name - text field to name your institute
- Add abbreviation - *mandatory, the abbreviation needs to be unique in order to save the institute's header information
- Add NB no - text field to add the NB number for the institute
- Choose status - any institute can either be 'Active' or 'Inactive'. By default any new institute is set to 'Active'. You can change the status at any time. After inactivating institutes they can not be used on your certificates
- Add the institute's address, city, zip code and select the correct country
Add institute contacts
Institute contacts serve as your personal address book within the system. While the contacts you add in Delogue do not gain access to the platform, this feature allows you to keep track of contact information associated with each institute.
Navigate to: Admin > Compliance
- Choose the header 'Institutes'
- Choose the subtab 'Contacts'
-
Click on the 'Add Contact' button to add as many institute contacts as needed

- Name the contact - *mandatory
- Add an email address
- Use the toggle to set the contact to 'Active' or 'Inactive'
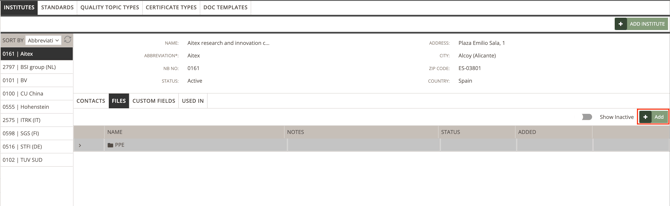
Add institute files
Here you can save all files that are related to your institute, e.g. contracts or other relevant documentation connected to the institute.
Navigate to: Admin > Compliance
- Choose the header 'Institutes'
- Choose the subtab 'Files'
-
Click on the 'Add' button to upload a new file
- Drag and drop or click to browse your computer for placing your file in the pop-up window
- Click 'Ok' to upload the file
- Files can be deleted - hover your cursor over the file and click the red 'Delete' icon on the far right
-
Files can be reordered - hover your cursor over a file, then click and hold the drag handle to the far left to move it up or down in the list

Create custom fields for institutes
With custom fields, you can enrich your institute data with additional information depending on your individual needs, such as creditor number or regulatory area the institute operates under. Read more about the setup here.
Use institutes used in
Here you will see a list of certificates associated with the institute, providing an overview of their validity dates, expiry dates and the certificate states.