Introduction & best practice
If you need to overview all items used in a specific season, or have an overview of all your fabrics including item prices and composition, then the Item Custom Report is the tool for you.
With this report, you will be able to make multiple favorite reports showing only the data that is relevant for your overview. You can even share your overview with a colleague or export the data to Excel - including even more details about the items.
In this article you will learn everything about setting up your reports and overviews.
Table of content
Create a report
If it is your first time creating an Item Custom Report, simply start by clicking on the big '+' or click on the 'star' icon to create a report.
Pre-filter
In the pre-filter you you set up the needed limitations of data, such as selection of brand, supplier, category etc.
INFO: Note that 'if nothing is selected, everything will show'. This just mean that if you do not set any limitations, then by default all active items will display in your report.
1. Start by given your report favorite a name.
2. Make a selection of any mandatory fields (*).
e.g. Brands*

3. Decide how many decimals you need to see for Item prices - the default value is 2 decimals.
4. Finalize your pre-filter by selecting specific data points from the 'Item data', 'Style data' and 'Custom fields' of your items.

NOTE: In the filter option for 'Used in Style' if you select 'not used in Style' and also have filters on other Style data you will not get any data in your Item Custom Report
5. Once you have set the pre-filter you need. Click on 'Save' and your Item Custom Report will be created.
Default columns in your Item Custom Report
Once your report has been generated based on the pre-filter, it will shown with following default columns:
- Item Logo
- Item brand
- Item Supplier
- Item Name
- Item Number
- Item Description
Change the columns in your Item Custom Report
You can change which columns you want to display in your report by using the Column selector - where you can select between all Item Data fields including colors and sizes.
You can also select any Item Custom Field you need.
And any Item Price you need in your report - you will need to have the Price role in order to see these.
INFO: Suppliers can not see data that they do not have access to on item level.
1. Click on the 'columns' selector in the right hand side.
2. Select or deselect any column
3. Click on 'Refresh' to update your report.

Reorder Columns
You can always change the order of the columns in your report by dragging and dropping a column to a new position.

You can also use the 'Pin' feature.
1. Click on the 3 lines showing at the column header.
2. Click once more on the 3 lines.
3. Now you can pin (or unpin) any given column.
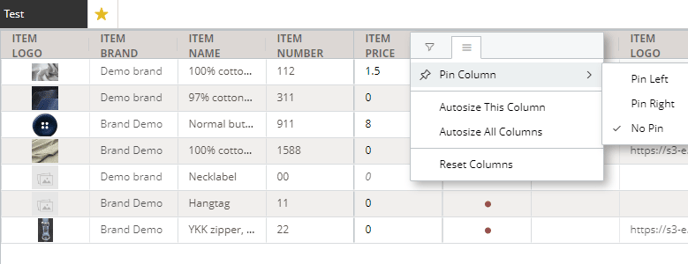
NOTE: Be careful if you pin anything "Pin right" your data might end up out of sight if you have many columns.
Resize column width
If you need the columns to be wider or narrower you can drag the divider between columns to the desired width.
Your cursor changes into a sideways arrow when you can drag the width.

Filter on columns in your Item Custom Report
When you have the right columns in your Item Custom Report you might want to filter or sort these columns.
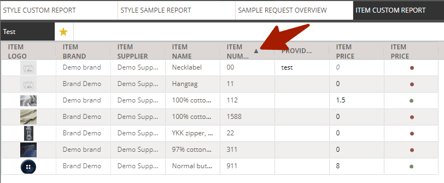
Sort your data
- Click on the name of the column and it will sort in ascending order.
- If you click again it will sort in descending order.
- If you click once more it will not sort.
You can always see the sorting order by the small icon next to the Column name.
Filter your data
You can filter on all columns except the Item Logo column.
There are different types of filters depending on what kind of value is in your column.
If you are already familiar with the filters in the Style Custom Report, these will work the same way.
- Drop-down filter

- Numeric filter

- Date filter

If you want to reset your filter, simply click on the 'Clear filter' that show in the yellow when a filter is added.

Update an existing Item Custom Report
Change the pre-filter
If you want to make changes to the pre-filter in an existing Item Custom Report, you can do so by clicking on the little edit icon.

Then you will get the pre-filter pop-up open again and you can change the basis for your report.
Just remember to save the new report and you are ready to work with that one too.
Copy your Report
Maybe you have made the perfect Item Custom Report and you just need a minor change to have the other Item Custom Report you need.
Then the simplest way is to make a copy of your Report.
Just click on the Copy icon.

You will get the pre-filter pop-up displayed and you can give the copy a new name and change the basis for this new report.
Delete your Report
You can always delete an Item Custom Report.
Just click on the Delete icon.

You will be asked to confirm that you want to delete your report.
Next Steps
