Table of contents
Quick search settings
With the quick search settings, you can set how you want the system to search for styles and items through the quick search.
Navigate to: Admin > General Settings > Search & Filter
- Find the headline 'Quick Search'

- By default, the option 'The filtered list of styles and items' is enabled
- The filtered list of styles and items - the system will search all published, unpublished or work-in-progress styles or active items from the style favourite filter or item favourite filter you are on
Example: The style favourite filter 'AW' is chosen. When typing in the 'quick search', the system will search the list of styles that is filtered by the AW filter

- You can change this setting to 'All styles or items'
- All styles or items - The system will search all published, unpublished or work-in-progress styles or active items in the system. Meaning it will search across favourite filters.
Style filter settings
It is possible to add a barcode search field to the style filter. This functionality is only accessible for companies using barcodes.
Navigate to: Admin > General Settings > Search & Filter
- Find the headline 'Style Filter'
- Set a checkmark next to 'Enable barcode search in style filter'
- The system will provide an extra search field for searching your styles by entering barcodes
- When the first option is enabled, set a checkmark next to 'Set focus in barcode search box'
- The cursor focus will automatically be in the barcode search field
Example:

Learn more about how to use style and item favourite filters here.
Filtering in Admin
The filter functionality in the different Admin sections allows you to refine data by applying specific conditions. Like this you can filter lists you created of e.g. brands, colors, price calculations or categories.
Below, you find the general principles of the filtering functionality described.
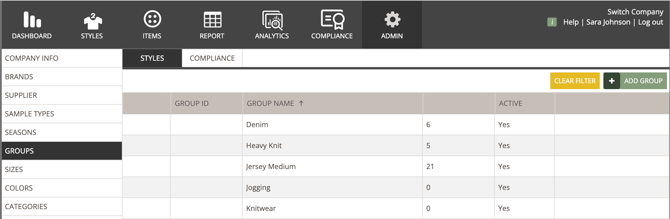
Navigate to: Admin > list created in Admin (e.g., this could be a list of brands, sample types, groups or colors)

Conditional filter
When the column you want to filter on contains any text or numbers:
- Hover over the column name
- Click on the 'Three Horizontal Lines' icon
- You now have these options:

- Contains / Not Contains – Display entries that include or exclude certain keywords.
Example: Find color names containing 'blue' -
Equals / Not Equal – Show or exclude data that matches an exact value.
Example: Filter group names where 'Denim' equals a group name -
Starts With / Ends With – Filter values starting or ending on a specific value
Example: View category names ending on 's' -
Blank / Not Blank – Identify missing or filled data fields
Example: Find groups without an ID assigned - Choose an option and fill in the value you want to filter on
- Click on 'And' or 'Or' to set any additional condition
- Click 'Apply'

- The 'Funnel' icon by the column name will indicate that the column has a filter added
- Click 'Reset' to clear the filter
Simple filter
When the data in a column you want to filter on comes from a predefined value you can filter with the Simple Filter which shows you all predefined options for the specific column.
- Hover over the column name
- Click on the 'Three Horizontal Lines' icon
- A list of all data points in the column is displayed
- Deselect 'Select all' to clear the filter
- Choose the value you want to filter on - type in the search field to find the right option
- Click 'apply'

- The 'Funnel' icon by the column name will indicate that the column has a filter added
- Click 'Reset' to clear the filter
Rearrange columns
To change the order of columns, follow these steps:
- Click on the column header you want to move
- Drag and drop the column in the desired position

Pin and resize columns
Pin a column to keep important information visible while you scroll through your list. When you pin a column to the left or right, it stays fixed in place, so you won't lose track of key details as you move across the view.
- Click on the column header you want pin
- Click on the 'Three Horizontal Lines' icon
- Click on the 'Three Horizontal Lines' icon again - placed next to the 'Funnel' icon
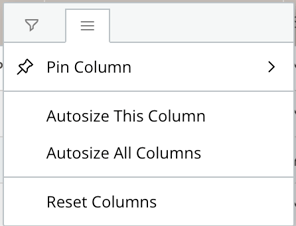
Resize an individual column to see the full column header and column content or make more space for other columns in your list:
- Hover over the column header to make it wider or slimmer
- Auto-size one or all culums to the with of the title by choosing 'Autosize This Column' or 'Autosize All Columns'
- Click 'Reset' to clear the filter
Clear filter
To view all the data in your list, make sure to clear any applied filters. When a filter is active, a yellow 'Clear Filter' button will appear in the top right corner above your list.
- Click on the yellow 'Clear Filter' to return to the original list view
Next steps
Intro to using filters and favourites
Using the filter button on styles and items