Delogue PLM Adobe Illustrator Plugin
This article will teach you how to install the Delogue Illustrator plugin and how to link styles using the plugin.
- Video Guide:
- Install plugin
- User Manual
- FAQ
- 1. 1001 error message on Creative Cloud. Couldn’t install the plugin.
- 2. The name of an Artboard must not contain "."
- 3. Filename of AI files should not contain special characters
- 4. Filename of AI files should not contain more than one "."
- 5. Illustrator Plugin generates tmp. folder and files on your computer
- 6. Insert a photo into an .AI-file, 2 options
- 7. An alternative to "Save As"
Video Guide:
NOTE:
Make sure to watch the Webinar about the Illustrator plugin, click here
To download our recommended AI template file, click here
Install plugin
In Adobe Creative Cloud you will find the plugin “Delogue PLM Design Studio”.
Click install
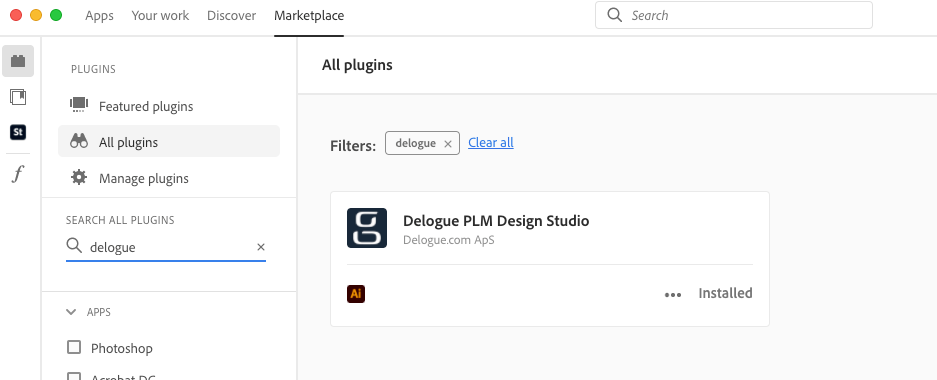
The plugin will appear in Illustrator under Window -> Extensions -> Delogue PLM
User Manual
Here are the details of the functions and features provided by Delogue PLM’s Adobe Illustrator plugin. (Or download the manual)
Login to Delogue PLM account
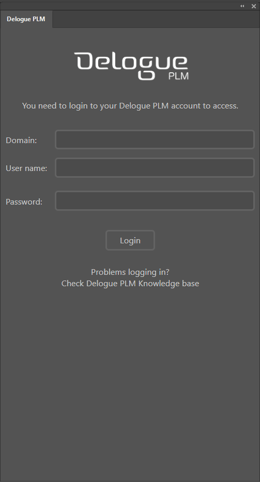
Users can log in to their Delogue PLM from the Illustrator plugin by providing a domain (example: my.delogue.com), username, and password.
If the user account is connected to more than one company, a list of companies will be displayed to the user to choose from.
Choose or create a new style
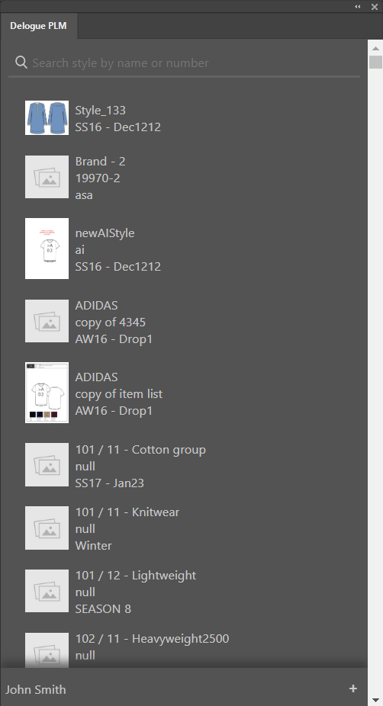
Users can select a style from the Delogue platform to upload the image file. A search option is also available.
Create a new style
Creating a new style from the plugin is also possible. Move the mouse over + on the right bottom side and click on +Add Style.

Then the user can select a brand, season, and supplier and give the style name, and number for creating the new style in Delogue PLM. 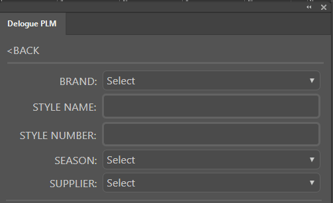
File upload to Delogue PLM
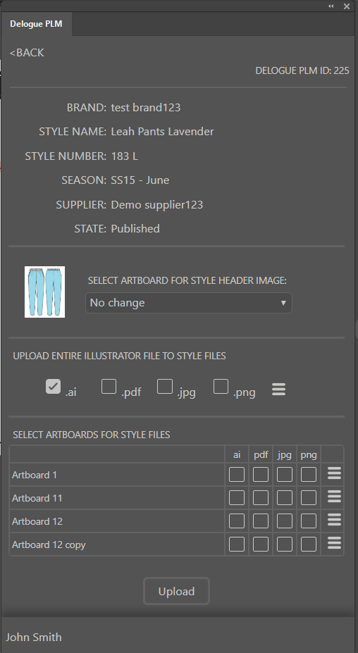
Once selecting a style or creating a style is selected, the user will move to the file upload screen. Here user can do the following features:
-
SELECT ARTBOARD FOR STYLE HEADER IMAGE: Any artboard (of a .ai file) can be chosen to become the logo of the style header.
-
UPLOAD ENTIRE ILLUSTRATOR FILE TO STYLE FILES: The whole file can be uploaded to the styles in different file formats: ai, pdf, jpg and png.
-
SELECT ARTBOARDS FOR STYLE FILES: Individual artboards can be selected to upload to styles, in different file formats too.
-
COLORWAY MENU ☰ : Associated colorway can be selected with the file uploading from ☰ menu.
-
Once the user clicks the Upload button, the files will be generated and uploaded to Delogue PLM as per user selections. Each uploaded file will be connected with the style internally for later easy access.
Style file linking
While uploading each file to styles in Delogue PLM, each file will be linked with the corresponding style.
That means if you download and open any of those files, instead of the style list, the linked style will be displayed.
It will help the user to keep track of which style is connected. Also if the user selects the linked style and uploads the file again, that file will be updated in the Delogue PLM without creating any copy in the platform.
The selected artboards and colorways will also be remembered in linked .ai files.
The User can remove the linking by clicking on ‘Delink style’ button.

Even though the file is linked, the user can search for other styles and upload to those. Then the linking of the file will be updated to that style.
The users can have multiple styles linked to a file.
Export of Illustrator files
The Admin 'Illustrator Plugin - Placement of exported files' setting in Delogue allows you to configure where exported files from the Illustrator plugin are saved. Specifically, this setting enables you to save exported files in a folder next to the Illustrator file on your own local drive. Read more about this Admin setting, here.
Logging out
The user can log out from Delogue PLM’s account inside the Illustrator plugin.
Until then the user is kept logged in.

FAQ
1. 1001 error message on Creative Cloud. Couldn’t install the plugin.
This might be due to multiple logins into the Adobe account. Make sure that both Adobe exchange and Creative Cloud have the same user accounts. Try to log in to the Creative Cloud app and https://exchange.adobe.com/ in browser with the same Adobe account (check the email address of both).
2. The name of an Artboard must not contain "." and must have unique names
- If your Artboard has a dot in its name, it is impossible to upload it into Delogue PLM, and we can't guarantee that you can make a preview.
We strongly advise you not to write your Artboard's name with a dot. - Artboards must have unique names. Do not rename artboards after linking the AI file to Delogue
3. The filename or path of AI files should not contain special characters
Your AI filename should not contain special characters like:
“-”, “#”, “_”, “[]”, “()” etc.
So only letters, numbers, and NO spaces in the file name.
Example of a file name: MyNewPants0023456AW26
Furthermore it's important that the folders leading to the Illustrator file doesn't use any special characters either.
4. The filename of AI files should not contain more than one "."
Your AI file name should not contain more than one "."
You should not name your file like my.new.file.ai
That will not work. instead it should be: mynewfile.ai
5. Illustrator Plugin generates tmp. folder and files on your computer
When you are working with Illustrator Plugin to Delogue PLM, your computer will automatically generate a .TMP Folder called "Delogue .TMP". The folder will contain several .tmp files for each style, you are working on in Illustrator.
Once you have uploaded the style, the .tmp files will be deleted again.
6. Insert a photo into an .AI-file, 2 options
An integrated photo in an AI file makes the file size of the AI file much larger. Here is two ways of working differently:
- As embedded in the file
- As placed file
If you add your photos to the AI file as a placed/linked file (see screen dump below) you can minimize your file considerably, size can e.g. go from 150 MB to 10 MB.
This means that:
- you consume much less space on your drive
- your files will be easier to work with as the file size is smaller
- faster to open
- easier to upload to Delogue
- easier for your suppliers to download style specs
But you can not change the path of the photo (you must not move the photo to the designated folder), otherwise the link will disappear.
So make sure you have organized a folder structure before linking files together.
Here is the menu + shortcut to file location:
Your photo file will look like this when you click on it, with a cross over the image, you can see at the top left that it is a linked file:
7. Reusing Linked AI Files:
If you want to reuse an already linked AI file for a new AI file do NOT use the "save as" function as it will link your file to the wrong style.
Instead, follow these steps:
- In the "old file," choose the artboard selection tool (PC/MAC: shift+o)
- Select all artboards (PC: ctrl+a / MAC: cmd+a)
- Copy the selected artboards (PC: ctrl+c / MAC: cmd+c)
- Create a new file with one artboard (PC: ctrl+n / MAC: cmd+n)
- Paste the copied artboards into the new file (PC: ctrl+v / MAC: cmd+v)
- Delete the “extra “ artboard
- Save the file under the new style name
- When doing the above - remember this setting in Layers - “Paste remembers layers”, see screen dump below
Or watch this video guide:
8. Copying Delogue Style with Linked AI Files
- If you copy a Delogue style that has linked AI files, be aware that the link will be broken despite it might look like it is linked.
- To maintain the link, you must relink the AI file to the copied Delogue style
9. Linking to Several Delogue Styles?
Yes, you can link one AI file to multiple Delogue styles
10. Linking Several AI Files to One Delogue Style?
Yes, you can also link multiple AI files to a single Delogue style
11. Save exported files in a folder next to the AI file on your own drive
- It is possible to save exported files on your hard drive. Check the setting in ADMIN > Files
- If you make updates to your AI file, the already exported files will automatically be updated
- Consider if is needed, since you will consume extra storage space.
